Plantronics Encore User Guide - Page 7
Adjusting the Headband and Receivers, Standard Models, Noise Cancelling Models, Adjusting the Tone - headset
 |
View all Plantronics Encore manuals
Add to My Manuals
Save this manual to your list of manuals |
Page 7 highlights
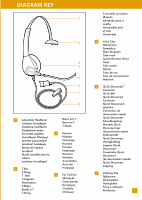
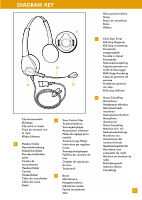
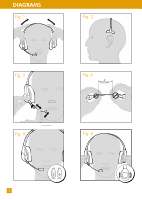
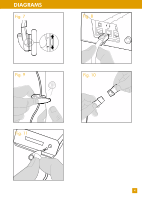
GB DIAGRAM KEY Fig. 1 Fig. 2 Fig. 3 Fig. 4 Fig. 5 Fig. 6 Fig. 7 Adjusting the Headband and Receivers To adjust the headband, lengthen or shorten the band until it fits comfortably. The click-stop feature keeps the headband securely adjusted. Position the headset receivers so that the foam cushions sit comfortably over the centre of your ears. On models with only one receiver, position the stabiliser T-bar above your ear. Standard Models Hold the receiver securely against your ear with one hand. With the other hand, adjust the click-stop mounting and the voice tube so that the tip sits two finger-widths from the corner of your mouth. (To prevent breath noise, avoid putting the voice tube in front of your mouth). Noise Cancelling Models Carefully shape boom with both hands as shown. Do not bend or twist the boom within 50mm of the microphone. Position the click-stop mounting and boom so that the microphone is two finger-widths from the corner of your mouth. Make sure that the front of the microphone faces your mouth. If necessary, carefully rotate the microphone into the proper position. However, you should try to avoid repeated twisting of the boom. Adjusting the Tone Control Adjust the tone by moving the tabs on the receiver as shown. To equalise the sound in both ears, move the tabs to the same setting on each receiver. To emphasise lower, or bass tones, move the receiver tabs to the position marked "o". To emphasise higher, or treble tones, move the receiver tabs to the position marked "•". 5
-
 1
1 -
 2
2 -
 3
3 -
 4
4 -
 5
5 -
 6
6 -
 7
7 -
 8
8 -
 9
9 -
 10
10 -
 11
11 -
 12
12 -
13
-
14
-
15
-
16
-
17
-
18
-
19
-
20
-
21
-
22
-
23
-
24
-
25
-
26
-
27
-
28
-
29
-
30
-
31
-
32
-
33
-
34
-
35
-
36
-
37
-
38
-
39
-
40
 |
 |
