Polaroid IP300W IP300 Polaroid Wireless Surveillence Camera Manual - Page 6
Software Operation - camera software
 |
View all Polaroid IP300W manuals
Add to My Manuals
Save this manual to your list of manuals |
Page 6 highlights
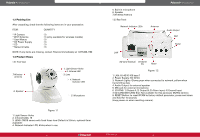
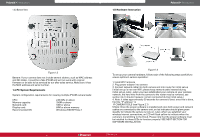
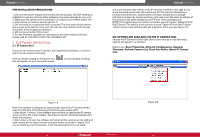
Polaroid • Software PRE-INSTALLATION PRECAUTIONS: 1. Use only the power adaptor that comes with the product. DO NOT attempt to substitute it with any other as other adaptors may cause damage to your unit. 2. Make sure the camera unit is mounted in an indoor environment where rain or other forms of moisture cannot get into it. 3. DO not touch or re-adjust the lens in any way. The focal point of the camera was pre-set at the factory. If you turn the lens you may interfere with the way the quality of the images are received. 4. DO not force the Pan/TIlt by hand 5. For any firmware upgrades or connection to any other external devices, please read all instructions within the installation CD. 2. SOFTWARE OPERATION 2.1 IP Camera Tool Once you've mounted your IP camera, and installed the software, it is time to see if you can access it remotely. Start by double clicking on IP Camera Icon box will appear on your computer screen on your desktop. A dialog Polaroid • Software 3.You will discover that several of the IP cameras installed on the LAN do not share the same subnet with the monitoring PC. This will be indicated by a prompt that will tell you: Subnet does not match, double click to change. Left click to choose the prompt and then right click to set the static IP address of the camera to the same subnet as your PC over LAN. (see figure 2.3) NOTE: If the subnet does not match, remember you can choose "Obtain IP from DHCP Server". The default of the camera is set to "Obtain IP from DHCP Server "which means it will automatically get a dynamic IP for you (see figure 2.2) SIX OPTIONS ARE AVAILABLE VIA THE IP CAMERA TOOL Choose the IP Camera list and right click on your mouse for the following options will appear in a window. Options are: Basic Properties, Network Configuration, Upgrade Firmware, Refresh Camera List, Flush Arp Buffer, About IP Camera tool. Figure 1.9 Note: The software is designed to automatically search for IP Camera servers over the LAN. One of the following 3 scenarios will present itself: 1. After about 1 minute, if the software does not find an appropriate IP camera server on the LAN, it will indicate "No IP server found" and automatically shut down the program. 2. After about a minute, the software will detect all the cameras on the LAN and each camera will be listed on your computer screen as shown in figure 1.9. If you're installing your first camera, it will naturally be the only one listed. 10 IP300 Manual Figure 2.0 11
-
 1
1 -
 2
2 -
 3
3 -
 4
4 -
 5
5 -
 6
6 -
 7
7 -
 8
8 -
 9
9 -
 10
10 -
 11
11 -
 12
12 -
13
-
14
-
15
-
16
-
17
-
18
-
19
-
20
-
21
-
22
-
23
-
24
-
25
-
26
-
27
-
28
-
29
-
30
-
31
-
32
 |
 |
