ProForm 400 C Treadmill Uk Manual - Page 11
View from Above
 |
View all ProForm 400 C Treadmill manuals
Add to My Manuals
Save this manual to your list of manuals |
Page 11 highlights
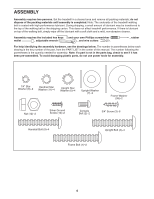
10. Attach the ground wire on the Console Base (67) to the right Handrail (40) with a Silver Ground 10 Screw (10). Connect the wire harness on the Console Base (67) to the Upright Wire (69) as shown in the inset drawing. Important: If the connectors are oriented correctly, they will slide together easily and snap into place. If the connectors are not oriented correctly, the console may be damaged when the power is turned on. Insert the connectors and excess wire into the Console Base (67). Wire Harness 69 67 10 Ground Wire 40 69 11. Attach the Console Base (67) to the Handrails (40) with four 3/4" Screws (3); do not tighten 11 67 Front View the Screws yet. Next, tighten two Console Bolts (2) with 1/4" Star Washers (8) into the Handrails 40 and the Console Base. Then, tighten the four 40 Screws. 3 12. Lower the Uprights (38, 39) as shown. 12 See the inset drawing. Push the Uprights (38, 39) sideways so that the treadmill Frame (36) is centered between the Uprights. Firmly tighten the Upright Bolts (4) and the Frame Bolt (1) on each side of the treadmill. Do not overtighten the Frame Bolts. 8 3 2 8 2 Side View 38, 39 1 4 36 View from Above 38 36 39 11
-
 1
1 -
2
-
3
-
4
-
5
-
 6
6 -
 7
7 -
 8
8 -
 9
9 -
 10
10 -
 11
11 -
 12
12 -
 13
13 -
 14
14 -
 15
15 -
 16
16 -
17
-
18
-
19
-
20
-
21
-
22
-
23
-
24
-
25
-
26
-
27
 |
 |
