ProForm 585 Ekg Elliptical User Manual - Page 8
How To Move The Elliptical Crosstrainer
 |
View all ProForm 585 Ekg Elliptical manuals
Add to My Manuals
Save this manual to your list of manuals |
Page 8 highlights
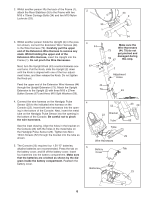
9. Identify the Left Rear Spring Bracket (12) on the left Pedal Spring (11). Apply a light coat of grease inside of the Pedal Arm Bushings (37) in the Left Rear Spring Bracket and to the axle on the left Disc Crossbar (16). Slide a Spring Spacer (63) onto the axle; make sure that the Spring Spacer is turned so the flat side is facing the elliptical crosstrainer. Next, slide the Left Rear Spring Bracket onto the axle. Slide a Spring Bracket Washer (35) onto an M10 x 27mm Patch Screw (40), and tighten the Patch Screw into the axle. 9 16, Grease 37, Grease 11 63 Next, hold the lower end of the left Handlebar Leg (5) 12 inside of the Front Spring Bracket (76) on the left Pedal Spring (11). Apply grease to an M10 Bolt Set (74). Attach the Handlebar Leg to the Front Spring Bracket with the Bolt Set. Do not overtighten the Bolt Set; 40 35 2 43 7 the Handlebar Leg must pivot freely. 5 Attach the right Pedal Spring (not shown) to the right side of the elliptical crosstrainer in the same way. Tighten the M6 x 25mm Button Screw (7) into the Upright (2). Turn the Upright Knob (43) clockwise until it is tight. See step 7. Tighten the M8 x 45mm Button Bolts (50) in the Handlebar Legs (5). 76 74 Grease 74 11 10. Make sure that all parts of the elliptical crosstrainer are properly tightened. Note: Some hardware may be left over after assembly is completed. To protect the floor or carpet from damage, place a mat under the elliptical crosstrainer. HOW TO MOVE THE ELLIPTICAL CROSSTRAINER Stand behind the elliptical crosstrainer, hold the Rear Stabiliser (9) firmly, and lift the elliptical crosstrainer until it can be moved on the Wheels (22). Carefully move the elliptical crosstrainer to the desired location, and then 22 lower it. CAUTION: To decrease the possibility of injury, bend your legs and keep your back straight as you lift the Rear Stabiliser; make sure to lift with your legs rather than your back. 9 8
-
 1
1 -
2
-
 3
3 -
 4
4 -
 5
5 -
 6
6 -
 7
7 -
 8
8 -
 9
9 -
 10
10 -
 11
11 -
 12
12 -
 13
13 -
14
-
15
-
16
-
17
-
18
-
19
-
20
-
21
-
22
-
23
-
24
-
25
-
26
-
27
-
28
 |
 |
