ProForm 955r Bike English Manual - Page 6
the Frame 1. Attach the Carriage Bar to the Frame
 |
View all ProForm 955r Bike manuals
Add to My Manuals
Save this manual to your list of manuals |
Page 6 highlights
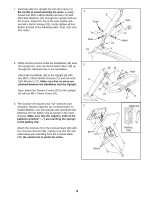
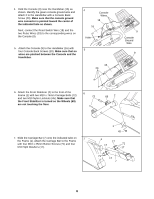
4. Hold the Console (9) near the Handlebar (16) as shown. Identify the green console ground wire and attach it to the Handlebar with a Console Back Screw (20). Make sure that the console ground wire connector is pointed toward the center of the indicated hole as shown. Next, connect the Reed Switch Wire (18) and the two Pulse Wires (33) to the corresponding wires on the Console (9). 4 Console Wires 18 16 33 Hole 20 5. Attach the Console (9) to the Handlebar (16) with 5 four Console Back Screws (20). Make sure that no wires are pinched between the Console and the Handlebar. 16 20 9 Console Ground Wire 9 6. Attach the Front Stabilizer (2) to the front of the 6 Frame (1) with two M10 x 75mm Carriage Bolts (72) 72 and two M10 Nylon Locknuts (45). Make sure that the Front Stabilizer is turned so the Wheels (69) are not touching the floor. 69 2 7. Slide the Carriage Bar (7) onto the indicated tube on 7 the Frame (1). Attach the Carriage Bar to the Frame with four M10 x 25mm Button Screws (71) and four M10 Split Washers (17). 1 45 1 17 71 17 17 71 17 7 6
-
 1
1 -
 2
2 -
 3
3 -
 4
4 -
 5
5 -
 6
6 -
 7
7 -
 8
8 -
 9
9 -
 10
10 -
 11
11 -
 12
12 -
13
-
14
-
15
-
16
 |
 |
