ProForm C90 English Manual - Page 16
ProForm C90 Manual
 |
View all ProForm C90 manuals
Add to My Manuals
Save this manual to your list of manuals |
Page 16 highlights
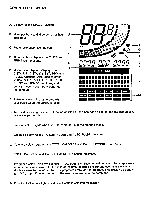
relative to the target pulse you have set. If the indicator is to the left of the plateau, your pulse is below target level. If the indicator reaches the right of the plateau, your pulse is above the target level. If your pulse remains above the target level for 10 seconds, a warning tone will sound until your pulse drops to or below the target level. Vary your pedaling speed and the pedal resistance to keep the indicator on the center of the plateau. Warning: the user is responsible for entering the pulse setting. A table of suggested pulse settings is included in the CONDITIONING GUIDELINES of this Owner's Manual. We recommend that you consult your physician for specific guidance. AUTO PULSE - Press one of the MODE keys until the AUTO PULSE indicator (M) appears on the display. Press the INCREASE key to enter the pulse that you want to maintain during exercise. Each time the key is pressed the pulse displayed will increase by 1, beginning at 50. Holding the key down will increase the amount more rapidly. (Press the DECREASE key to decrease the amount if necessary.) After the pulse is set, attach the pulse earclip and press the START/STOP key to start or stop the function. The AUTO PULSE indicator (M) will flash when the function is started. As you exercise, the computer will monitor your pulse, automatically adjusting the pedal resistance to keep your pulse at or near the level you have set. An indicator will appear on the graphic pulse display (I) to indicate your current pulse relative to the pulse you have set. Vary your pedaling speed to keep the indicator on the center of the plateau. Warning: the user is responsible for entering the pulse setting. A table of suggested pulse settings is included in the CONDITIONING GUIDELINES of this Owner's Manual. We recommend that you consult your physician for specific guidance. TEMPO - Press one of the MODE keys until the TEMPO indicator (M) appears on the display. This function will be displayed in the MODE COUNT display (E). Press the INCREASE key to enter the pedal RPM that you want to maintain during exercise. For example, if you want to pedal at a constant rate of 70 revolutions per minute, enter the number 70. Each time the key is pressed the number displayed will increase by 1. Holding the key down will increase the number more rapidly. (Press the DECREASE key to decrease the number if necessary.) After the desired rate is set, press the START/STOP key to start or stop the function. To maintain the desired RPM, turn the pedals one complete revolution with each tone. To cancel the tone, stop the computer and press the CLEAR key. (The TEMPO indicator (M) must appear on the display.) PROGRAM 1 - Program 1 is a beginning level exercise program. Press one of the MODE keys until the PROGRAM 1 indicator (M) appears on the display. This program is preset to run for 20 minutes. Press the INCREASE or DECREASE keys if you want to run the program for a different length of time. Press the START/STOP key to start or stop the program. As you exercise, the computer will automatically change the pedal resistance in order to vary the intensity level of your workout. The vertical columns of bars in the program display (L) represent pedal resistance levels from 0-10. The farthest left column is the current level. As you progress through the program, the columns will move to the left until the program has ended. A tone will sound at the end of the program. PROGRAM 2 - This is a novice level program. Press one of the MODE keys until the PROGRAM 2 indicator (M) appears on the display and run the program as described above. PROGRAM 3 - This is an intermediate level program. Press one of the MODE keys until the PROGRAM 3 indicator (M) appears on the display and run the program as described above. PROGRAM 4 - This is an advanced level program. Press one of the MODE keys until the PRO16 GRAM 4 indicator (M) appears on the display and run the program as described above.
-
 1
1 -
2
-
3
-
4
-
5
-
6
-
7
-
8
-
9
-
10
-
 11
11 -
 12
12 -
 13
13 -
 14
14 -
 15
15 -
 16
16 -
 17
17 -
 18
18 -
 19
19 -
 20
20
 |
 |
