ProForm Club Sx2 English Manual - Page 5
Stepper, Operation
 |
View all ProForm Club Sx2 manuals
Add to My Manuals
Save this manual to your list of manuals |
Page 5 highlights
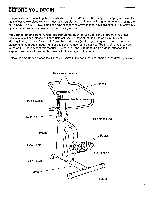
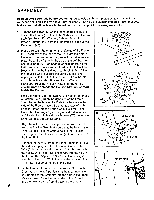
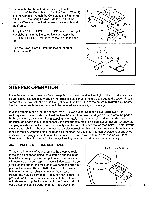
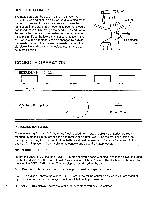
5. Remove the two Mounting Screws (18) from the underside of the Console (1). Plug the Sensor Wire (9) into the Console. Attach the Console to the Frame (6) with the two Mounting Screws. Make sure that the Sensor Wire is not pinched between the Console and the Frame. Apply the "PRESS RIGHT BUTTON" decal to the Right Handlebar (11) in the indicated location. Apply the "PRESS LEFT BUTTON" decal to the Left Handlebar (12). 6. Plug the Power Cord (3) into the jack at the front of the Frame (6). 5 12 Decal 9 6 6 6 11 Decal 18 3 STEPPER OPERATION Place the stepper on a level surface. Keep the console out of direct sunlight or the LCD display may be damaged. The accessory tray on the console is designed to hold a beverage and a towel. Press a corner of your towel into the slot in the right side of the tray. Due to the nature of hydraulic cylinders, the floor underneath the stepper should be covered in case of slight oil leakage. Plug the transformer on the power cord into a 120-volt outlet. Keep the power cord away from walkways and heated surfaces. Hold the handlebars with an overhand grip and step onto the pedals. Both pedals will slowly sink. Begin stepping, alternately pressing the right and left pedals down. Because the pedals move independently, it is important to maintain a continuous motion. Change the stepping resistance until you can comfortably maintain a continuous motion (see below). Note: If your steps are too shallow, the console may not display correct feedback. Move the pedals through a wide range of motion, without letting the pedals hit the floor. As you step, you can exercise your upper leg muscles by keeping your feet flat on the pedals. To exercise your calf muscles, rise on your toes. Stand erect or lean forward slightly, always keeping your back straight in order to avoid injury. ADJUSTING THE STEPPING RESISTANCE Resistance Buttons To vary the intensity of your exercise, the stepping resis- tance can be changed using the electronic buttons in the handlebars. As you press the right button, the resistance will increase and your stepping pace will decrease. As you press the left button, the resistance will decrease and your Decrease pace will increase. IMPORTANT: Do not hold down a button for more than sixty seconds or the motor or Increase • transformer may be damaged. If a button sticks after it is pressed, tap the button until it releases. If the button does not release, unplug the transformer immediately, and call our Customer Service Department at 1-800-999-3756. 5
-
 1
1 -
 2
2 -
 3
3 -
 4
4 -
 5
5 -
 6
6 -
 7
7 -
 8
8 -
 9
9 -
 10
10 -
 11
11 -
12
 |
 |
