ProForm Club Sx2 English Manual - Page 7
Trouble, Shooting, Maintenance
 |
View all ProForm Club Sx2 manuals
Add to My Manuals
Save this manual to your list of manuals |
Page 7 highlights
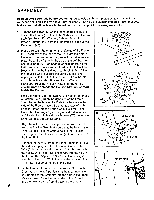
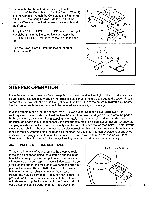
CALORIES-This display shows the total number of nutritional Calories you have burned. Note: The number displayed is averaged. The actual number may be slightly higher or lower depending on the stepping resistance and the resistance of the handlebars. PULSE-This display shows your heart rate. Plug the pulse earclip into the jack on the console, and attach the earclip to your left ear lobe. Slide the clothes clip onto your collar to minimize movement of the earclip wire. After a few seconds, your heart rate will be displayed. If your heart rate is not displayed after a few seconds, rub your ear lobe and reposition the earclip. It may be helpful to stand still while measuring your heart rate. TURNING THE POWER OFF If no buttons are pressed and the stepper pedals are not moved for five minutes, the power will turn off automatically. TROUBLE-SHOOTING AND MAINTENANCE Inspect and tighten all parts of the stepper regularly. The stepper can be cleaned using a soft cloth and mild, non-abrasive detergent. Do not allow liquid to come in contact with the console. CONSOLE If the console does not function properly, or if the display becomes faint, the batteries should be replaced (see INSTALLING BATTERIES on page 6). Most problems are the result of drained batteries. If the pulse earclip does not function properly, the earclip should be cleaned. Press the earclip open, and wipe the two clear circles inside the earclip, using a cotton swab saturated with denatured alcohol. PEDALS The lower end of the resistance shaft and the axles to which the pedals and pedal arms are Screw Screw attached should be oiled regularly. Apply oil every six months, or whenever the joints become noisy. Resistance Remove the four screws at the bottom of the side Shaft shields. Pull the bottom of the side shields apart slightly, until the side shields can be lifted off the frame. Apply a few drops of light multi-purpose oil K Apply Oil at the locations indicated in the drawing. Reattach the side shields with the screws. Apply Oil Pedal Arm STEPPING RESISTANCE If the stepping resistance does not change when the buttons in the handlebars are pressed, make sure that the power cord is plugged in. If the resistance still does not change, the wire connections should be checked. UNPLUG THE POWER CORD. Remove the grommet from the hole in the front of the frame, and make sure that the handlebar wires are plugged fully into the wires in the frame. Reinsert the grommet into the hole. Next, check the switches in the handlebars. Using an adjustable wrench, turn the plastic nut on each switch until the switches can be removed from the handlebars. Make sure that the wires in the handlebars are plugged fully into the switches. Retighten the plastic nuts on the switches and press the switches back into the handlebars. 7
-
 1
1 -
 2
2 -
 3
3 -
 4
4 -
 5
5 -
 6
6 -
 7
7 -
 8
8 -
 9
9 -
 10
10 -
 11
11 -
 12
12
 |
 |
