ProForm T60 Treadmill Owners Manual - Page 3
Assembly
 |
View all ProForm T60 Treadmill manuals
Add to My Manuals
Save this manual to your list of manuals |
Page 3 highlights
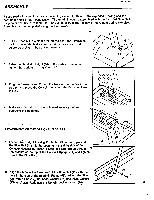
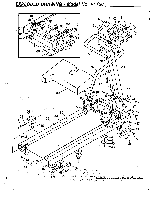
ASSEMBLY MC V. WOO Please read all instructions before beginning assembly. Refer to the exploded drawing and the part list for help in part identification. The treadmill can be assembled with the included Side Rail for greater security, or without the Side Rail to allow more freedom of movement during exercise. Assembly can be completed using the tool provided. 2 14 1. Set the treadmill in a clear area on the floor and remove all packing materials. Make sure that all parts are included before disposing of the packing materials. 24 2. Raise the Handrail Upright (14) to the vertical position and tighten the Upright Locking Knob (24). 3 3. Plug the Sensor Wire (20) into the back of the Electronic Console (4) and press the Console firmly into the Console Housing (5). 4 _ oa \ 5 1 1 20 O • 4. Make sure that all parts are tightened securely before operating the treadmill. 5 • ATTACHMENT OF THE OPTIONAL SIDE RAIL 1 19 5. Loosen the Upright Locking Knob (24). Slide the upper end of 14 the Side Rail (11) into the opening in the right side of the Console Housing (5). Insert a Side Rail Bolt (19) up through 6 the bracket at the top of the Handrail Upright (14) and tighten 11 it in to the Side Rail. 6. Align the hole in the lower end of the Side Rail (11) with ihe hole in the side of the treadmill Frame (57). Attach the Side ail with,a Bolt (19), Rounded Washer (76) and Pivot Washer (75) as shown. Retighten the Upright Locking Knob (24). 76 75 19 57 3
-
 1
1 -
 2
2 -
 3
3 -
 4
4 -
 5
5 -
 6
6 -
 7
7 -
 8
8 -
 9
9 -
10
-
11
-
12
 |
 |
