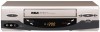
RCA VR637HF User Guide
RCA VR637HF - Hi-Fi VCR Manual
 |
UPC - 034909121351
View all RCA VR637HF manuals
Add to My Manuals
Save this manual to your list of manuals |
RCA VR637HF manual content summary:
- RCA VR637HF | User Guide - Page 1
VCR User's Guide Changing Entertainment. Again. VR546/VR637HF - RCA VR637HF | User Guide - Page 2
DO NOT OPEN. (or back). No user serviceable parts inside. Refer servicing to qualified service personnel. This symbol indicates "dangerous voltage" sales receipt to obtain warranty parts and service and for proof of purchase. Attach it here and record the serial and model numbers in case you need - RCA VR637HF | User Guide - Page 3
Components to Your VCR ...4 TV + VCR ...5 TV + VCR + Satellite Receiver ...6 TV + VCR + Cable Box ...7 Put Batteries in the Remote Control ...8 Turn on the TV and VCR ...8 Using the Remote Control to Choose On-Screen Menu Items ...8 Complete the On-screen Setup Guide ...8 VCR Basics...10 Playing - RCA VR637HF | User Guide - Page 4
(Continued) Preferences ...19 Remote Control ...Auto Play ...Auto TV/VCR ...EnergySaver ...Front Panel ...Tape Speed ...Set Auto Repeat ...19 19 19 19 20 20 20 Audio ...20 Reception ...20 Tape Playback ...20 Language ...20 Chapter 4: Additional Information ...21 Troubleshooting ...21 Display Panel - RCA VR637HF | User Guide - Page 5
Models (VR546 and VR637HF) • • Model VR546 (mono) Model VR637 (hi-fi) The graphics in this user's guide show the VR637HF, so the jacks on the front and back of the VCR Insert all cable plugs firmly into their jacks. Place any Audio/Video (A/V) cables to the side(s) of the TV's back panel instead - RCA VR637HF | User Guide - Page 6
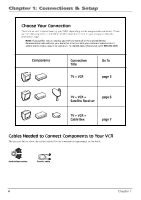
entertainment system and to instruct you in its operation. For details about this service, call 1-888-206-3359. Components Connection Title Go To TV + VCR TV VCR page 5 TV VCR lite tel a S TV + VCR + Satellite Receiver page 6 TV VCR Cab le x Bo TV + VCR + Cable Box page 7 Cables - RCA VR637HF | User Guide - Page 7
The back of your TV might not look exactly like the one shown here. VCR 1B AUDIO R L OUT IN VCR ANT. IN 1A 2 From Cable or Antenna RF OUT VIDEO The VCR pictured here is model VR637HF and shows stereo audio jacks. Model VR546 is mono and will not have separate left and right audio jacks. Use - RCA VR637HF | User Guide - Page 8
shown here. VCR 1B AUDIO R L OUT IN VCR ANT. IN 1A RF OUT VIDEO The VCR pictured here is model VR637HF and shows stereo audio jacks. Model VR546 is the VCR. - OR - B. Connect audio/video cables to the AUDIO IN R and L jacks on the back of the VCR (color coded, red and white), and the VIDEO IN - RCA VR637HF | User Guide - Page 9
exactly like the one shown here. VCR 1B 1A AUDIO R L OUT IN VCR ANT. IN RF OUT The VCR pictured here is model VR637HF and shows stereo audio jacks. Model VR546 is mono and will not have separate left and right audio jacks. Use connection 1A for model VR546. VIDEO 2 CABLE BOX IN FROM ANT CH3 - RCA VR637HF | User Guide - Page 10
VCR. See page 19 for instructions on how to change the output channel once you have started setup. • If you used audio/video cables to connect your VCR, tune the TV to its Video Input Channel (see page 27). Using the Remote Control on-screen setup guide Select a language. Seleccione un idioma. Choisissez une langue - RCA VR637HF | User Guide - Page 11
VCR's remote control. TIME menu - accesses settings for VCR's time and date information. CABLE BOX SETUP On what channel does the VCR receive signals from the cable box? (usually 3, 4, or Video off, you'll need to manually set the time and date in order for the VCR's recording features to work. ( - RCA VR637HF | User Guide - Page 12
tape 1. 2. Tune the TV to your VCR viewing channel (03, 04, or the Video Input Channel). Insert a tape in the VCR. If the Auto Play feature is set Press the STOP/EJECT button on the VCR when stopped to eject the tape. You can also press and hold the remote control's STOP button for three seconds. - RCA VR637HF | User Guide - Page 13
remote control. Similarly, to control the VCR, press the VCR button on the remote control. Pressing any remote control button will affect either the VCR or the TV, depending on which is the active device the remote control is set to operate. Buttons of the Remote Control VCR TV INFO GUIDE SEARCH - RCA VR637HF | User Guide - Page 14
This button will automatically turn on most RCA, GE, Proscan, and Scenium TVs. VCR Puts the remote control in VCR mode. Decreases or increases the TV volume. VOL+/VOL- buttons Using the INPUT Button Use the INPUT button to toggle through the available Video Input Channel sources (Video1 and Video2 - RCA VR637HF | User Guide - Page 15
36 Record Length 1:30 Press REC to set length 3. Press REC to set length Press the RECORD button on the front of the VCR (or REC on the remote control) to start recording. Repeatedly press REC to set up the recording duration Press REC until RECORD TIME 0:00 appears. Each press of the - RCA VR637HF | User Guide - Page 16
record? 1 2 3 4 One time Daily (every day) Weekdays (M-F) Weekly (once per week) TIMER RECORDINGS 1 Create a New Program 2 Review Existing Progs. Press the MENU button to display the VCR MAIN MENU. Press the 2 button to choose Timer Recordings. Press the 1 button to choose Create a New Program - RCA VR637HF | User Guide - Page 17
to protect set timer recordings, the unit can be locked so that the buttons on the VCR or remote control don't work. • To Lock: Press and hold either the remote control's ON•OFF or VCR button until the VCR indicator on the front of the VCR goes out. The clock blinks if a button is pressed while the - RCA VR637HF | User Guide - Page 18
from the screen and return to the normal display mode. 0:30:00 Seconds 5. Info Display To find out the status of the VCR, press the INFO button on the remote control. Each time you press INFO, different information appears on the screen. See the following examples. Note: The date and time must be - RCA VR637HF | User Guide - Page 19
menus that you can access through the VCR MAIN MENU (press MENU on the remote control). The quickest way to select a menu is to press the number button on the remote control that matches the number next to the item. Some menus have on-screen instructions for more complicated settings. If you ever - RCA VR637HF | User Guide - Page 20
should happen, you will need to select either Cable TV or Antenna manually. When scanning is complete, the VCR tunes to the lowest channel available. After completing Auto Channel Search, press the remote control's CH + or - buttons to select active channels. 0 Exit ADD/REMOVE CHANNELS Channel - RCA VR637HF | User Guide - Page 21
in this menu let you customize your VCR features. Remote Control If you have a universal RCA or GE remote with VCR1 and VCR2 buttons and a second VCR, you can set this VCR to be controlled with the VCR2 button. This allows you to control both VCRs from one remote. Auto Play With Auto Play turned on - RCA VR637HF | User Guide - Page 22
ask for a loop end time to be specified. To turn off Set Auto Repeat, press the CLEAR button. Audio (VR637HF only) AUDIO 1 Reception: STEREO 2 Tape Playback: HI-FI Your VCR's audio features can be customized and affect both tape playback and recordings. Reception You can select the type of audio - RCA VR637HF | User Guide - Page 23
the VCR or cable box is tuned to the time data channel (check with your cable service provider for information about time data). Auto Clock Set is not supported in all areas or by digital satellite receivers. Set the time and date manually using the TIME menu. Go to page 9 for instructions. Chapter - RCA VR637HF | User Guide - Page 24
you are using A/V cables, make sure the TV is set to the Video Input Channel. Go to page 27 for instructions. If you are not using A/V cables, make sure the VCR is not in Video Input Channel mode. Press INPUT on the remote control to return to normal viewing. Try another tape. Some snow/streaks are - RCA VR637HF | User Guide - Page 25
stereo sound during playback (VR637HF only) • • Make sure the Tape Playback feature is set to Hi-Fi to hear stereo sound during playback. You must connect the VCR to the TV using A/V cables (not provided) to hear true stereo sound during playback. Go to page 5 for instructions. The stereo Audio is - RCA VR637HF | User Guide - Page 26
of time using 30- or 60-minute increments. Pro-Tect Plus™ Allows the VCR to be disabled so that the front panel and remote control buttons don't work. Useful for protecting timer recordings. Initial Setup Guide The on-screen instructions that walk you through several steps the first time you turn on - RCA VR637HF | User Guide - Page 27
with a new or, at our option, refurbished unit. We will charge you a flat handling fee of $29.95 to replace your defective VCR. How to get service: During the initial 90 days: • • Properly pack your unit. Include any cables, etc., which were originally provided with the product. We recommend using - RCA VR637HF | User Guide - Page 28
instruction. (Your Owner's Manual describes how to install, adjust, and operate your VCR. Any additional information should be obtained from your dealer.) Installation and setup service adjustments. Batteries. Cleaning of audio / video SCOPE OF THIS WARRANTY. REPAIR OR REPLACEMENT AS PROVIDED UNDER - RCA VR637HF | User Guide - Page 29
input channel for TVs varies by brand and model. Below are some steps to try to find your TV's video input channel: • VCR TV INFO GUIDE SEARCH GO BACK ON•OFF If your TV brand is RCA, GE, Proscan, or Scenium, press the TV button on the VCR's remote control, then press the INPUT button. SPEED CLEAR - RCA VR637HF | User Guide - Page 30
basic 10 Express (XPR) 13 speeds 20 timer 14 Remote 11 Remote Control 19 Removing/adding channels 18 REV button 10 Reviewing timer programs 14 Rewind, automatic 10 V VCR connecting 5 VCR indicator 24 VCR Output Channel 19 VCR viewing channel 10 Video Input Channel 27 VOL+/- button 12 F Front Panel - RCA VR637HF | User Guide - Page 31
- RCA VR637HF | User Guide - Page 32
Visit the RCA website at www.rca.com Please do not send any products to the Indianapolis address listed in this manual or on the carton. This will only add delays in service for your product. Thomson multimedia Inc. 10330 North Meridian Street Indianapolis, IN 46290 ©2002 Thomson multimedia Inc.
-
 1
1 -
 2
2 -
 3
3 -
 4
4 -
 5
5 -
 6
6 -
 7
7 -
8
-
9
-
10
-
11
-
12
-
13
-
14
-
15
-
16
-
17
-
18
-
19
-
20
-
21
-
22
-
23
-
24
-
25
-
26
-
27
-
28
-
29
-
30
-
31
-
32
 |
 |
VCR
User’s Guide
Changing Entertainment. Again.
VR546/VR637HF