RCA VR637HF User Guide - Page 10
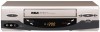
RCA VR637HF - Hi-Fi VCR Manual
 |
UPC - 034909121351
View all RCA VR637HF manuals
Add to My Manuals
Save this manual to your list of manuals |
Page 10 highlights
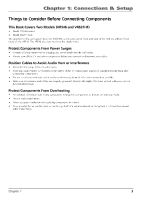
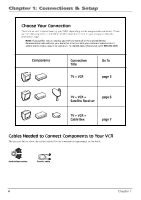
Chapter 1: Connections & Setup Put Batteries in the Remote Control 1. Insert the batteries matching the polarities (+ and -) on the batteries with the diagram in the battery compartment. Turn on the TV and VCR 1. 2. Turn on the TV (if the TV you've connected to the VCR is an RCA, GE, Proscan, or Scenium TV, press the TV button on the remote packed with your VCR). Tune the TV to the correct Video Input Channel. • If you used a coaxial cable to connect your VCR to your TV, tune the TV to channel 3. Your TV must be set to channel 3 the first time you set up the VCR. See page 19 for instructions on how to change the output channel once you have started setup. • If you used audio/video cables to connect your VCR, tune the TV to its Video Input Channel (see page 27). Using the Remote Control to Choose On-screen Menu Items To select an on-screen item, press the MENU button, then the number button on the remote control that matches the on-screen number. Selecting a menu item can take you to another menu, activate a choice, or activate a data entry field (such as the hour field in the Set Time menu). If a number doesn't appear next to an on-screen menu, use the arrow buttons to highlight an item on the screen, and press OK to select the highlighted item. Complete the on-screen setup guide Select a language. Seleccione un idioma. Choisissez une langue. 1>English 2 Español 3 Français To help you use the VCR as quickly as possible, an on-screen setup guide walks you through several important menu screens the first time you turn on your VCR. The first menu item asks you to select the language for the on-screen menus. The other setup menu items are listed in this section. LANGUAGE menu: determines the language in which the on-screen displays and menus appear. The first time you turn on the VCR, you'll be asked to select the language for the on-screen menus. 1 2 3 4 5 6 7 0 VCR MAIN MENU Timer Recordings Time Channels Setup Preferences Audio Language Exit Note: If you ever need to change some of the settings in any of the menus that appear in the setup procedure, go to the VCR MAIN MENU (press MENU on the remote) and choose Setup (press 4). If you ever need to change some of the settings in any of the menus that appear in the setup procedure, choose Setup (press 4 on the remote) from the VCR MAIN MENU. Note that the VR546 does not have the Audio menu, as it is a mono model. 8 Chapter 1
-
 1
1 -
2
-
3
-
4
-
 5
5 -
 6
6 -
 7
7 -
 8
8 -
 9
9 -
 10
10 -
 11
11 -
 12
12 -
 13
13 -
 14
14 -
 15
15 -
16
-
17
-
18
-
19
-
20
-
21
-
22
-
23
-
24
-
25
-
26
-
27
-
28
-
29
-
30
-
31
-
32
 |
 |
