Reebok 125 Axb Bench English Manual - Page 7
Attach the Frame Extension 5 to the Crossbar
 |
View all Reebok 125 Axb Bench manuals
Add to My Manuals
Save this manual to your list of manuals |
Page 7 highlights
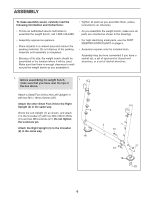
2. Orient the Frame Extension (5) as shown, and 2 slide it onto the Frame (3). Attach the Frame Extension with two M8 x 70mm Bolts (30), two M8 Washers (28), and two M8 Locknuts (27). Do not tighten the Locknuts yet. See the inset drawing. Orient the Large Foot (19) as shown, and attach it to the Frame (3) with two M4 x 16mm Screws (25). 30 30 3 28 28 5 27 Hexagonal Holes 3 Wide Side 19 3. Attach the Frame Extension (5) to the Crossbar 3 (2) with three M8 x 80mm Bolts (31), three M8 Washers (28), and three M8 Locknuts (27). Do not tighten the Locknuts yet. 2 5 28 31 28 25 31 28 27 27 4. Set the ends of the Backrest Support (14) in a set of brackets on the Uprights (1, 4). Make sure 4 that the pins on the Backrest Support are fully inserted into the holes in the brackets. See steps 1 to 3. Tighten the M8 Locknuts (27). Hole Pin 14 4 Hole Pin 1 7
-
 1
1 -
 2
2 -
 3
3 -
 4
4 -
 5
5 -
 6
6 -
 7
7 -
 8
8 -
 9
9 -
 10
10 -
 11
11 -
 12
12 -
13
-
14
-
15
-
16
 |
 |
