Ricoh 2045 Scanning Configuration - Page 3
Additional Configuration Info - specifications
 |
UPC - 026649003776
View all Ricoh 2045 manuals
Add to My Manuals
Save this manual to your list of manuals |
Page 3 highlights
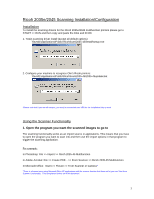
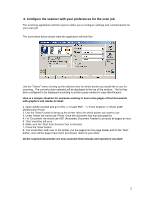
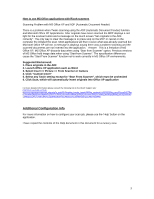
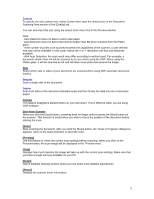
How to use MS Office applications with Ricoh scanners Scanning Problem with MS Office XP and ADF (Automatic Document Feeder) There is a problem when Twain scanning using the ADF (Automatic Document Feeder) function and Microsoft Office XP Applications. After originals have been scanned the MFP displays a red light for the scanner button and a message on the touch screen "Set originals in the ADF correctly". The only way to clear the message is to press stop on the MFP or cancel on the computer the initiated the scan. Most applications will then receive what was already scanned but Microsoft Office XP will not. A message is displays saying there was a problem scanning and the scanned documents are not inserted into the application. Answer This is a limitation of MS Office XP. MS Office XP discards data when using "Start from Scanner" option. Previous versions of MS Office hold image data when using "Start from Scanner". The specification differences cause the "Start From Scanner" function not to work correctly in MS Office XP environments. Suggested Workaround: 1. Place originals in the ADF 2. Launch Office XP application such as Word 3. Select Insert >> Picture >> From Scanner or Camera 4. Click "Custom Insert" 5. Select any Twain setting except for "Start From Scanner", which must be unchecked 6. Click Scan, which will automatically insert originals into Office XP application For more detailed information please consult the following link to the Ricoh Support site: http://ricoh.custhelp.com/cgibin/ricoh.cfg/php/enduser/std_adp.php?p_sid=B3UIzhgh&p_lva=&p_faqid=2865&p_created=1043099203&p_sp=cF9zcmNoPTEm cF9ncmlkc29ydD0mcF9yb3dfY250PTc0JnBfc2VhcmNoX3RleHQ9JnBfc2VhcmNoX3R5cGU9MyZwX3Byb2RfbHZsMT02JnBfcHJ vZF9sdmwyPTc4JnBfY2F0X2x2bDE9fmFueX4mcF9zb3J0X2J5PWRmbHQmcF9wYWdlPTE Additional Configuration Info For more information on how to configure your scan job, please use the 'Help' button on the application. I have copied the contents of the Help document in this document for a cursory view. 3
-
 1
1 -
 2
2 -
 3
3 -
 4
4 -
 5
5 -
 6
6
 |
 |