Ricoh 2045 Scanning Configuration - Page 5
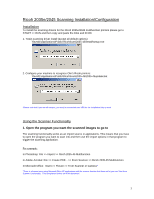
Deskew, Start from Scanner, Scan], Preview], Data], Detail], About] - driver windows 7
 |
UPC - 026649003776
View all Ricoh 2045 manuals
Add to My Manuals
Save this manual to your list of manuals |
Page 5 highlights
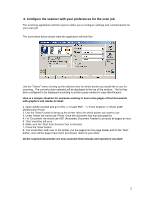
Custom To specify our own custom size, select Custom then input the desired size in the Document Scanning Area section of the [Quality] tab. You can also input this size using the Select Scan Area Tool in the Preview window. Note: · Auto Detection does not detect custom size paper. · Auto Detection does not detect documents smaller than B5 when scanned from the Platen glass. · If the number of pixels to be scanned exceeds the capabilities of the scanner, a user-defined size may not be available. In this case, reduce the X or Y resolution until that size becomes available. · With Auto Detection, the scan result may differ according to method used. For example, a document smaller than A4 will be scanned as its size when using the ADF. When using the Platen glass, it will be scanned as A4 and will have more white area around the image. Side Select which side or sides of your document are scanned when using ADF automatic document feeders. Simplex Scan a single side of the document. Duplex Scan both sides of the document simultaneously and then format the data into two consecutive pages. Deskew This feature straightens slanted letters on your document. This is effective when you are using OCR software. Start from Scanner When you click the [Scan] button, scanning does not begin until you press the [Start] button on the scanner. This function is useful when you wish to check the position of the document before starting the scan. [Scan] Start scanning the document. After you click the [Scan] button, the "Scan in Progress" dialog box appears. Click on the [Cancel] button to abort the scan. [Preview] Use this feature to check the current scan settings before scanning. When you click on the Preview button, the scan image will be displayed in the "Preview Area". [Data] Displays how much memory the image will take up with the current scan settings. Make sure that you have enough memory available on your PC. [Detail] Opens Detailed Settings window where you can make more detailed adjustments. [About] Displays the scanner driver information. 5
-
 1
1 -
 2
2 -
 3
3 -
 4
4 -
 5
5 -
 6
6
 |
 |