Ricoh Aficio SP C231SF User Guide - Page 294
Mode2, High Humidity Mode, Machine Settings, Toner Saver Mode, Problem, Solution
 |
View all Ricoh Aficio SP C231SF manuals
Add to My Manuals
Save this manual to your list of manuals |
Page 294 highlights
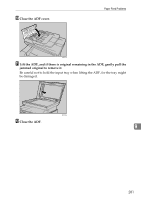
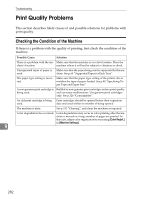
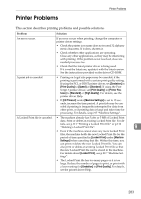
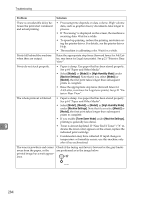
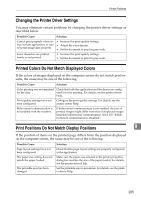
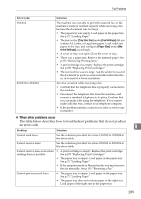
Troubleshooting Problem Solution There is considerable delay between the print start command and actual printing. • Processing time depends on data volume. High volume data, such as graphics-heavy documents, take longer to process. • If "Processing" is displayed on the screen, the machine is receiving data. Wait for a while. • To speed up printing, reduce the printing resolution using the printer driver. For details, see the printer driver Help. • The machine is calibrating color. Wait for a while. Prints fall behind the machine when they are output. Raise the appropriate stop fence (forward fence for A4/Letter, rear fence for Legal size prints). See p.21 "Exterior: Rear View". Prints do not stack properly. • Paper is damp. Use paper that has been stored properly. See p.64 "Paper and Other Media". • Select [Mode2] or [Mode3] in [High Humidity Mode] under [Machine Settings]. Note that if you select [Mode2] or [Mode3], the first print takes longer than subsequent prints to complete. • Raise the appropriate stop fence (forward fence for A4/Letter, rear fence for Legal size prints). See p.21 "Exterior: Rear View". The whole printout is blurred. • Paper is damp. Use paper that has been stored properly. See p.64 "Paper and Other Media". • Select [Mode1], [Mode2] or [Mode3] in [High Humidity Mode] under [Machine Settings]. Note that if you select [Mode2] or [Mode3], the first print takes longer than subsequent prints to complete. • If you enable [Toner Saver Mode] under [Machine Settings], printing is generally less dense. 9 • Toner is almost depleted. If "Near End X Toner" ("X" in- dicates the toner color) appears on the screen, replace the indicated print cartridge. • Condensation may have collected. If rapid change in temperature or humidity occurs, use this machine only after it has acclimatized. The toner is powdery and comes Check if the fusing unit lever is lowered or the grey knobs away from the paper, or the are positioned as in the image below. printed image has a matt appear- ance. ASH129S 284
-
 1
1 -
2
-
3
-
4
-
5
-
6
-
7
-
8
-
9
-
10
-
11
-
12
-
13
-
14
-
15
-
16
-
17
-
18
-
19
-
20
-
21
-
22
-
23
-
24
-
25
-
26
-
27
-
28
-
29
-
30
-
31
-
32
-
33
-
34
-
35
-
36
-
37
-
38
-
39
-
40
-
41
-
42
-
43
-
44
-
45
-
46
-
47
-
48
-
49
-
50
-
51
-
52
-
53
-
54
-
55
-
56
-
57
-
58
-
59
-
60
-
61
-
62
-
63
-
64
-
65
-
66
-
67
-
68
-
69
-
70
-
71
-
72
-
73
-
74
-
75
-
76
-
77
-
78
-
79
-
80
-
81
-
82
-
83
-
84
-
85
-
86
-
87
-
88
-
89
-
90
-
91
-
92
-
93
-
94
-
95
-
96
-
97
-
98
-
99
-
100
-
101
-
102
-
103
-
104
-
105
-
106
-
107
-
108
-
109
-
110
-
111
-
112
-
113
-
114
-
115
-
116
-
117
-
118
-
119
-
120
-
121
-
122
-
123
-
124
-
125
-
126
-
127
-
128
-
129
-
130
-
131
-
132
-
133
-
134
-
135
-
136
-
137
-
138
-
139
-
140
-
141
-
142
-
143
-
144
-
145
-
146
-
147
-
148
-
149
-
150
-
151
-
152
-
153
-
154
-
155
-
156
-
157
-
158
-
159
-
160
-
161
-
162
-
163
-
164
-
165
-
166
-
167
-
168
-
169
-
170
-
171
-
172
-
173
-
174
-
175
-
176
-
177
-
178
-
179
-
180
-
181
-
182
-
183
-
184
-
185
-
186
-
187
-
188
-
189
-
190
-
191
-
192
-
193
-
194
-
195
-
196
-
197
-
198
-
199
-
200
-
201
-
202
-
203
-
204
-
205
-
206
-
207
-
208
-
209
-
210
-
211
-
212
-
213
-
214
-
215
-
216
-
217
-
218
-
219
-
220
-
221
-
222
-
223
-
224
-
225
-
226
-
227
-
228
-
229
-
230
-
231
-
232
-
233
-
234
-
235
-
236
-
237
-
238
-
239
-
240
-
241
-
242
-
243
-
244
-
245
-
246
-
247
-
248
-
249
-
250
-
251
-
252
-
253
-
254
-
255
-
256
-
257
-
258
-
259
-
260
-
261
-
262
-
263
-
264
-
265
-
266
-
267
-
268
-
269
-
270
-
271
-
272
-
273
-
274
-
275
-
276
-
277
-
278
-
279
-
280
-
281
-
282
-
283
-
284
-
285
-
286
-
287
-
288
-
 289
289 -
 290
290 -
 291
291 -
 292
292 -
 293
293 -
 294
294 -
 295
295 -
 296
296 -
 297
297 -
 298
298 -
 299
299 -
300
-
301
-
302
-
303
-
304
-
305
-
306
-
307
-
308
-
309
-
310
-
311
-
312
-
313
-
314
-
315
-
316
-
317
-
318
-
319
-
320
-
321
-
322
-
323
-
324
-
325
-
326
-
327
-
328
-
329
-
330
-
331
-
332
-
333
-
334
-
335
-
336
-
337
-
338
-
339
-
340
-
341
-
342
-
343
-
344
-
345
-
346
-
347
-
348
-
349
-
350
-
351
-
352
-
353
-
354
-
355
-
356
-
357
-
358
-
359
-
360
-
361
-
362
-
363
-
364
-
365
-
366
-
367
-
368
-
369
-
370
-
371
-
372
-
373
-
374
-
375
-
376
-
377
-
378
-
379
-
380
-
381
-
382
-
383
-
384
-
385
-
386
-
387
-
388
-
389
-
390
-
391
-
392
-
393
-
394
-
395
-
396
-
397
-
398
-
399
-
400
-
401
-
402
-
403
-
404
-
405
-
406
-
407
-
408
-
409
-
410
-
411
-
412
-
413
-
414
-
415
-
416
 |
 |