Ricoh MP 5055 Driver Installation Guide - Page 20
Using the LPR port
 |
View all Ricoh MP 5055 manuals
Add to My Manuals
Save this manual to your list of manuals |
Page 20 highlights
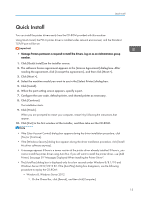
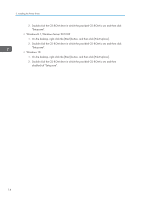
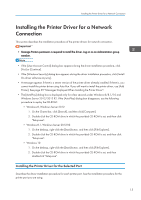
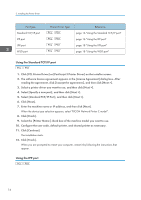
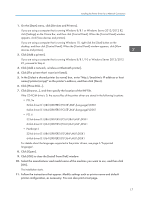
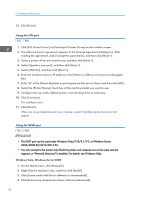
2. Installing the Printer Driver 12. Click [Finish]. Using the LPR port 1. Click [PCL Printer Driver] or [PostScript 3 Printer Driver] on the installer screen. 2. The software license agreement appears in the [License Agreement] dialog box. After reading the agreement, click [I accept the agreement.], and then click [Next >]. 3. Select a printer driver you want to use, and then click [Next >]. 4. Select [Specify a new port], and then click [Next >]. 5. Select [LPR Port], and then click [Next >]. 6. Enter the machine name or IP address in the [Name or address of server providing lpd:] box. 7. Enter "lp" in the [Name of printer or print queue on that server:] box, and then click [OK]. 8. Select the [Printer Name:] check box of the machine model you want to use. 9. Configure the user code, default printer, and shared printer as necessary. 10. Click [Continue]. The installation starts. 11. Click [Finish]. When you are prompted to restart your computer, restart it by following the instructions that appear. Using the WSD port • The WSD port can be used under Windows Vista/7/8/8.1/10, or Windows Server 2008/2008 R2/2012/2012 R2. • You can connect to the printer only if both the printer and computer are on the same network segment, or "Network discovery" is enabled. For details, see Windows Help. Windows Vista, Windows Server 2008 1. On the [Start] menu, click [Network]. 2. Right-click the machine's icon, and then click [Install]. 3. Click [Locate and install driver software (recommended)]. 4. Click [Browse my computer for driver software (advanced)]. 18
-
 1
1 -
2
-
3
-
4
-
5
-
6
-
7
-
8
-
9
-
10
-
11
-
12
-
13
-
14
-
 15
15 -
 16
16 -
 17
17 -
 18
18 -
 19
19 -
 20
20 -
 21
21 -
 22
22 -
 23
23 -
 24
24 -
 25
25 -
26
-
27
-
28
-
29
-
30
-
31
-
32
-
33
-
34
-
35
-
36
-
37
-
38
-
39
-
40
-
41
-
42
-
43
-
44
-
45
-
46
-
47
-
48
-
49
-
50
-
51
-
52
-
53
-
54
-
55
-
56
-
57
-
58
-
59
-
60
 |
 |
