Rocketfish RF-G1502 User Manual - Page 13
Option 2: Attaching the mounting hardware to, TVs with irregular or obstructed backs
 |
View all Rocketfish RF-G1502 manuals
Add to My Manuals
Save this manual to your list of manuals |
Page 13 highlights
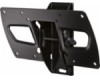
TV WALL MOUNT RF-TVMLPT01V2 STEP 5 - Option 2: Attaching the mounting hardware to TVs with irregular or obstructed backs 1 Place the spacers (E) overtop of the screw holes on the back of your TV. 2 Align the holes on the TV bracket (A) with the spacers on the back of your TV. Place the washers (D) over the holes in the TV bracket, then insert the screws (C) through the washers, TV bracket, and spacers. NOTE: If the hole pattern on your TV is 75 mm x 75 mm, the washers (D) will not fit, so do not use them. 3 Tighten all screws carefully until snug. Do not overtighten. Note: No washers used with 75 mm x 75 mm hole pattern. You'll need Screws C (4) Washers D (4) Spacers E (4) TV bracket (A) Phillips screwdriver Need help? Call 1-800-620-2790 (U.S. and Canada) 13
-
 1
1 -
2
-
3
-
4
-
5
-
6
-
7
-
 8
8 -
 9
9 -
 10
10 -
 11
11 -
 12
12 -
 13
13 -
 14
14 -
 15
15 -
 16
16 -
 17
17 -
 18
18 -
19
-
20
 |
 |
