Rocketfish RF-HTLF23 User Guide - Page 14
STEP 6 - Option 1: Installing on a wood stud wall
 |
View all Rocketfish RF-HTLF23 manuals
Add to My Manuals
Save this manual to your list of manuals |
Page 14 highlights
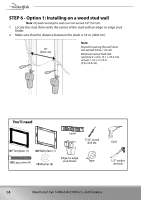
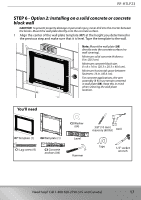
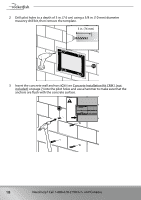
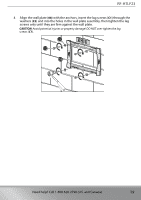
STEP 6 - Option 1: Installing on a wood stud wall Note: Drywall covering the wall must not exceed 5/8" (16 mm). 1 Locate the stud, then verify the center of the stud with an edge-to-edge stud finder. 2 Make sure that the distance between the studs is 16 in. (40.6 cm). 16" (40.6 cm) Note: Drywall covering the wall must not exceed 5/8 in. (1.6 cm). Minimum wood stud size: nominal 2 × 4 in. (5.1 × 10.2 cm) actual 1 1/2 × 3 1/2 in. (3.8 × 8.9 cm). You'll need Level 07 Template (1) 08 Wall plate (1) 09 Lag screw (4) 10 Washer (4) Edge-to edge stud finder 7/32" wood drill bit Tape Drill 1/2" socket wrench 14 Need help? Call 1-800-620-2790 (U.S. and Canada)
-
 1
1 -
2
-
3
-
4
-
5
-
6
-
7
-
8
-
 9
9 -
 10
10 -
 11
11 -
 12
12 -
 13
13 -
 14
14 -
 15
15 -
 16
16 -
 17
17 -
 18
18 -
 19
19 -
20
-
21
-
22
-
23
-
24
-
25
-
26
-
27
-
28
 |
 |

14
Need help? Call 1-800-620-2790 (U.S. and Canada)
STEP 6 - Option 1: Installing on a wood stud wall
Note
: Drywall covering the wall must not exceed 5/8" (16 mm).
1
Locate the stud, then verify the center of the stud with an edge-to-edge stud
finder.
2
Make sure that the distance between the studs is 16 in. (40.6 cm).
You’ll need
16"
(40.6 cm)
Note:
Drywall covering the wall must
not exceed 5/8 in. (1.6 cm).
Minimum wood stud size:
nominal 2 × 4 in. (5.1 × 10.2 cm)
actual 1 1/2 × 3 1/2 in.
(3.8 × 8.9 cm).
Edge-to edge
stud finder
09
Lag screw (4)
Drill
7/32" wood
drill bit
1/2" socket
wrench
07
Template (1)
Tape
08
Wall plate (1)
Level
10
Washer (4)