Ryobi P507 Manual 1
Ryobi P507 Manual
 |
View all Ryobi P507 manuals
Add to My Manuals
Save this manual to your list of manuals |
Ryobi P507 manual content summary:
- Ryobi P507 | Manual 1 - Page 1
Blade Wrench, Operator's Manual TABLE OF CONTENTS General Power Tool Safety Warnings 2-3 Circular Saw Safety Warnings..........3-4 Symbols 5 Features 6 Assembly 6-7 Operation 7-10 Adjustments 10 Maintenance 11 Accessories 11 Illustrations 12-14 Parts Ordering / Service - Ryobi P507 | Manual 1 - Page 2
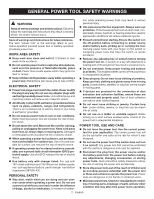
instructions for future reference. The term "power tool" in the warnings refers to your mains-operated (corded) power tool or battery or a key left attached to a rotating part of the power tool may result in personal Do not use on a ladder or unstable support. Stable footing on a solid surface enables - Ryobi P507 | Manual 1 - Page 3
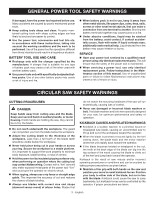
tool is maintained. When servicing a power tool, use only identical replacement parts. Follow instructions in the Maintenance section of this manual. Use of unauthorized parts or failure to follow Maintenance instructions may create a risk of shock or injury. CIRCULAR SAW SAFETY WARNINGS CUTTING - Ryobi P507 | Manual 1 - Page 4
the guard and the spring are not operating properly, they must be serviced before use. Lower guard may operate sluggishly due to damaged parts, gummy deposits, or a build-up of debris. Lower guard should be retracted manually only for special cuts such as "plunge cuts" and "compound cuts." Raise - Ryobi P507 | Manual 1 - Page 5
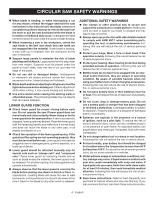
Operator's Manual To reduce the risk of injury, user must read and understand operator's manual before using blade will result in serious personal injury. This product uses nickel-c admium (Ni-Cd) and lithium-ion (Li-ion) batteries. Local, state or federal laws may prohibit disposal of batteries - Ryobi P507 | Manual 1 - Page 6
, always remove the battery pack from the product when assembling parts. If inner blade washer has been removed, replace it before placing blade on spindle. Failure to do so could cause an accident since blade will not tighten properly. n Fit the saw blade inside the lower blade guard and onto the - Ryobi P507 | Manual 1 - Page 7
that is too thick to allow the outer blade washer to engage with the flats on the spindle. REMOVING THE BLADE See Figure 2, page 12. Remove the battery pack from the saw. n Remove the blade wrench from the storage area. n Position the saw as shown, depress the spindle lock but- ton and remove - Ryobi P507 | Manual 1 - Page 8
or nails before cutting. Never saw into a knot or nail. Make straight cuts. Always use a straight edge guide when rip cutting. This helps prevent twisting the blade. Use clean, sharp, and properly set blades. Never make cuts with dull blades. Support the workpiece properly before beginning - Ryobi P507 | Manual 1 - Page 9
the saw on the workpiece that is supported, GUIDE later in this manual. Use a guide when making long or wide rip cuts with the saw. Secure the workpiece. Clamp a straight edge to the workpiece using C-clamps. Saw along the straight edge to achieve a straight rip cut. NOTE: Do not bind the blade - Ryobi P507 | Manual 1 - Page 10
front of the base flat against the workpiece with the rear of the handle raised so the blade does not touch the workpiece. Start the saw and let the blade reach full speed. Guide the saw into the workpiece and make the cut. WARNING: Always cut in a forward direction when pocket cutting. Cutting - Ryobi P507 | Manual 1 - Page 11
servicing, use only identical replacement parts. Use of any other parts battery pack from the product when cleaning or performing any maintenance. ACCESSORIES Look for these accessories where you purchased this product or call 1-800-525-2579: 6-1/2 in. Thin Kerf Blade...681115012 Edge Guide Kit - Ryobi P507 | Manual 1 - Page 12
est en position d'arrêt avant de brancher Conserver les avertissements et les instructions à des fins de référence ultérieure. Le terme « outil ouïes d'aération. Ne pas utiliser l'outil sur une échelle ou un support instable. Une bonne tenue et un bon équilibre permettent de mieux contrôler l' - Ryobi P507 | Manual 1 - Page 13
à celles d'origine pour les réparations. Se conformer aux instructions de la section Entretien de ce manuel. L'usage de pièces non , ce qui peut électrocuter l'utilisateur. Pour la refente, toujours utiliser un guide longitudinal ou une règle. Ceci accroît la précision de la coupe et - Ryobi P507 | Manual 1 - Page 14
taille ont tendance à ployer sous leur propre poids. Des supports doivent être placés sous la planche, de chaque ésence d'une flamme vive. En explosant, une batterie peut projeter des débris et des produits chimiques. de blessures graves. Conserver ces instructions. Les consulter fréquemment et les - Ryobi P507 | Manual 1 - Page 15
SYMBOLES Les termes de mise en garde suivants et leur signification ont pour but d'expliquer le degré de risques associé à l'utilisation de ce produit. SYMBOLE SIGNAL SIGNIFICATION DANGER : Indique une situation extrêmement dangereuse qui, si elle n'est pas évitée, aura pour conséquences des - Ryobi P507 | Manual 1 - Page 16
CARACTÉRISTIQUES FICHE TECHNIQUE Moteur 18 V C.C. Diamètre de la lame 165 mm (6-1/2 po) Axe de lame 15,9 mm (5/8 po) Profondeur de coupe à 0 52,4 mm (2-1/16 po) Profondeur de coupe à 45 36,5 mm (1-7/16 po) Vitesse à vide 4 700 r/min (RPM). ASSEMBLAGE DÉBALLAGE Cet produit doit être assembl - Ryobi P507 | Manual 1 - Page 17
de la lame en cours de coupe. Coupe avec une lame émoussée, encrassée ou mal réglée. INSTALLATION DU BLOC-PILES Voir la figure 3, page 12. Support incorrect de la pièce à couper. Coupe forcée. n Insérer le bloc-piles dans la scie. Aligner la nervure du bloc- Coupe de planches humides - Ryobi P507 | Manual 1 - Page 18
de noeuds ou de clous. Effectuer des coupes droites. Toujours utiliser un guide pour le sciage en long. Ceci évite la déviation de la lame. élever ou abaisser la lame, de manière à ce que le repère du support s'aligne sur l'encoche de la garde. Serrer fermement le bouton de verrouillage de - Ryobi P507 | Manual 1 - Page 19
coupes en biseau à 45°, aligner 45° l'encoche de guidage sur le trait de scie. Effectuer un essai sur une chute pour déterminer le déport du guide avant de commencer la coupe. Régler l'angle de coupe comme désiré, ente 0 et 50°. Voir Réglage d'angle de biseau, ci-après. RÉGLAGE D'ANGLE DE BISEAU - Ryobi P507 | Manual 1 - Page 20
infliger des blessures graves. RÉGLAGES AVERTISSEMENT : Pour empêcher un démarrage accidentel pouvant entraîner des blessures graves, tojours retirer le bloc de batterie de l'produit avant d'assembler des pièces. BUTÉE FIXE DE BISEAU À 0° Voir la figure 20, page 14. La scie est dotée d'une but - Ryobi P507 | Manual 1 - Page 21
Rechercher ces accessoires où vous avez acheté ce produit ou en appelant au 1-800-525-2579 : Lame de 165 mm (6 1/2 po)...681115012 Guide de chant...201985001 AVERTISSEMENT : Les outils et accessoires disponibles actuellement pour cet produit sont listés ci-dessus. Ne pas utiliser d'outils ou - Ryobi P507 | Manual 1 - Page 22
ADVERTENCIAS DE SEGURIDAD PARA HERRAMIENTAS ELÉCTRICAS ADVERTENCIA Lea todas las advertencias de seguridad y las instrucciones. El incumplimiento de las advertencias e instrucciones puede ocasionar descarga eléctrica, fuego o lesiones graves. Guarde todas las advertencias e instrucciones para - Ryobi P507 | Manual 1 - Page 23
. Siga las instrucciones señaladas en la sección Mantenimiento de este manual. El empleo de piezas no autorizadas o el incumplimiento de las instrucciones descarga eléctrica o de lesiones. ADVERTENCIAS DE SEGURIDAD SIERRA CIRCULAR PROCEDIMIENTOS DE CORTE hojas que no coinciden con los elementos - Ryobi P507 | Manual 1 - Page 24
ADVERTENCIAS DE SEGURIDAD SIERRA CIRCULAR Cuando esté atorándose la hoja, o esté interrumpié retractor y asegúrese de que se mueve libremente y no toca la hoja de corte ni ninguna otra parte, en todos los ángulos y profundidades de corte. Verifique el funcionamiento del resorte de la protección - Ryobi P507 | Manual 1 - Page 25
DENOMINACIÓN/EXPLICACIÓN Alerta de seguridad Indica un peligro posible de lesiones personales. Lea el manual del operador Para reducir el riesgo de lesiones, el usuario debe leer y comprender el manual del operador antes de usar este producto. no .../min V min Protección ocular Siempre - Ryobi P507 | Manual 1 - Page 26
antes de enganchar el seguro. NOTA: No ponga a funcionar la sierra circular con el seguro del husillo puesto. n Unte una gota de aceite en ntela en el husillo. NOTA: Los dientes de la sierra apuntan hacia arriba en la parte delantera de la sierra. n Vuelva a colocar la arandela de la hoja. n - Ryobi P507 | Manual 1 - Page 27
hoja tan gruesa que no pueda acoplarse la rondana exterior de la hoja en las partes planas del husillo. DESMONTAJE DE LA HOJA DE CORTE Vea la figura 2, pá retire el paquete de baterías de la herramienta cuando esté ensamblando partes, realizando ajustes, limpiando o cuando ésta no esté en uso. - Ryobi P507 | Manual 1 - Page 28
Vea la figura 8, página 13. La protección inferior montada en la sierra circular es para protegerlo a usted y para su seguridad. No la altere de ninguna corte deseada. Localice la escala de profundidad de corte, en la parte posterior de la protección superior de la hoja. Mantenga horizontal la - Ryobi P507 | Manual 1 - Page 29
pieza de trabajo, la hoja queda expuesta en la parte inferior de la sierra hasta que cierra la protección guía de borde para hacer cortes al hilo. Consulte la Guía EDGE OPCIONAL más adelante en este manual. Al efectuar cortes al hilo largos o anchos con la sierra utilice una guía. Asegure la - Ryobi P507 | Manual 1 - Page 30
dedos puede tener como resultado el contacto con la hoja, por consecuencia posibles lesiones serias. Deje descansar la parte frontal de la base contra la pieza de trabajo, con la parte posterior del mango elevada de manera que la hoja no toque la pieza de trabajo. Encienda la sierra y permita - Ryobi P507 | Manual 1 - Page 31
MANTENIMIENTO ADVERTENCIA: Al dar servicio a la unidad, sólo utilice piezas de repuesto idénticas. El empleo de piezas diferentes puede causar un peligro o dañar el producto. ADVERTENCIA: Siempre póngase protección ocular con protección lateral con la marca de cumplimiento de la norma ANSI Z87.1. - Ryobi P507 | Manual 1 - Page 32
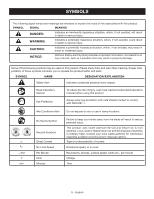
(pour serrer, para apretar) E - To loosen (pour desserrer, para aflojar) Fig. 4 KICKBACK - BLADE SET TOO DEEP (REBOND - PROFONDEUR DE COUPE EXCESSIVE, CONTRAGOLPE - LA HOJA SE AJUSTO MUY PROFUNDA) 12 A - Depress latches to remove battery pack (appuyer sur les loquets pour libérer le blocpiles, para - Ryobi P507 | Manual 1 - Page 33
Fig. 5 INCORRECT SUPPORT (SUPPORT INCORRECT, SOPORTE INCORRECTO) Fig. 8 A Fig. 11 WRONG (MAL, INCORRECTO) Fig. 6 CORRECT BLADE DEPTH SETTING = BLADE EXPOSED 1/4 in. (6.35 mm) OR LESS ON UNDERSIDE OF WORKPIECE (RÉGLAGE DE PROFONDEUR DE COUPE CORRECT = LA LAME DÉPASSE DE 1/4 po (6,4 mm) OU MOINS AU - Ryobi P507 | Manual 1 - Page 34
Fig. 14 TOP VIEW OF SAW (VUE SUPÉRIEURE DE SCIE, VISTA SUPERIOR DE LA SIERRA) Fig. 17 B Fig. 19 A A B C A - 45º blade guide notch (encoche guide de lame de 45°, muesca guía de la hoja de 45°) B - Guideline (ligne de coupe, línea guía) C - 0º blade guide notch (encoche guide de lame de 0°, muesca - Ryobi P507 | Manual 1 - Page 35
NOTES/NOTAS 15 - Ryobi P507 | Manual 1 - Page 36
/6-1/2 IN., 18 VOLT CIRCULAR SAW MANUEL D'UTILISATION/SCIE CIRCULAIRE (6-1/2 po) 18 V MANUAL DEL OPERADOR/SIERRA CIRCULAR (6-1/2 pulg.) 18 V P507 To request service, purchase replacement parts, locate an Authorized Service Center and obtain Customer or Technical Support: Visit www.ryobitools.com
-
 1
1 -
 2
2 -
 3
3 -
 4
4 -
 5
5 -
 6
6 -
 7
7 -
8
-
9
-
10
-
11
-
12
-
13
-
14
-
15
-
16
-
17
-
18
-
19
-
20
-
21
-
22
-
23
-
24
-
25
-
26
-
27
-
28
-
29
-
30
-
31
-
32
-
33
-
34
-
35
-
36
 |
 |
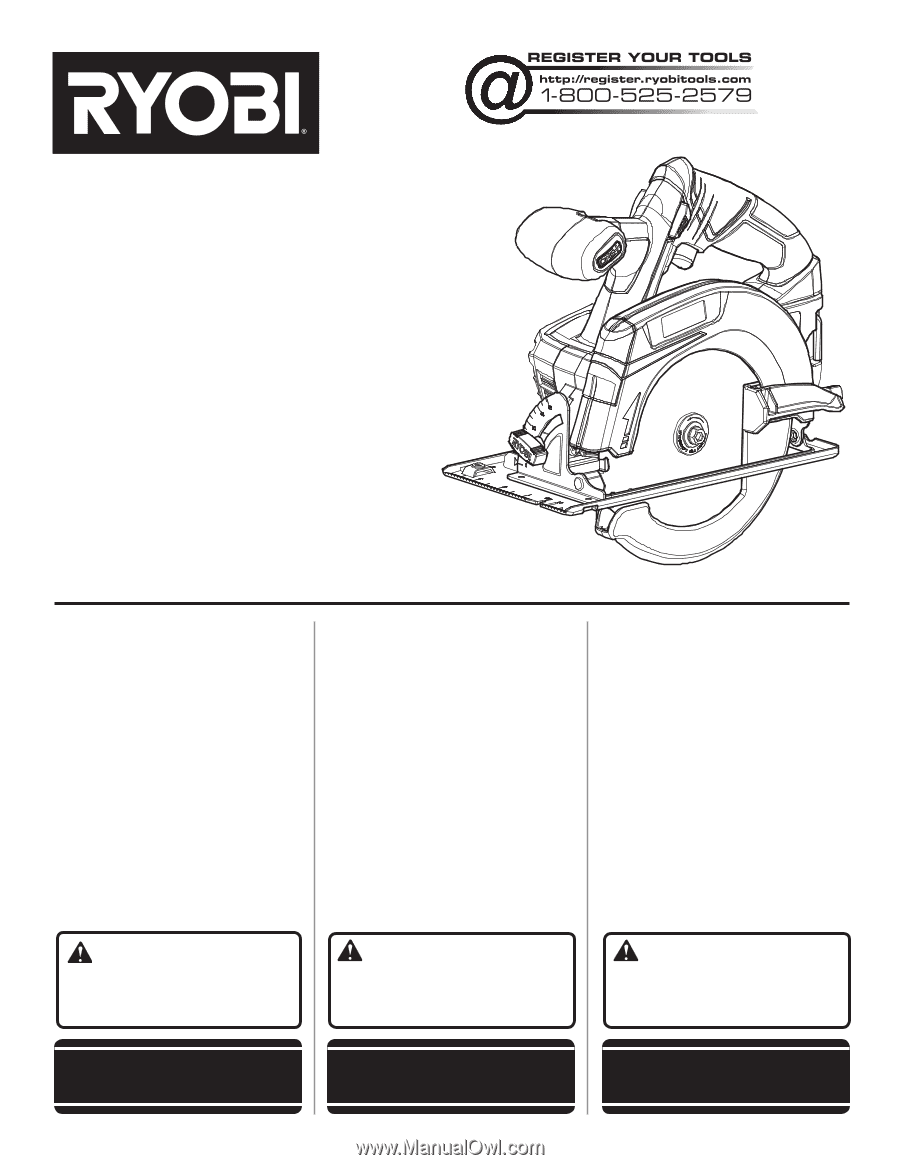
OPERATOR’S MANUAL
MANUEL D’UTILISATION
MANUAL DEL OPERADOR
6-1/2 in., 18 VOLT CIRCULAR SAW
SCIE CIRCULAIRE 165 mm
(6-1/2 po) 18 V
SIERRA CIRCULAR 165 mm
(6-1/2 pulg.) 18 V
P507
WARNING:
To reduce the
risk of injury, the user must read and
understand the operator’s manual
before using this product.
SAVE THIS MANUAL FOR
FUTURE REFERENCE
ADVERTENCIA:
Para reducir
el riesgo de lesiones, el usuario debe leer
y comprender el manual del operador
antes de usar este producto.
AVERTISSEMENT :
Pour
réduire les risques de blessures,
l’utilisateur doit lire et veiller à bien
comprendre le manuel d’utilisation avant
d’employer ce produit.
GUARDE ESTE MANUAL
PARA FUTURAS CONSULTAS
INCLUDES:
Circular Saw, 6-1/2 in. Blade,
Blade Wrench, Operator’s Manual
TABLE OF CONTENTS
****************
General Power Tool Safety
Warnings
.........................................
2-3
Circular Saw Safety Warnings
.........
3-4
Symbols
..............................................
5
Features
..............................................
6
Assembly
.........................................
6-7
Operation
.......................................
7-10
Adjustments
.....................................
10
Maintenance
.....................................
11
Accessories
......................................
11
Illustrations
..................................
12-14
Parts Ordering / Service
.....
Back Page
INCLUT :
Scie circulaire, lame de 165 mm
(6-1/2 po), clé de lame, manuel d’utilisation
TABLE DES MATIÈRES
****************
Avertissements de sécurité relatives
aux outils électriques
......................
2-3
Avertissements de sécurité
relatifs au scie circulaire
..................
3-4
Symboles
............................................
5
Caractéristiques
.................................
6
Assemblage
.....................................
6-7
Utilisation
.......................................
7-10
Réglages
...........................................
10
Entretien
...........................................
11
Accessoires
......................................
11
Illustrations
..................................
12-14
Commande de pièces /
réparation
..........................
Page arrière
INCLUYE:
Sierra circular, hoja de 165 mm
(6-1/2 pulg.), llave de la hoja, manual del
operador
ÍNDICE DE CONTENIDO
****************
Advertencias de seguridad
para herramientas eléctricas
...........
2-3
Advertencias de seguridad
sierra circular
...................................
3-4
Símbolos
............................................
5
Características
...................................
6
Armado
............................................
6-7
Funcionamiento
.............................
7-10
Ajustes
..............................................
10
Mantenimiento
..................................
11
Accesorios
........................................
11
Ilustraciones
................................
12-14
Pedidos de piezas /
servicio
..........................
Pág. posterior
CONSERVER CE MANUEL
POUR FUTURE RÉFÉRENCE