Ryobi RB61 RB61 (Trilingual) - Page 8
Operation
 |
View all Ryobi RB61 manuals
Add to My Manuals
Save this manual to your list of manuals |
Page 8 highlights
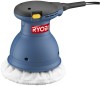
OPERATION WARNING: Do not allow familiarity with tools to make you careless. Remember that a careless fraction of a second is sufficient to inflict serious injury. WARNING: Always wear eye protection with side shields marked to comply with ANSI Z87.1. Failure to do so could result in objects being thrown into your eyes resulting in possible serious injury. WARNING: Do not use any attachments or accessories not recommended by the manufacturer of this tool. The use of attachments or accessories not recommended can result in serious personal injury. APPLICATIONS You may use this tool for the purpose listed below: Polishing and buffing cars, boats, RVs, personal watercraft, motorcycles, hardwood floors, and large furniture PREPARE THE SURFACE For best results, the surface should be clean and dry. Most high-gloss surfaces can be cleaned with a mild soap and water solution. For removal of stubborn dirt such as road tar, grease, and bug stains, you can use a mild ammonia solution such as that used in glass cleaners. Before using any cleaning product, check the label for recommended applications and follow the directions for use. Never apply cleaner directly onto surface to be polished. Apply to a clean cloth then use the cloth to clean the surface. Do not use any type of abrasive cleanser as it may damage or scratch the surface. WARNING: Before connecting the buffer/polisher to the power source, always check to make sure the switch is not in ON position. Failure to do so could result in accidental starting of the buffer/polisher, resulting in possible serious personal injury. ON/OFF SWITCH See Figure 2, page 11. The ON/OFF switch is located on each side of the buffer/ polisher. To turn the tool ON, push the switch to the left. To turn the tool OFF, push the switch to the right. ATTACH THE APPLICATION BONNET See Figure 3, page 11. WARNING: To avoid injury, always make sure the buffer/polisher is unplugged before attaching bonnets. The buffer/polisher comes with two bonnets, one for applying the polish to the surface and another for buffing the surface. The application bonnet is the one made of terry cloth. To attach the application bonnet to the pad, slip the bonnet edges completely over the pad. APPLY POLISH TO THE APPLICATION BONNET Most polishes are either in paste or liquid form. Before using any polish, read all directions on appropriate applications and proper use. APPLICATION OF PASTE POLISH See Figure 4, page 11. Use a putty knife or other flat, blunt object to apply approximately one rounded teaspoon of paste onto the bonnet. Evenly spread the paste over the entire surface of the bonnet. NOTE: Do not apply paste directly to the surface being polished. APPLICATION OF LIQUID POLISH See Figure 5, page 11. Apply a small circle of liquid (about the size of a half-d ollar) around the center of the bonnet, followed by two more rings, each slightly larger than the previous one. After the first application, the bonnet will not absorb as much polish. Apply two rings of polish to the bonnet for subsequent applications, using half of the initial quantity. APPLY POLISH TO SURFACE See Figure 6, page 11. While holding the buffer/polisher firmly against the surface, slide the ON/OFF switch to the ON position (to the left). Always start and stop the polisher on or against the surface being polished. Begin by applying polish to larger flat surfaces, such as the hood, trunk, and roof. Use a broad sweeping motion in a crisscross pattern. Do not press down on the surface with the polisher. Let the orbital action of the pad and bonnet do the work. 8 - English
-
 1
1 -
2
-
 3
3 -
 4
4 -
 5
5 -
 6
6 -
 7
7 -
 8
8 -
 9
9 -
 10
10 -
 11
11 -
 12
12 -
 13
13 -
14
-
15
-
16
-
17
-
18
-
19
-
20
-
21
-
22
-
23
-
24
-
25
-
26
-
27
-
28
-
29
-
30
-
31
-
32
 |
 |
