Ryobi TS1144 Operation Manual - Page 16
Dust Bag, Work Clamp, Warning, To Install/replace The Blade
 |
View all Ryobi TS1144 manuals
Add to My Manuals
Save this manual to your list of manuals |
Page 16 highlights
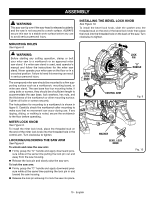
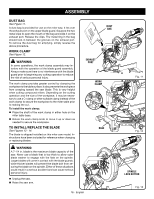
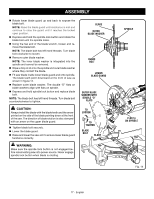
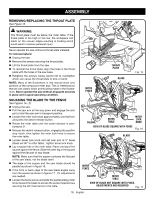
ASSEMBLY DUST BAG See Figure 11. A dust bag is provided for use on the miter saw. It fits over the exhaust port on the upper blade guard. Squeeze the two metal clips to open the mouth of the bag and slide it on the exhaust port. Release the clips. The metal ring in the bag should lock in between the grooves on the exhaust port. To remove the dust bag for emptying, simply reverse the above procedure. WORK CLAMP tooltip See Figure 12. WARNING: In some operations, the work clamp assembly may interfere with the operation of the blade guard assembly. Always make sure there is no interference with the blade guard prior to beginning any cutting operation to reduce the risk of serious personal injury. The work clamp provides greater control by clamping the workpiece to the table surface. It also prevents the workpiece from creeping toward the saw blade. This is very helpful when cutting compound miters. Depending on the cutting operation and the size of the workpiece, it may be necessary to use a C-clamp or other suitable clamp instead of the work clamp to secure the workpiece to the miter table prior to making the cut. To install the work clamp: Place the shaft of the work clamp in either hole on the miter table base. Rotate the work clamp knob to move it up or down as needed to secure the workpiece. TO INSTALL/REPLACE THE BLADE See Figures 13 - 14. The blade is shipped installed on this miter saw model. Instructions have been included for reference when changing or replacing blades. WARNING: A 7-1/4 in. blade is the maximum blade capacity of the saw. Never use a blade that is too thick to allow outer blade washer to engage with the flats on the spindle. Larger blades will come in contact with the blade guards, while thicker blades will prevent the blade bolt from securing the blade on the spindle. Either of these situations could result in a serious accident and can cause serious personal injury. Unplug the saw. Raise the saw arm. DUST BAG EXHAUST PORT WORK CLAMP BASE 16 - English Fig. 11 Fig. 12 SPINDLE LOCK BUTTON Fig. 13
-
 1
1 -
2
-
3
-
4
-
5
-
6
-
7
-
8
-
9
-
10
-
 11
11 -
 12
12 -
 13
13 -
 14
14 -
 15
15 -
 16
16 -
 17
17 -
 18
18 -
 19
19 -
 20
20 -
 21
21 -
22
-
23
-
24
-
25
-
26
-
27
-
28
-
29
-
30
-
31
-
32
-
33
-
34
-
35
-
36
-
37
-
38
-
39
-
40
-
41
-
42
-
43
-
44
-
45
-
46
-
47
-
48
-
49
-
50
-
51
-
52
-
53
-
54
-
55
-
56
-
57
-
58
-
59
-
60
-
61
-
62
-
63
-
64
-
65
-
66
-
67
-
68
-
69
-
70
-
71
-
72
-
73
-
74
-
75
-
76
-
77
-
78
-
79
-
80
-
81
-
82
-
83
-
84
-
85
-
86
-
87
-
88
-
89
-
90
-
91
-
92
 |
 |
