Ryobi YN600A Operation Manual - Page 10
Warning
 |
View all Ryobi YN600A manuals
Add to My Manuals
Save this manual to your list of manuals |
Page 10 highlights
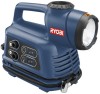
OPERATION Turn on the inflator and inflate item to desired pressure. To determine air pressure using the pressure gauge, refer to instructions in the "Using the Pressure Gauge" section later in the manual. NOTE: When inflating items of 10 PSI., .69 BAR, .70 KG/ CM2 or less, inflate in short bursts and check after each burst by feel or with a reliable measuring device to determine accurate pressure. Turn off the unit once inflation is complete. INSTALLING NOZZLES See Figure 10, page 13. WARNING: Improperly attached nozzles can become detached under pressure and cause serious injury. Possible air leaks can cause faulty pressure readings. Make sure all connections are tightly secured. The high pressure air hose can be used with the provided nozzles to inflate a variety of items. Position air chuck clamp in the unlock position perpendicular to the high pressure air hose. Insert nozzle into air chuck and push air chuck clamp down until it locks into place. To remove, lift air chuck clamp up and remove nozzle from air chuck. NOZZLE FUNCTIONS See Figures 10 - 11, page 13. The inflator comes with two inflation nozzles and a sports ball inflation needle. The inflation nozzles can be used to inflate items with small pinch valves, which usually require the user to inflate them by blowing air into them. NOTE: When not in use, the inflation nozzles can be stored in the accessory compartment. The sports ball needle can be used to inflate any type of sports ball or any other item that requires an inflation sports ball needle. To use the sports ball needle: Insert sports ball needle into sports ball valve and in- flate. NOTE: When inflating items of 10 PSI., .69 BAR, .70 KG/ CM2 or less, inflate in short bursts and check after each burst by feel or with a reliable measuring device to determine accurate pressure. Remove sports ball needle after inflation. NOTE: Pressure required for most sports balls is too low for accurate reading on gauge. USING THE PRESSURE GAUGE See Figure 12, page 14. Pressure gauge accuracy is ±5 psi from 0-100 psi and ±7psi from 100-150 psi. To use the pressure gauge: Place pressure hose onto valve stem. NOTE: Do not turn the inflator on. Wait 5-7 seconds for an accurate pressure readout. NOTE: The pressure readout on the gauge while inflating is a measurement of the fluctuating pressure between the item and the high pressure hose. To get an accurate reading, stop inflating and follow above instructions for reading the air pressure. WARNING: Since the pressure gauge is not calibrated, and is therefore not binding for exact values, tire pressure must be checked using a reliable measuring device before driving a vehicle with vehicle tires inflated with the inflator. Driving a vehicle with improperly inflated tires could result in serious injury. PreSET Pressure See Figure 12, page 14. When the preset pressure feature is used, the inflator will automatically stop inflating once a predetermined pressure has been reached. To use the preset pressure feature: Turn off the inflator. Place pressure hose onto valve stem. Turn the preset dial until index point is on desired shutoff pressure. Turn the inflator on. The inflator will continue to run until desired pressure is reached. Once the desired pressure is reached, the unit will automatically shutoff. 10 - English
-
 1
1 -
2
-
3
-
4
-
 5
5 -
 6
6 -
 7
7 -
 8
8 -
 9
9 -
 10
10 -
 11
11 -
 12
12 -
 13
13 -
 14
14 -
 15
15 -
16
-
17
-
18
-
19
-
20
-
21
-
22
-
23
-
24
-
25
-
26
-
27
-
28
-
29
-
30
-
31
-
32
-
33
-
34
-
35
-
36
 |
 |
