Samsung 1701MP User Manual (ENGLISH)
Samsung 1701MP Manual
 |
View all Samsung 1701MP manuals
Add to My Manuals
Save this manual to your list of manuals |
Samsung 1701MP manual content summary:
- Samsung 1701MP | User Manual (ENGLISH) - Page 1
SyncMaster 1501MP / 1701MP - Samsung 1701MP | User Manual (ENGLISH) - Page 2
Base Adjusting Your LCD Monitor User Controls User control buttons Direct-Access Features On-Screen Display OSD Functions Screen Adjustment Animation Clips Troubleshooting Check before Calling for Service Problems and Solutions Q & A Specifications General Specifications PowerSaver Preset Timing - Samsung 1701MP | User Manual (ENGLISH) - Page 3
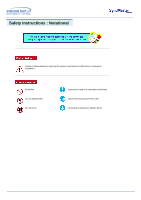
Safety Instructions : Notational Failure to follow directions noted by this symbol could result in bodily harm or damage to equipment. Prohibited Do not disassemble Do not touch - Samsung 1701MP | User Manual (ENGLISH) - Page 4
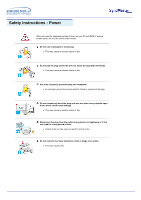
Safety Instructions : Power When not used for extended periods of time, set your PC to DPMS. If using a screen saver, set it to the active screen mode. Do - Samsung 1701MP | User Manual (ENGLISH) - Page 5
when moving it. z This may cause damage to the product or human body. Place the monitor on a flat and stable surface. z The monitor can cause injury by falling. Set down the monitor carefully. z It could be damaged or broken. Do not place the monitor face down. z The TFT-LCD surface may be damaged. - Samsung 1701MP | User Manual (ENGLISH) - Page 6
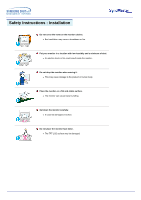
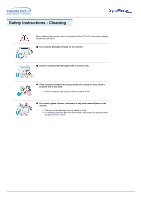
Instructions : Cleaning When cleaning the monitor case or the surface of the TFT-LCD, wipe with a slightly moistened, soft fabric. Do not spray detergent directly on the monitor any small metal objects on the monitor. z This may cause damage, electric shock or a fire. z If a foreign substance gets - Samsung 1701MP | User Manual (ENGLISH) - Page 7
Safety Instructions : Ohter Do not remove cover(or back). No user serviceable parts inside. z This may cause an electric shock or a fire. z Refer servicing to qualified service personnel. If your monitor does not operate normally - in particular, if there are any unusual sounds or smells coming from - Samsung 1701MP | User Manual (ENGLISH) - Page 8
Safety Instructions : Ohter Keep all power adaptors apart. z Possible fire hazard. Keep power adaptor away from any other heat source. z Possible fire hazard. Remove and discard vinyl bag from power adaptor before use. z Possible fire hazard. Always keep power adaptor in well-ventilated area. If you - Samsung 1701MP | User Manual (ENGLISH) - Page 9
Introduction : Unpacking Please make sure the following items are included with your monitor. If any items are missing, contact your dealer. User's Guide and Natural Color/Driver Installation CD Power Cord Signal Cable(15 pin D-Sub) DC Adapter Remote Control / Batteries (CR2025) Quick Setup - Samsung 1701MP | User Manual (ENGLISH) - Page 10
functions, refer to User Controls under Adjusting Your Monitor. The monitor's front configuration may vary slightly depending on the monitor model. 1. Input Signal Indicators 2. TV / VIDEO button 3. PC button 4. EXIT button / AUTO button 5. MENU button 6. Power button / Power indicator 7. Up-Down - Samsung 1701MP | User Manual (ENGLISH) - Page 11
monitor's rear configuration may vary slightly depending on the monitor model. Remove the cover to connect the cables. (Pull the joining part to remove the cover.) A Power (Input) 4 Headphone connection terminal (Output) D Antenna Connection Terminal (When TV is connected) E Anti-Theft Security Lock - Samsung 1701MP | User Manual (ENGLISH) - Page 12
10m) and 30 degrees to the left and right of the monitor's Remote Control Reception sensor. 1. Button Names 1. POWER button 2. PC button 3. MUTE button 4. AUTO / Previous channel button 5. CAPTION button 6. CHANNEL button 7. TV / VIDEO button 8. Up-Down button / Channel button 9. Left-Right button - Samsung 1701MP | User Manual (ENGLISH) - Page 13
cables. 5. Turn on both your computer and the monitor. 6. You may enjoy clear and quality sound from the computer sound card using the monitor speakers. (You don't need to install any separate speakers for your computer.) Contact a local Samsung Electronics service center to buy optional items. - Samsung 1701MP | User Manual (ENGLISH) - Page 14
, VCRs or Camcorders as well as your computer may be connected to the monitor. For detailed information on connecting AV input devices, refer to User Controls under Adjusting Your Monitor. 1. Connecting AV Devices The monitor has AV connection terminals to connect AV input devices like DVDs, VCRs or - Samsung 1701MP | User Manual (ENGLISH) - Page 15
coaxial cable to the Antenna terminal on the rear of the monitor. You need to use a coaxial antenna cable. 2. Turn on the monitor. 3. Select TV using Source button among the external signal adjustment buttons. 4. Select a desired TV channel. As this product is designed for NTSC signals only, you - Samsung 1701MP | User Manual (ENGLISH) - Page 16
then connect the adapter jack to the DC14V power port on the monitor. (Voltage is automatically adjusted by the power adaptor.) 2. Connect the signal cable to the on its rear. 4. Turn on the monitor and Macintosh. Contact a local Samsung Electronics service center to buy optional items. 4. Connecting - Samsung 1701MP | User Manual (ENGLISH) - Page 17
site : http://www.samsung-monitor.com/ (Worldwide) http://www.samsungusa.com/monitor/ (USA) http://www.sec.co.kr/monitor/ (Korea) http://www.samsungmonitor.com.cn/ (China) 1. Windows ME Refer to "Installing the Monitor Driver and User Manual" CD-ROM supplied with the monitor. When inserted into the - Samsung 1701MP | User Manual (ENGLISH) - Page 18
"Installing the Monitor Driver and User Manual" CD-ROM supplied with the monitor. When inserted monitor driver is under certifying MS logo,and this installation don't damage your system. The certified driver will be posted on Samsung Monitor Homepage http://www.samsung-monitor.com/ 6. Monitor driver - Samsung 1701MP | User Manual (ENGLISH) - Page 19
shown here. z Internet web site : http://www.samsung-monitor.com/ (Worldwide) http://www.samsungusa.com/monitor/ (USA) http://www.sec.co.kr/monitor/ (Korea) http://www.samsungmonitor.com.cn/ (China) To install the monitor driver manually, follow the procedures explained below after checking your - Samsung 1701MP | User Manual (ENGLISH) - Page 20
- Installing the Monitor Driver : Manual 5. Click "Update Driver.." and select "Install from a list or.." then click "Next" button. 6. Select "Don't search ,I will.." then click "Next" and then click "Have disk". 7. Click the "Browse" button then choose A:(D:\Driver) and choose your monitor model in - Samsung 1701MP | User Manual (ENGLISH) - Page 21
Monitor Driver : Manual This monitor driver is under certifying MS logo,and this installation don't damage your system. The certified driver will be posted on Samsung Monitor Homepage http://www.samsung-monitor.com/ 9. Click the "Close" button then click "OK" button continually. 10. Monitor driver - Samsung 1701MP | User Manual (ENGLISH) - Page 22
" tab and click "Advanced Properties" button. 4. Select the "Monitor" tab. 5. Click the "Change" button in the "Monitor Type" area. 6. Choose "Specify the location of the driver". 7. Choose "Display a list of all the driver in a specific location.." then click "Next" button. 8. Click the "Have - Samsung 1701MP | User Manual (ENGLISH) - Page 23
Setup - Installing the Monitor Driver : Manual 4. Microsoft® Windows® NT 4.0 Operating System 1. Click Start the level of resolution and vertical frequency by referring to the Preset Display Modes in the user guide. 5. Linux Operating System To execute X-Window, you need to make the X86Config file, - Samsung 1701MP | User Manual (ENGLISH) - Page 24
may be reclined from 0 to 90 degrees. When fully folded (reclined), the base becomes a handy holder for moving the monitor around. 1. Reclining Monitor 1. The monitor may be reclined by approximately 15 degrees without pressing the FOLD button. 2. You need to press the FOLD button to raising the - Samsung 1701MP | User Manual (ENGLISH) - Page 25
Setup - Installing a VESA base : Using the FOLD button 2. Folding Base 1. Disconnect the monitor cables. 2. Fully recline the monitor backward pressing the FOLD button. 3. Reconnect the monitor cables. You may install a VESA base when the monitor base is fully folded. - Samsung 1701MP | User Manual (ENGLISH) - Page 26
before installing a VESA base. Align the four bolt holes (1) on the monitor base with the holes (2) on the VESA base and then fasten the base with the four bolts (3) supplied. Only the supplied bolts should be used. Samsung Electronics will not be responsible for damages caused by using a base other - Samsung 1701MP | User Manual (ENGLISH) - Page 27
this button to turn the monitor on and off. Power Indicator shows PowerSaver mode by green blinking. Refer to Specifications > PowerSaver. 7. - CH + button Moves from one menu item to another vertically or adjusts selected menu values. In TV mode, selects TV channels. For more information, refer - Samsung 1701MP | User Manual (ENGLISH) - Page 28
Adjusting Your Monitor - User Controls : User control buttons Remote Control Buttons For more information on the screen adjustment functions, refer to On-Screen Display. 1. POWER button 2. PC button 3. MUTE button 4. AUTO / Previous channel button 5. CAPTION button 6. CHANNEL button 7. TV / VIDEO - Samsung 1701MP | User Manual (ENGLISH) - Page 29
Adjusting Your Monitor - User Controls : User control buttons 1. POWER button 2. PC button 3. MUTE button 4. AUTO / Previous channel button 5. CAPTION button 6. CHANNEL button 7. TV / VIDEO button 8. Up-Down button / Channel button 9. Left-Right button / Volume button 10. MENU button 11. EXIT button - Samsung 1701MP | User Manual (ENGLISH) - Page 30
Adjusting Your Monitor - User Controls : Direct-Access Features Direct-Access Features let you display Monitor Adjustment Menu by simply pressing Auto button once. Or they are used to adjust monitor functions. You need to activate functions other than Auto Adjustment only when Auto-Access Features - Samsung 1701MP | User Manual (ENGLISH) - Page 31
Adjusting Your Monitor - User Controls : Direct-Access Features 3. Volume When OSD is not on the screen, push the or button to adjust volume. 1. Push 1. Push the button to decrease the channel number. 2. Push the button to increase the channel number. This function is available in TV mode only. - Samsung 1701MP | User Manual (ENGLISH) - Page 32
Adjusting Your Monitor - On-Screen Display : OSD Functions Characters and icons become highlighted The individual color components are also user customizable. 1) Mode 1 : Plain white. 2) Mode 2 : Reddish white. 3) Mode 3 : Bluish white. 4) User Mode : User customizable. 5) Reset : Color parameters - Samsung 1701MP | User Manual (ENGLISH) - Page 33
Adjusting Your Monitor - On-Screen Display : OSD Functions 2. S-Video Screen For detailed information on Screen Adjustment in the S-Video mode, refer to S-Video Screen Adjustment Animation Clips. Screen - Samsung 1701MP | User Manual (ENGLISH) - Page 34
Monitor - On-Screen Display : OSD Functions 4. TV Screen For detailed information on Screen Adjustment in TV mode, refer to TV Screen Adjustment Animation Clips. Screen Adjustment in TV in your particular area. 2) Auto program The TV automatically cycles through all of the available channels and - Samsung 1701MP | User Manual (ENGLISH) - Page 35
Adjusting Your Monitor - On-Screen Display : OSD Functions 5. OSD Control For detailed information on screen adjustment functions, refer to OSD Screen Adjustment Animation Clips. Language You can choose - Samsung 1701MP | User Manual (ENGLISH) - Page 36
Troubleshooting - Check before calling for service Check the following items yourself before calling for service. Contact the service center for problems that you cannot solve by yourself. Self-Test Feature Check | Video mode not supported | Display Adapter Driver | Maintenance and Cleaning | - Samsung 1701MP | User Manual (ENGLISH) - Page 37
, if there is trouble with the PC or the video card, this can cause the monitor to become blank, have poor coloring, noise, Video mode not supported, etc. In this case, first check the source of the problem, and then contact a service center or your dealer. 1. Check if the power cord and the cable - Samsung 1701MP | User Manual (ENGLISH) - Page 38
characters appear on the TV screen. (Refer to Closed Caption) 2. Problems related to Screen Problems related to the monitor screen and their solutions are listed. Problems Screen is blank and power indicator is off "Check Signal Cable" message "Video mode not supported" message Picture rolls - Samsung 1701MP | User Manual (ENGLISH) - Page 39
OSD memory. z The monitor is using its power management system. z Move the computer's mouse or press a key on the keyboard z Check if OSD Lock/Unlock is on by pressing Menu button. z If the problem persists, contact the service center. 3. Problems related to Audio Problems related to audio signals - Samsung 1701MP | User Manual (ENGLISH) - Page 40
can I set the Power Saving function? How can I clean the outer case/LCD Panel? Answer Frequency can be changed by reconfiguring the video card. Note that video card support can vary, depending on the version of the driver used. (Refer to the computer or the video card manual for details.) Windows - Samsung 1701MP | User Manual (ENGLISH) - Page 41
Design and specifications are subject to change without prior notice. General Model Name LCD Panel Size Display area Pixel Pitch Type Viewing Angle Synchronization Horizontal Vertical SyncMaster 1501MP 15,0 inch (Diagonal) 304,128 (H) x 228,096 (V) 0,297 (H) x 0,297 (V) a-si TFT active matrix - Samsung 1701MP | User Manual (ENGLISH) - Page 42
computer systems will provide the best operating conditions and monitor settings. In most cases, monitor installation will proceed automatically, unless the user wishes to select alternate settings. Dot Acceptable TFT LCD panel manufactured by using advanced semiconductor technology with precision - Samsung 1701MP | User Manual (ENGLISH) - Page 43
SyncMaster 1701MP Design and specifications are subject to change without prior notice. General Model Name SyncMaster 1701MP LCD Panel Size 17,0 inch (Diagonal) Display area 337.92 (H) x 270.336 (V) Pixel Pitch 0,264 (H) x 0,264 (V) Type a-si TFT active matrix Viewing Angle 170 (H) / - Samsung 1701MP | User Manual (ENGLISH) - Page 44
: General Specifications SyncMaster 1701MP Environmental considerations Operating Temperature : 50°F ~ 104°F(10°C ~ 40°C) Humidity : 10% ~ 80%, non-condensing Storage Temperature : -4°F ~113°F (-20°C ~ 45°C) Humidity : 5% ~ 95%, non-condensing Plug and Play Capability This monitor can be - Samsung 1701MP | User Manual (ENGLISH) - Page 45
Consumption Normal Operation Green Less than 45.0W SyncMaster 1701MP Power saving mode EPA/ENERGY 2000 Green, Blinking Less than 1W (120 Vac) Less than 2W (230 Vac) Power Switch off Black Less than 1W (120 Vac) Less than 2W (230 Vac) This monitor is EPA ENERGY STAR® compliant and ENERGY2000 - Samsung 1701MP | User Manual (ENGLISH) - Page 46
Specifications : Preset Timing Modes If the signal transferred from the computer is the same as the following Preset Timing Modes, the screen will be adjusted automatically. However, if the signal differs, the screen may go blank while the power LED is on. Refer to the video card manual and adjust - Samsung 1701MP | User Manual (ENGLISH) - Page 47
Specifications : Preset Timing Modes If the signal transferred from the computer is the same as the following Preset Timing Modes, the screen will be adjusted automatically. However, if the signal differs, the screen may go blank while the power LED is on. Refer to the video card manual and adjust - Samsung 1701MP | User Manual (ENGLISH) - Page 48
ägen 4 Samsung support Sverige: 020-46 46 46 Samsung support Danmark : 8088-4646 Samsung support Norge: 8001-1800 Samsung support Finland: 0800-118001 Tel +46 8 590 966 00 Fax +46 8 590 966 50 http://www.samsung.se/ HUNGARY : Samsung Electronics Magyar Rt. 1039, Budapest, Lehel u. 15-17. Tel - Samsung 1701MP | User Manual (ENGLISH) - Page 49
800 220 120 http://www.samsung.pt/ NETHERLANDS/BELGIUM/LUXEMBOURG : Samsung Electronics Benelux B. V. Fleminglaan 12 2289 CP Rijiswijk, NEDERLANDS Service and informatielijn ; Belgium :0800-95214, http://www.samsung.be/ Netherlands : 0800-2295214, http://www.samsung.nl/ CHILE : SONDA S.A. Teatinos - Samsung 1701MP | User Manual (ENGLISH) - Page 50
flickering of the screen can be detected. To avoid this problem, there is a Flicker-free Mode using a vertical frequency TVs. Plug & Play This is a function that provides the best quality screen for the user by allowing the computer and the monitor to exchange information automatically. This monitor - Samsung 1701MP | User Manual (ENGLISH) - Page 51
., LTD America QA Lab of Samsung 3351 Michelson Drive, Suite #290, Irvine, CA92612 USA Tel) 949-975-7310 Fax) 949-922-8301 Warning User must use shielded signal interface cables to maintain FCC compliance for the product. Provided with this monitor is a detachable power supply cord with IEC320 style - Samsung 1701MP | User Manual (ENGLISH) - Page 52
Regulatory MPR II Compliance This monitor complies with SWEDAC(MPR II) 1996+A12/A13/A14:1999 - Electromagnetic Immunity z EN61000-3-2:1995+A1/A2:1998 - Power Line Harmonics z EN61000-3-3:1995 - Voltage Fluctuations z EN60065:1997 or EN60095:1998 use the equipment according to the instruction manual. - Samsung 1701MP | User Manual (ENGLISH) - Page 53
encouraging the adaptation of goods and services to the environment.The main problem as far as monitors and other electronic equipment are concerned its power consumption to a lower level, in one or more stages. The length of time to reactivate the monitor shall be reasonable for the user. Labelled - Samsung 1701MP | User Manual (ENGLISH) - Page 54
Information : Regulatory Environmental Requirements Brominated flame retardants are present in printed circuit boards, cables, wires, casings and housings. In turn, they delay the spread of fire. Up to thirty percent of the plastic in a computer casing can consist of flame retardant substances. - Samsung 1701MP | User Manual (ENGLISH) - Page 55
of goods and services to the environment. The main problem, as far as after a certain period of inactivity, shall reduce its power consumption to a lower level in one or more stages time to reactivate the computer shall be reasonable for the user. Below you will find a brief summary of the - Samsung 1701MP | User Manual (ENGLISH) - Page 56
the labelled unit. There is however one exception. Mercury is, for the time being, permitted in the back light system of flat panel monitors as today there is no commercially available alternative. TCO aims on removing this exception when a Mercury free alternative is available. CFCs (freons) The - Samsung 1701MP | User Manual (ENGLISH) - Page 57
requirements: Ergonomics Good visual ergonomics and image quality in order to improve the working environment for the user and to reduce sight and strain problems. Important parameters are luminance, contrast, resolution, reflectance, colour rendition and image stability. Energy z Energy-saving mode - Samsung 1701MP | User Manual (ENGLISH) - Page 58
the monitor. The Natural Color S/W is the very solution for this problem. It is a color administration system developed by Samsung install the Natural Color software. To install the program manually, insert the CD included with the Samsung monitor into the CDROM Drive, click the [Start] button - Samsung 1701MP | User Manual (ENGLISH) - Page 59
use it without uneasiness. SyncMaster 1501MP { For example, the number of TFT LCD pixels that is contained in this product are 2,359,296. SyncMaster 1701MP { For example, the number of TFT LCD pixels that is contained in this product are 3,932,160. 3. When you clean the monitor and the panel outside - Samsung 1701MP | User Manual (ENGLISH) - Page 60
Association; the ENERGY STAR name and logo are registered trademarks of the U.S. Environmental Protection Agency (EPA). As an ENERGY STAR Partner, Samsung Electronics Co., Ltd. has determined that this product meets the ENERGY STAR guidelines for energy efficiency. All other product names mentioned
-
 1
1 -
 2
2 -
 3
3 -
 4
4 -
 5
5 -
 6
6 -
 7
7 -
8
-
9
-
10
-
11
-
12
-
13
-
14
-
15
-
16
-
17
-
18
-
19
-
20
-
21
-
22
-
23
-
24
-
25
-
26
-
27
-
28
-
29
-
30
-
31
-
32
-
33
-
34
-
35
-
36
-
37
-
38
-
39
-
40
-
41
-
42
-
43
-
44
-
45
-
46
-
47
-
48
-
49
-
50
-
51
-
52
-
53
-
54
-
55
-
56
-
57
-
58
-
59
-
60
 |
 |
SyncMaster 150
1
MP / 170
1
MP