Samsung 211MP Owners Instructions - Page 7
Inserting the Batteries in the Remote Control
 |
View all Samsung 211MP manuals
Add to My Manuals
Save this manual to your list of manuals |
Page 7 highlights
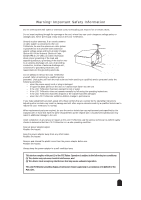
Unpacking Your LCD TV/Monitor Please make sure the following items are included with your LCD TV/Monitor. If any items are missing, contact your dealer. Warranty Card (Not available in all locations) Owner's Instructions Hexagonal wrench (BN80-00001A) LCD TV/Monitor & Speakers Power SOURCE AUTO DISPLAY STILL P.STD S.STD CH VOL MENU CH VOL MUTE EXIT 1 2 3 4 5 6 7 +100 SLEEP 8 9 PRE-CH 0 V.DOLBY ASPECT MTS ADD/ERASE CH.SCAN PBP LOCATE SIZE PIP ON V.CHIP CAPTION Installation CD (BH59-00179A) Remote Control (BN59-00226A) & Batteries (AAA x 2) (4301-000121) Power Cord (BH39-10339X) DC Adapter (BN44-00051D) PC Stereo Cable (BH39-00120A) 15-pin D-Sub Signal Cable (BN39-00115A) Inserting the Batteries in the Remote Control 1 Remove the cover on the rear of the remote control by pressing the downwards and then pulling firmly to remove it as shown in the figure. 2 Insert two R03, UM4, "AAA" 1.5V or equivalent batteries, taking care to respect the polarities: x + on the battery against + on the remote control x - on the battery against - on the remote control 3 Replace the cover by aligning it with the base of the remote control and pressing it back into place. ➣ Do not mix battery types, i.e. alkaline and manganese. 7
-
 1
1 -
 2
2 -
 3
3 -
 4
4 -
 5
5 -
 6
6 -
 7
7 -
 8
8 -
 9
9 -
 10
10 -
 11
11 -
 12
12 -
13
-
14
-
15
-
16
-
17
-
18
-
19
-
20
-
21
-
22
-
23
-
24
-
25
-
26
-
27
-
28
-
29
-
30
-
31
-
32
-
33
-
34
-
35
 |
 |
