Samsung DIGIMAX L60 User Manual
Samsung DIGIMAX L60 Manual
 |
View all Samsung DIGIMAX L60 manuals
Add to My Manuals
Save this manual to your list of manuals |
Samsung DIGIMAX L60 manual content summary:
- Samsung DIGIMAX L60 | User Manual - Page 1
- Samsung DIGIMAX L60 | User Manual - Page 2
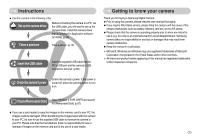
Getting to know your camera Thank you for buying a Samsung Digital Camera. ƃ Prior to using this camera, please read the user manual thoroughly. ƃ If you require After Sales service, please bring the camera and the cause of the camera malfunction (such as battery, Memory card etc.) to the A/S centre - Samsung DIGIMAX L60 | User Manual - Page 3
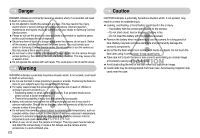
must contact your dealer or Samsung Camera Service centre. Do not continue to use the camera as this may cause a fire or electric shock. ƈ Do not insert or drop metallic or inflammable foreign objects into the camera through access points e.g. the memory card slot and battery chamber. This may cause - Samsung DIGIMAX L60 | User Manual - Page 4
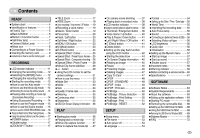
Requirements ōōōōō63 ƃAbout the software 63 ƃSetting up the application software ō64 ƃStarting PC mode 66 ƃRemoving the removable diskōō68 ƃSetting up the USB Driver for MAC ō68 ƃUsing the USB Driver for MAC ōōō68 ƃRemoving the USB Driver for Windows 98SE ō69 ƃDigimax Master 69 ƃFAQ 72 ŝ3Ş - Samsung DIGIMAX L60 | User Manual - Page 5
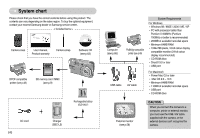
Samsung service centre. < Included items > Camera case User manual, Product warranty Camera strap Software CD (see p.63) DPOF compatible printer (see p.49) SD memory card / MMC (see p.9) AC cord ŝ4Ş Rechargeable battery (SLB-0837) Charger (SBC-L5) Computer (see p.66) USB cable PictBridge - Samsung DIGIMAX L60 | User Manual - Page 6
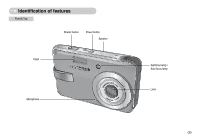
Identification of features Front & Top Shutter button Power button Speaker Flash Microphone Self-timer lamp / Auto focus lamp Lens ŝ5Ş - Samsung DIGIMAX L60 | User Manual - Page 7
Identification of features Back & Bottom Camera status lamp LCD monitor E (Effects) button Tripod socket Zoom W button (Thumbnail) Zoom T button (Digital zoom) M (Mode) button Strap eyelet + / - button, Delete button 5 function button Play mode button ŝ6Ş - Samsung DIGIMAX L60 | User Manual - Page 8
Bottom / 5-function button Memory card slot Battery holder Battery chamber cover Battery chamber Voice memo / USB cable is inserted to a PC Transmitting Data with a PC When the USB cable is inserted to a printer When the printer is printing Description The lamp turns on and off when the camera - Samsung DIGIMAX L60 | User Manual - Page 9
about the camera mode setting. MODE Samsung's standard conditions and Shooting conditions and may vary depending on the way of user's usage. INFORMATION Important information about battery usage ƃ When the camera is not in use, turn off the camera power. ƃ Please remove the battery if the camera - Samsung DIGIMAX L60 | User Manual - Page 10
perfectly normal. ƃ Do not use a memory card that is used in another digital camera. To use the memory card in this camera, format the memory card using this camera. ƃ Do not use a memory card formatted by another digital camera or memory card reader. ƃ If the memory card is subjected to any of the - Samsung DIGIMAX L60 | User Manual - Page 11
cause damage to data in the memory card. ƈ The camera can use SD Memory Cards and MMC (Multi Media Cards). Please consult the enclosed manual for using the MMC Cards. Card pins Write protect switch Label [SD (Secure Digital) memory card] The SD memory card has a write protect switch that prevents - Samsung DIGIMAX L60 | User Manual - Page 12
ۃ [Image & Full Status] No. Description 1 Recording mode 2 Battery 3 Continuous shot Icons AEB Page p.13~16 p.9 p.35 No. Description 4 Flash 5 Self-timer 6 Macro 7 Metering 8 Card inserted indicator 9 Auto focus frame 10 Camera shake warning 11 Date / Time 12 Exposure - Samsung DIGIMAX L60 | User Manual - Page 13
camera and [MODE], [MODE SET] menu. Auto, Program, movie clip, scene (night, portrait, children, landscape, text recognition, close-up, sunset, dawn, backlight, fireworks, beach & snow) camera modes are available. ƃ Selecting the [MODE] menu 1. Insert the battery (p.9). 2. Insert the memory card - Samsung DIGIMAX L60 | User Manual - Page 14
will display. 6. Press the M (Mode) button located on the back of the camera and the mode selection menu will display. 7. To select the Auto, Program, or Scene modes, press the Left / Right button. To move between the Auto, Manual, Movie clip menu line and Scene menu line, press the Up / Down button - Samsung DIGIMAX L60 | User Manual - Page 15
for as long as the available recording time of the memory capacity allows. 1. Select the [FULL] sub menu on the M (Mode) button (p.13). 3. Point the camera towards the subject and compose the image by using the below. - Image size : 640X480, 320X240 (user selectable) - Movie clip file type : - Samsung DIGIMAX L60 | User Manual - Page 16
Starting the recording mode ƈ How to use the Program mode Selecting the automatic mode will configure the camera with optimal settings and you can manually configure various functions. 1. Select the [FULL] sub menu on the [MODE] menu (p.12). 2. Select the Program mode by pressing the M (Mode) - Samsung DIGIMAX L60 | User Manual - Page 17
button to confirm focus and flash battery charge. Press the shutter button all way down to take the picture. [Lightly press the shutter button] [Press the shutter button] ƈ The available memory capacity may vary depending on shooting conditions and camera settings. ƈ When the Flash Off or Slow - Samsung DIGIMAX L60 | User Manual - Page 18
. : When the maximum (3X) optical zoom is selected, pressing the ZOOM T button activates the digital zoom software. Releasing ZOOM T button stops the digital zooming at the required setting. Once the maximum digital zoom (5X) is achieved, pressing the ZOOM T button will have no effect. Pressing the - Samsung DIGIMAX L60 | User Manual - Page 19
button continuously will set the camera to its minimum zoom setting i.e. the subject appears at its furthest from the camera. Pressing the ZOOM W button Pressing the ZOOM W button [TELE zoom] [Optical zoom 2X] [WIDE zoom] Digital zoom WIDE Optical zoom Digital zoom : When the digital zoom is - Samsung DIGIMAX L60 | User Manual - Page 20
setting is completed. [Preparing for Voice Memo] Stop:Shutter [Recording Voice Memo] 3. Press the shutter button and take a picture. The picture is stored on the memory card is selected, it is possible that camera shake will occur. Take care not to shake the camera. ƃ When you take a picture - Samsung DIGIMAX L60 | User Manual - Page 21
button halfway. When the green auto focus frame lights up, it means the camera is focused on the subject. Be careful not to press the SHUTTER button all 3. With the SHUTTER button still pressed down only halfway, move the camera to recompose your picture as desired, and then press the SHUTTER button - Samsung DIGIMAX L60 | User Manual - Page 22
life of the battery. ƃ Under normal operating conditions the charging time for the flash is normally less than 5 seconds. If the battery is weak, the reflecting of the flash light from the atmospheric dust. It is not camera malfunction. ƃ Flash mode indicator Menu tab Flash mode Auto flash Auto - Samsung DIGIMAX L60 | User Manual - Page 23
, Self-timer button, Shutter button or Play mode button during the self-timer operation, the self-timer function is cancelled. ƃ Use a tripod to prevent the camera from shaking. ƃ In Movie Clip mode, only the 10SEC self-timer will work. ŝ22Ş - Samsung DIGIMAX L60 | User Manual - Page 24
for confirming data. M (Mode) button ƈ You can turn on the camera with this button. ƈ You can select the desired recording mode. The selectable [MODE] menu. - [STILL & MOVIE] : A recording mode selected in the [MODE SET] menu, Movie clip mode - [FULL] : Auto, Movie clip, Program, Scene modes - Samsung DIGIMAX L60 | User Manual - Page 25
Backlight, Fireworks and Beach & Snow) If a special effect is selected, the rest special effect functions set before are cancelled automatically. ƈ Even if the camera is turned off, the special effect setting will be preserved. To cancel the special effect, select the sub menu in the Colour menu - Samsung DIGIMAX L60 | User Manual - Page 26
Special Effect : Colour ƈ By using the camera's digital processor, it is possible to add special effects to your images. 1. Press the E button in the available camera modes. 2. Select the ( ) menu tab by pressing the Left / Right button. Normal [Still image mode] Normal [Movie clip mode] 3. - Samsung DIGIMAX L60 | User Manual - Page 27
Special Effect : Preset focus frames ƃ Moving and changing the focus frame You can change the focus frame after selecting a Range menu. 1. Point the camera towards the subject and compose the image by using the LCD monitor. 2. Press the + / - button. 3. The colour of focus frame turns white. Press - Samsung DIGIMAX L60 | User Manual - Page 28
the composite shooting. ƃ If you press the M button, Play mode button or press the Voice recording button twice during the composite shots, each camera working mode is executed. The images captured before will be deleted. ƃ After taking the last composite shooting, press the OK button. And then the - Samsung DIGIMAX L60 | User Manual - Page 29
can select this menu only in the MOVIE CLIP mode. If the memory card is not inserted, this function will not operate. ƃ How to use Movie clip frame stabiliser function Stabilizer becomes disabled. - : Prevents camera shake during movie recording. The recording frame range will become narrower - Samsung DIGIMAX L60 | User Manual - Page 30
steps) ƈ RGB : Allows the user to adjust the R (Red), G (Green), and B (Blue) values of the images to be captured. ƃ Setting RGB Values 1. Press the + saturated in high luminance. The higher the ISO value, the higher the camera's sensitivity to light is and therefore the greater its capacity to take - Samsung DIGIMAX L60 | User Manual - Page 31
set the white balance to the desired value. The value you set wil be displayed on the LCD monitor. AUTO : The camera automatically selects the appropriate white balance settings light bulb) lighting. CUSTOM : Allows the user to set the white balance according to the shooting condition. - Samsung DIGIMAX L60 | User Manual - Page 32
will appear white or you may not get good pictures. Using the LCD monitor to set the camera settings ƈ You can use the menu on the LCD monitor to set up recording functions. The items indicated by are default settings. Menu tab Main menu Sub menu Auto Program Movie Night Portrait Children - Samsung DIGIMAX L60 | User Manual - Page 33
Using the LCD monitor to set the camera settings Menu tab Main menu Sub menu Camera working mode Page Super Fine Fine QUALITY p.34 Normal - FRAME RATE 30 FPS 15 FPS p.34 METERING Multi Spot p.35 Single Continuous SHOOTING p.35 AEB - - Samsung DIGIMAX L60 | User Manual - Page 34
manually configure all functions except the aperture value and shutter speed. : For taking a movie clip : Use this for shooting still images at Move: MODE SET Auto Program Movie Night Portrait Set camera and the [MODE] menu. [STILL & MOVIE] : A still image mode that was selected on the [MODE SET] - Samsung DIGIMAX L60 | User Manual - Page 35
mode] SIZE 640X480 320X240 [MOVIE CLIP mode] INFORMATION ƃ High resolution images use more memory than lower resolution shots. Therefore the higher the resolution selected the fewer will be CLIP mode] INFORMATION ƃ This file format complies with the DCF (Design rule for Camera File system). ŝ34Ş - Samsung DIGIMAX L60 | User Manual - Page 36
for light. This is the preferable setting when you want the subject in this may result in an exposure error. In this circumstance, it is fewer than 3 pictures are available in the memory, the AEB shooting is not available. ſ longer and the blurring caused by camera shake may occur. Sharpness ƈ You - Samsung DIGIMAX L60 | User Manual - Page 37
to save battery life. Refer to page 54 for more information about the auto power off function. Starting play mode ƈ Turn the camera on and select Play mode by pressing the play mode button ( ). The camera can now play back the images stored in the memory. ƈ If the memory card is inserted - Samsung DIGIMAX L60 | User Manual - Page 38
a new file name. ſ The captured movie clip file has same size as the original movie clip (640X480, 320X240). MARK IN:OK Capture:E [Paused] ƈ On camera movie trimming : You can extract desired frames of a movie clip during the movie clip play back. ƃ If the running time is under 10 seconds, the - Samsung DIGIMAX L60 | User Manual - Page 39
the displayed image. Play mode Battery (p.9) Voice Memo (p.40) Protect indicator (p.46) DPOF indicator (p.48) Folder name and Stored image number Using the camera buttons to adjust the camera ƈ In Play mode, you can use the buttons on the camera to conveniently set up the Play mode functions - Samsung DIGIMAX L60 | User Manual - Page 40
Thumbnail / Enlargement button ƃ You can view multiple pictures, enlarge a selected picture, and crop and save a selected area of an image. ƃ Thumbnail display 1. While an image is displayed full screen, press the thumbnail button. 2. The thumbnail display will highlight the image that had been - Samsung DIGIMAX L60 | User Manual - Page 41
. [No] : The trimming menu will disappear. ſ If there is insufficient memory space to save the trimmed image, the image can't be trimmed. ſ To the voice memo button ( ) and the voice memo indicator will display. The camera is now ready to record a voice memo. 3. Press the shutter button to start - Samsung DIGIMAX L60 | User Manual - Page 42
using the 5 function button. E (Effect) button ƈ By using the camera's digital processor, it is possible to add special effects to your images. 1. in negative mode. Delete ( ) button ƈ This deletes images stored on the memory card. 1. Select an image that you want to delete by pressing the LEFT - Samsung DIGIMAX L60 | User Manual - Page 43
the LCD monitor. The menus you can set up in Play mode are as follows. To capture an image after setting up the play menu, press the PLAY 1600X1200 - p.46 1024X768 - 640X480 - User Image 1,2 - ŝ42Ş Menu tab Main menu PROTECT DELETE COPY TO CARD DPOF Sub menu Select All Pics Select - Samsung DIGIMAX L60 | User Manual - Page 44
is available while the camera is connected to a PictBridge supporting printer (direct connection to the camera, sold separately) with a USB cable. Menu tab Main menu IMAGES AUTO SET CUSTOM SET Sub menu One Pic All Pics No Yes Size Layout Secondary menu - Auto PostCard Card 4X6 L 2L Letter A4 - Samsung DIGIMAX L60 | User Manual - Page 45
Starting the slide show ƈ Images can be displayed continuously at pre-set intervals. You can view the slide show by connecting the camera to an external monitor. 1. Select the [Show] sub menu by pressing the UP / DOWN button and press the RIGHT button. 2. Use the Up / Down buttons - Samsung DIGIMAX L60 | User Manual - Page 46
On Screen Display information ƈ You can check shooting information about the displayed image. 1. Select a desired sub menu by pressing the UP / DOWN button and press the OK button. OSD INFORMATION Full Basic OSD Off Rotating an image ƈ You can rotate the stored images by various degrees. Once - Samsung DIGIMAX L60 | User Manual - Page 47
have a new file name. The [User Image] image is stored not on the memory card but on the internal memory. ƃ Only two [User Image] images can be saved. ƃ If the memory capacity is insufficient to store the resized Select All Pics PROTECT Exit:MENU Move: WȜ Unlock ȞT Set:OK ?Ȝ Unlock Ȟ< Set:OK - Samsung DIGIMAX L60 | User Manual - Page 48
ƈ This enables you to copy image files, movie clips and voice recording files on the camera's built-in internal memory to the camera's removable SD memory card. ƃ Copying to the Memory Card 1. Select a desired sub menu by pressing the UP / DOWN button and press the OK button. - [No] : Cancels - Samsung DIGIMAX L60 | User Manual - Page 49
DPOF (Digital Print Order Format) allows you to embed printing information on your memory card's MISC setting. If an image carries DPOF instructions, the DPOF indicator ( ) will show. Standard Index Size DPOF Select All Pics Cancel Back: Set:OK WȜ 0 Prints ȞT Set:OK WȜ 0 Prints ȞT ŝ48Ş Set - Samsung DIGIMAX L60 | User Manual - Page 50
when printing images stored on the memory card. The [Size] menu is available only for DPOF 1.1 compatible printers. ƃ Setting the Print Size 1. Select the Set:OK W Cancel T Set:OK W Cancel T Set:OK PictBridge ƈ You can use the USB cable to connect this camera to a printer that supports - Samsung DIGIMAX L60 | User Manual - Page 51
] sub menu in the [USB] setup menu, [Connecting Computer] message will display when you connect the camera to your printer and the to the menu without setting the number of prints. PictBridge : Print Setting ƈ AUTO SET 1. Use the LEFT and RIGHT buttons to select the [AUTO SET] menu tab. 2. - Samsung DIGIMAX L60 | User Manual - Page 52
supported on all printers. If not supported, the menus are still displayed in the LCD, but are not selectable. ſ If the setting values are not changed in the automatic/ manual setting, the setting ] : Print the pictures stored in the memory card in set numbers. One picture is printed on one piece - Samsung DIGIMAX L60 | User Manual - Page 53
depending on the printer manufacturer. For your printer's default setting, refer to the user's guide that came with your printer. ŝ52Ş Setup menu ƈ In this mode, you can set up basic settings. You can use the setup menu in all camera modes, except Voice Recording mode. The items indicated by - Samsung DIGIMAX L60 | User Manual - Page 54
ƍ ~ ƍ STP69999. ƃ The folder number is assigned sequentially from 100 to 999 as follows: 100SSCAM ƍ 101SSCAM ƍ ~ ƍ 999SSCAM. ƃ The files used with the memory card conform to the DCF (Design rule for Camera File systems) format. If you change the image file name, the image may not play back. ŝ53Ş - Samsung DIGIMAX L60 | User Manual - Page 55
memory card. - A memory card that has a file this camera can't recognise or one that has been taken from another camera. ƃ Always format the memory card using this camera. If you insert a memory card that has been formatted using other cameras, memory card readers, or PCs, you will get a [Card Error - Samsung DIGIMAX L60 | User Manual - Page 56
: SETUP Off Low Medium High Set:OK Connecting an External Device (USB) ƈ You can select an external device to which you want to connect the camera using the USB cable. [Computer] : Select this if you want to connect the camera to your PC. Refer to page 66 for instructions on how to connect the - Samsung DIGIMAX L60 | User Manual - Page 57
etc.) to which the camera is connected. PAL mode can support only BDGHI. USB LCD Video Out Quick View Reset Back: SETUP NTSC PAL Set:OK Yellow - Video to select the external or AV channel of the TV. ƃ There will be a digital noise on the external monitor, but it is not a malfunction. ƃ If the - Samsung DIGIMAX L60 | User Manual - Page 58
can select the image that is first displayed on the LCD monitor whenever the camera is turned on. MYCAM Start Image Start Sound Shutter Sound Back: Set:OK INFORMATION ƃ Use a saved image for the start-up image with the [User Image] in the [RESIZE] menu in the play mode. ƃ The start-up image - Samsung DIGIMAX L60 | User Manual - Page 59
surface of the lens. ƈ If the digital camera is not used for a long period, an electric discharge can occur. It is a good idea to remove the battery and the memory card if you do not intend to use the camera for an extended period of time. ƈ If the camera is exposed to an electronic interference, it - Samsung DIGIMAX L60 | User Manual - Page 60
no images stored on the memory ƍ Take images ƍ Insert a memory card that is holding some images File Error! ҮFile error ƍ Format the memory card ҮMemory card error ƍ Contact a camera service centre Low Battery! ҮThere is low battery capacity ƍ Insert fresh batteries. Low Light! ҮWhen taking pictures - Samsung DIGIMAX L60 | User Manual - Page 61
has adopted the default settings ƍ Reset the date and time correctly The camera buttons do not operate ҮCamera malfunction ƍ Remove / re-insert battery and switch the camera on A card error has occurred while the memory card is in the camera. ҮIncorrect memory card format ƍ Re-format the memory card - Samsung DIGIMAX L60 | User Manual - Page 62
with the camera ƍ Check the connection cables ҮThere are incorrect files in the memory card ƍ Insert a memory card that has correct support USB. ƍ Install Windows 98, 98SE, 2000, ME, XP/ Mac OS 9.0 ~ 10.3 to PC that supports USB. ҮThe camera driver is not installed ƍ Install a [USB Storage Driver - Samsung DIGIMAX L60 | User Manual - Page 63
battery may vary depending on sales region. ƈ Dimensions (WxHxD) : 96.9 X 56.8 X 20.5 mm ƈ Weight : 129.5g - Operating Temperature : 0 ~ 40ŭC - Operating Humidity : 5 ~ 85% ƈ Software - Camera Driver : Storage Driver (Windows98 / 98SE / 2K / ME / XP, Mac OS 9.0 ~ 10.3) - Application : Digimax - Samsung DIGIMAX L60 | User Manual - Page 64
is provided only for Windows. A USB Driver for MAC is not included with the Application CD. You can use the camera with Mac OS 9.0 ~ 10.3. ƈ Digimax Master : This is the all-in-one multi media software solution. You can download, view, edit and save your digital images and movie clips clip with - Samsung DIGIMAX L60 | User Manual - Page 65
. ƈ You can visit the Samsung web-site through the internet. http://www.samsungcamera.com : English http://www.samsungcamera.co.kr : Korean 1. The auto run frame will display. Click the [Install] menu in the Auto run frame. 2. Install the camera driver, DirectX, Xvid and Digimax Master by selecting - Samsung DIGIMAX L60 | User Manual - Page 66
the USB cable. 4. Turn the camera power on. The [Found New Hardware Wizard] will open and the computer will recognise the camera. ſ If your OS is Windows XP, an image viewer program will open. If the download window of Digmax Master opens after starting Digimax Master, the camera driver was set up - Samsung DIGIMAX L60 | User Manual - Page 67
then press the OK button. 5. Press the menu button twice and the menu will disappear. 6. Connect the PC to the camera with the USB cable. AF Lamp Sound USB LCD Video Out Back: SETUP Computer Printer Set:OK ƈ Connecting the camera to a PC ſ If you selected [Printer] in Step 4, when you connect the - Samsung DIGIMAX L60 | User Manual - Page 68
Downloading stored images You can download the still images stored on the camera to your PC's hard disk and print them or use a photo editing software to edit them. 1. Connect the camera to your PC with the USB cable By using [Digimax Master], you can see the stored images in the memory directly on - Samsung DIGIMAX L60 | User Manual - Page 69
disk will be removed safely. 7. Unplug the USB cable. Setting up the USB Driver for MAC 1. A USB Driver for MAC is not included with the software CD as MAC OS supports the camera driver. 2. Check the MAC OS version during start-up. This camera is compatible with MAC OS 9.0 ~ 10.3. 3. Connect - Samsung DIGIMAX L60 | User Manual - Page 70
Remove the [Samsung Digital Camera] on the Device manager. 4. Disconnect the USB cable. 5. Remove the [Digimax L60 / Kenox X60] on the Add / Remove Programs Properties. Digimax Master ƈ You can download, view, edit and save your images and movies with this software. This software is only compatible - Samsung DIGIMAX L60 | User Manual - Page 71
Digimax Master 4. Select a destination and make a folder to save downloaded images and folders. - Folder names can be made in order of date and images will be downloaded. - Folder name will be made as you want and images will be downloaded. - After selecting a folder that was made before, images - Samsung DIGIMAX L60 | User Manual - Page 72
still image edited with Digimax Master can't be played back on the camera. ſ Refer to the [Help] menu in Digimax Master for further information brightness, contrast, colour and saturation. [Effects] : You can insert an effect. [Set Text] : You can insert texts. [Narrate] : You can insert a narration - Samsung DIGIMAX L60 | User Manual - Page 73
the supplied USB cable. ƍ Connect the supplied USB cable. Case 2 The camera is not recognised by your PC. Sometimes, the camera may appear under [Unknown Devices] in Device Manager. ƍ Install the camera driver correctly. Turn off the camera, remove the USB cable, plug in the USB cable again, and - Samsung DIGIMAX L60 | User Manual - Page 74
then reinstall the camera driver. Case 7 In some security programs (Norton Anti Virus, V3, etc.), the computer may not recognise the camera as a removable disk. ƍ Stop the security programs and connect the camera to the computer. Refer to the security program instructions about how to temporarily - Samsung DIGIMAX L60 | User Manual - Page 75
responding while Windows is starting. ƍ In this case, disconnect the PC and the camera and Windows will start. If the problem happens continuously, set the Legacy USB Support to disable and re-start the PC. The Legacy USB Support is in the BIOS setup menu. (The BIOS setup menu differs from the PC - Samsung DIGIMAX L60 | User Manual - Page 76
MEMO MEMO ŝ75Ş - Samsung DIGIMAX L60 | User Manual - Page 77
MEMO MEMO ŝ76Ş - Samsung DIGIMAX L60 | User Manual - Page 78
DIGITAL IMAGING DIVISION 145-3, SANGDAEWON 1-DONG, JUNGWONGU, SUNGNAM-CITY, KYUNGKI-DO, KOREA 462-121 TEL : (82) 31-740-8086, 8088, 8090, 8092, 8099 FAX : (82) 31-740-8398 www.samsungcamera.com SAMSUNG UK only) UK Service Hotline : 01932455320 www.samsungcamera.co.uk SAMSUNG OPTO-ELECTRONICS GMBH AM
-
 1
1 -
 2
2 -
 3
3 -
 4
4 -
 5
5 -
 6
6 -
 7
7 -
8
-
9
-
10
-
11
-
12
-
13
-
14
-
15
-
16
-
17
-
18
-
19
-
20
-
21
-
22
-
23
-
24
-
25
-
26
-
27
-
28
-
29
-
30
-
31
-
32
-
33
-
34
-
35
-
36
-
37
-
38
-
39
-
40
-
41
-
42
-
43
-
44
-
45
-
46
-
47
-
48
-
49
-
50
-
51
-
52
-
53
-
54
-
55
-
56
-
57
-
58
-
59
-
60
-
61
-
62
-
63
-
64
-
65
-
66
-
67
-
68
-
69
-
70
-
71
-
72
-
73
-
74
-
75
-
76
-
77
-
78
 |
 |