Samsung DIGIMAX L60 User Manual - Page 47
Resize, Protecting images
 |
View all Samsung DIGIMAX L60 manuals
Add to My Manuals
Save this manual to your list of manuals |
Page 47 highlights
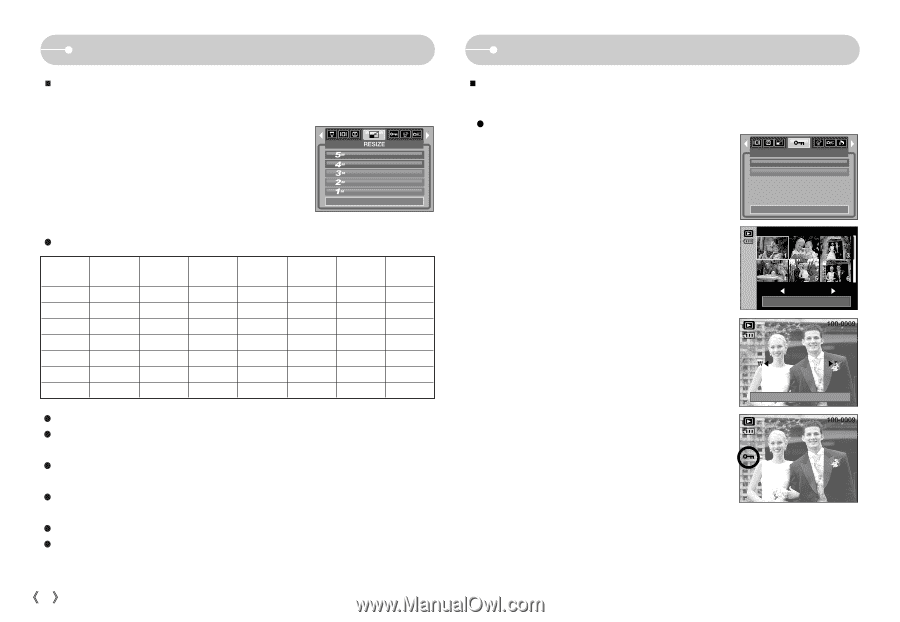
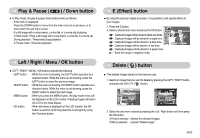
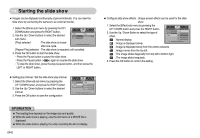
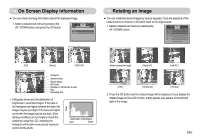
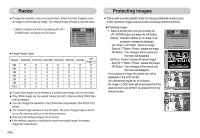
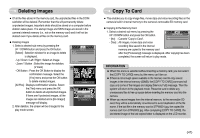
Resize ƈ Change the resolution (size) of pictures taken. Select the [User Image] to save an image to be the start-up image. The resized image will have a new file name. 1. Select a desired sub menu by pressing the UP / DOWN button and press the OK button. Exit:MENU :-;1B- 2592X1944 2272X1704 2048X1536 1600X1200 1024X768 Move: ƃ Image Resize Types Resize 6M 5M 4M 3M 2M 1M VGA 2592X1944 2272X1704 2048X1536 1600X1200 1024X768 O O O O O X O O O O X X O O O X X X O O X X X X O X X X X X X X X X X 640X480 O O O O O O X User Image 1,2 O O O O O O O ƃ A large sized image can be resized to a smaller sized image, but not vice versa. ƃ Only JPEG images can be resized. Movie clip (AVI), Voice recording (WAV) files can't be resized. ƃ You can change the resolution of only those files compressed in the JPEG 4:2:2 format. ƃ The resized image will have a new file name. The [User Image] image is stored not on the memory card but on the internal memory. ƃ Only two [User Image] images can be saved. ƃ If the memory capacity is insufficient to store the resized image, the resized image will not be stored. ŝ46Ş Protecting images ƈ This is used to protect specific shots from being accidentally erased (Lock). It also unprotects images that have been previously protected (Unlock). ƃ Protecting Images 1. Select a desired sub menu by pressing the UP / DOWN button and press the OK button. [Select] : Selection window for an image to be protected / released is displayed. - Up / Down / Left / Right : Select an image - Zoom W / T Button : Protect / release the image - OK Button : Your changes will be saved and the menu will disappear. [All Pics] : Protect / release all saved images - Zoom W / T Button : Protect / release the images - OK Button : Your changes will be saved and the menu will disappear. - If you protect an image, the protect icon will be displayed on the LCD monitor. (An unprotected image has no indicator) - An image in LOCK mode will be protected from the delete function, but will NOT be protected from the format function. Select All Pics PROTECT Exit:MENU Move: WȜ Unlock ȞT Set:OK ?Ȝ Unlock Ȟ< Set:OK
-
 1
1 -
2
-
3
-
4
-
5
-
6
-
7
-
8
-
9
-
10
-
11
-
12
-
13
-
14
-
15
-
16
-
17
-
18
-
19
-
20
-
21
-
22
-
23
-
24
-
25
-
26
-
27
-
28
-
29
-
30
-
31
-
32
-
33
-
34
-
35
-
36
-
37
-
38
-
39
-
40
-
41
-
 42
42 -
 43
43 -
 44
44 -
 45
45 -
 46
46 -
 47
47 -
 48
48 -
 49
49 -
 50
50 -
 51
51 -
 52
52 -
53
-
54
-
55
-
56
-
57
-
58
-
59
-
60
-
61
-
62
-
63
-
64
-
65
-
66
-
67
-
68
-
69
-
70
-
71
-
72
-
73
-
74
-
75
-
76
-
77
-
78
 |
 |