Samsung DMR57LFS Installation Guide (ENGLISH) - Page 11
Preparing The Dishwasher, Step ´ - installation
 |
UPC - 036725405103
View all Samsung DMR57LFS manuals
Add to My Manuals
Save this manual to your list of manuals |
Page 11 highlights
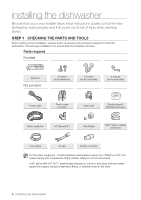
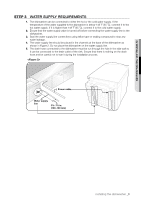
02 Installing the dishwasher STEP 5 Preparing the dishwasher 1. Ensure that the circuit breaker and water supply valve are turned off before proceeding with the following steps. 2. Ensure that the kick plate is placed on the cushion front, and make sure to keep it. 3. Install the 90˚ elbow at the Inlet valve. When inserting the elbow into the Inlet valve, use Teflon tape or sealing compound to prevent water leakage. To prevent blocking the inlet valve, make sure that the Teflon tape or sealing compound does not enter the valve. 4. Remove the junction box cover located at the bottom right at the front of the dishwasher using a screwdriver and then Install the strain relief. Make sure to keep the junction box cover you removed as it is used in STEP 10. 5. When the countertop is made of wood or a material that is not damaged by drilling, locate the two (2) Installation brackets that were supplied with the dishwasher. (Refer to the figures in STEP 8.) Kick plate A A B C B C Junction box Strain relief installing the dishwasher _11
-
 1
1 -
2
-
3
-
4
-
5
-
 6
6 -
 7
7 -
 8
8 -
 9
9 -
 10
10 -
 11
11 -
 12
12 -
 13
13 -
 14
14 -
 15
15 -
 16
16 -
17
-
18
-
19
-
20
 |
 |
