Samsung NE59M4310SS/AA Installation Guide
Samsung NE59M4310SS/AA Manual
 |
View all Samsung NE59M4310SS/AA manuals
Add to My Manuals
Save this manual to your list of manuals |
Samsung NE59M4310SS/AA manual content summary:
- Samsung NE59M4310SS/AA | Installation Guide - Page 1
Electric Range installation manual imagine the possibilities Thank you for purchasing this Samsung product. Install_30_Electric_Range_USA_DG68-00108G-09_EN+MES.indb 1 2018-07-31 3:48:02 - Samsung NE59M4310SS/AA | Installation Guide - Page 2
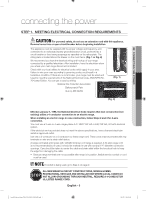
MANUAL READ THESE INSTRUCTIONS COMPLETELY AND CAREFULLY. Important note to the installer • Read all instructions contained in these installation instructions the service panel and lock the service disconnecting means to prevent power from being switched on accidentally. When the service - Samsung NE59M4310SS/AA | Installation Guide - Page 3
REMOVE PACKAGING Remove packaging materials. Failure to remove packaging materials could result in damage to the appliance. PREPARE TOOLS & PARTS What tools you will need Drill Adjustable Wrench Pliers Phillips Screwdriver Flat Screwdriver What's included with your range Pencil 1/4" Nut - Samsung NE59M4310SS/AA | Installation Guide - Page 4
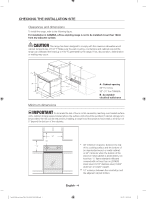
CHECKING THE INSTALLATION SITE Clearances and dimensions To install the range, refer to the following figure. For installation in CANADA, a Free-standing range is not to be installed closer than 12mm from any adjacent surface. CAUTION CAUTION This range has been designed to comply with the - Samsung NE59M4310SS/AA | Installation Guide - Page 5
relief within the knockout hole to keep the edge from damaging the cable. • Because range terminals are not accessible after range is in position, flexible service conduit or cord must be used. NOTE If conduit is being used, go to Step 4 on page 9. ALL NEW BRANCH-CIRCUIT CONSTRUCTIONS, MOBILE HOMES - Samsung NE59M4310SS/AA | Installation Guide - Page 6
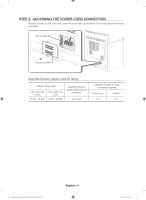
STEP 2. ACCESSING THE POWER CORD CONNECTION Remove the rear access cover and loosen the screw with a screwdriver. The terminal block will then be accessible. Terminal block Access cover Specified power-supply-cord kit rating Range rating, watts 120 / 240 volts 3-wire 8,750 - 16,500 120 / 208 - Samsung NE59M4310SS/AA | Installation Guide - Page 7
STEP 3. INSTALLING THE POWER CORD For power cord installations, hook the strain relief over the power cord hole (13/8") located below the rear of the drawer body. Insert the power cord through the strain relief and tighten the device. Conduit connection plate 02 CONNECTING THE POWER Power cord - Samsung NE59M4310SS/AA | Installation Guide - Page 8
Installing a 4-wire power cord WARNING WARNING The neutral wire of the supply circuit must be connected to the neutral terminal located in the lower center of the terminal block. The power leads must be connected to the lower left and the lower right terminals of the terminal block. The 4th - Samsung NE59M4310SS/AA | Installation Guide - Page 9
STEP 4. INSTALLING THE CONDUIT Remove the conduit connection plate from the rear of the drawer body and rotate it as shown below. The conduit hole (11/8") must be used. " 11/8 " 13/8 02 CONNECTING THE POWER " 13/8 1. Prepare the conduit cord shown in Figure 1. 2. Install the conduit cord as - Samsung NE59M4310SS/AA | Installation Guide - Page 10
Installing a 4-wire conduit • Aluminum building wire may be used but it must be rated for the correct amperage and voltage to make the connection. Connect wires according to this Step 4 depending on the number of wires. • Wire used, location and enclosure of splices, etc., must conform to good - Samsung NE59M4310SS/AA | Installation Guide - Page 11
the risk of tipping, the appliance must be secured by properly installing the Anti-Tip device packed with the appliance. • Refer to the installation instructions supplied with the bracket. • Unless properly installed, the range could be tipped by stepping or sitting on the door. Injury may result - Samsung NE59M4310SS/AA | Installation Guide - Page 12
bracket engages the back brace and prevents tip-over. • Turn on the electrical power. Check the range for proper operation as described in the user manual. Anti-Tip bracket Leveling leg Install_30_Electric_Range_USA_DG68-00108G-09_EN+MES.indb 12 English - 12 DG68-00108G-09 2018-07-31 3:48:06 - Samsung NE59M4310SS/AA | Installation Guide - Page 13
Estufa eléctrica manual de instalación imagine las posibilidades Gracias por adquirir este producto Samsung. Install_30_Electric_Range_USA_DG68-00108G-09_EN+MES.indb 1 2018-07-31 3:48:06 - Samsung NE59M4310SS/AA | Installation Guide - Page 14
morir. b) Instale el dispositivo anti inclinación en la estructura y/o en la parte posterior derecha (o posterior izquierda) de la base de la estufa. c) Acople . PARA SU SEGURIDAD ADVERTENCIA ADVERTENCIA Si la información de este manual no es seguida con exactitud, se podrían producir incendios - Samsung NE59M4310SS/AA | Installation Guide - Page 15
01 ANTES DE COMENZAR Y PREPARACIÓN PARA INSTALAR LA ESTUFA preparación para instalar la estufa RETIRE EL MATERIAL DE EMPAQUE Retire el material de empaque. No retirar los materiales de empaque podría causar daños al electrodoméstico. PREPARE LAS HERRAMIENTAS Y LAS PIEZAS Las herramientas que - Samsung NE59M4310SS/AA | Installation Guide - Page 16
de almacenamiento, el riesgo puede reducirse instalando una campana para estufas que se proyecte horizontalmente por lo menos 5" más allá de la parte inferior de los gabinetes. ** 15" 30" * 30" Install_30_Electric_Range_USA_DG68-00108G-09_EN+MES.indb 4 * Separación mínima de 30 pulgadas entre el - Samsung NE59M4310SS/AA | Installation Guide - Page 17
02 CONEXIÓN A LA CORRIENTE ELÉCTRICA cómo conectar la corriente eléctrica PASO 1. CUMPLIMIENTO DE LAS EXIGENCIAS DE CONEXIÓN ELÉCTRICA PRECAUCIÓN PRECAUCIÓN Para seguridad de las personas, no utilice cables prolongadores con este electrodoméstico. Quite el fusible de su casa o corte la - Samsung NE59M4310SS/AA | Installation Guide - Page 18
PASO 2. CÓMO ACCEDER A LA CONEXIÓN DEL CABLE DE ALIMENTACIÓN ELÉCTRICA Retire la cubierta de acceso de la parte posterior y afloje el tornillo con un desarmador. Habrá quedado abierto el acceso al cuerpo de terminales. Cuerpo de terminales Cubierta de acceso Especificaciones del kit - Samsung NE59M4310SS/AA | Installation Guide - Page 19
ón, enganche el sujetador de cables con amortiguador de esfuerzo sobre el orificio del cable de alimentación (13/8") ubicado debajo de la parte trasera del cuerpo del cajón. Inserte el cable de alimentación atravesando el sujetador-amortiguador y ajuste el dispositivo. Placa de conducción del - Samsung NE59M4310SS/AA | Installation Guide - Page 20
de 4 conductores ADVERTENCIA ADVERTENCIA El conductor neutro del circuito de alimentación debe conectarse a la terminal neutra ubicada en la parte central inferior del cuerpo de terminales. Los chicotes de cable que portan corriente deben conectarse a las terminales inferior izquierda e inferior - Samsung NE59M4310SS/AA | Installation Guide - Page 21
las 3 terminales inferiores del cuerpo de terminales. 2. Introduzca la punta desnuda del conductor central (blanco/neutro) a través de la abertura en la parte central inferior del cuerpo de terminales. En ciertos modelos, será necesario introducir el conductor a través de la abertura de la cinta de - Samsung NE59M4310SS/AA | Installation Guide - Page 22
ón. Fase 1 - Neutro Fase 2 - Neutro Fase 1 - Fase 2 120 V 120 V 208 V / 240 V PASO 5. RECOLOCAR LA CUBIERTA DE ACCESO Recoloque la cubierta de acceso en la parte trasera de la estufa. Para recolocar la cubierta de los conductores, inserte las dos pestañas en las cavidades ubicadas debajo de la - Samsung NE59M4310SS/AA | Installation Guide - Page 23
*NOTA: Para instalar la ménsula Anti Inclinación libere la pata niveladora. Se requiere una distancia mínima de 21/32 pulgadas (16.5 mm) entre la parte inferior de la estufa y el piso de la cocina. 1. Ubique la ménsula en la posición adecuada utilizando la plantilla La ménsula anti inclinación se - Samsung NE59M4310SS/AA | Installation Guide - Page 24
Inclinación engancha al puntal trasero e imposibilita el vuelco. • Encienda la corriente eléctrica. Controle el funcionamiento correcto de la estufa tal como se describe en el manual del usuario. Ménsula anti inclinación Pata niveladora Install_30_Electric_Range_USA_DG68-00108G-09_EN+MES.indb 12
-
 1
1 -
 2
2 -
 3
3 -
 4
4 -
 5
5 -
 6
6 -
 7
7 -
8
-
9
-
10
-
11
-
12
-
13
-
14
-
15
-
16
-
17
-
18
-
19
-
20
-
21
-
22
-
23
-
24
 |
 |

imagine
the possibilities
Thank you for purchasing this Samsung product.
Electric Range
installation manual
Install_30_Electric_Range_USA_DG68-00108G-09_EN+MES.indb
1
2018-07-31
°° 3:48:02