Samsung NQ70T5511DS/AA Installation Guide - Page 8
Installation instructions
 |
View all Samsung NQ70T5511DS/AA manuals
Add to My Manuals
Save this manual to your list of manuals |
Page 8 highlights
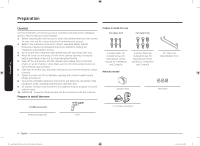
Installation instructions Prepare built-in oven WARNING Excessive Weight Hazard Use two or more people to move and install an oven. Failure to do so can result in back or other injury. 1. Decide on the final location for the oven. Avoid drilling or cutting into house wiring during installation. 2. To avoid floor damage, set the oven on a cardboard prior to installation. Do not use handle or any portion of the front frame for lifting. 3. Remove the shipping materials and tape from the oven. Remember to keep the packing materials that may be needed for installation. 4. Remove the hardware package from inside of the bag containing literature. 5. Remove racks and other parts from inside the oven. 6. Move oven and cardboard close to the oven's final location. Remove and replace oven door IMPORTANT: Use two hands to remove lower oven door. Upper oven door can't be removed. Prior to removing the oven door, prepare a surface where you will place it. This surface should be flat and covered with a soft blanket, or use the corner posts from your packaging material. Remove lower oven door A B A. Oven door hinge lock in locked position B. Oven door hinge lock in unlocked position 1. Open the oven door. 2. Locate the oven door hinge locks in both corners of the oven door, and then rotate the hinge locks toward the oven door to the unlocked position (see illustration B). If the door hinge lock is not rotated fully, the door will not remove properly. 3. Partially close the door to engage the door latch locks. The door will stop at this point. Installation instructions 8 English Install_NQ5300R_NQ70R5511DG_AA_DG68-01149A-04_EN.indd 8 11/11/2019 6:07:30 PM
-
 1
1 -
2
-
 3
3 -
 4
4 -
 5
5 -
 6
6 -
 7
7 -
 8
8 -
 9
9 -
 10
10 -
 11
11 -
 12
12 -
 13
13 -
14
-
15
-
16
-
17
-
18
-
19
-
20
-
21
-
22
-
23
-
24
-
25
-
26
-
27
-
28
-
29
-
30
-
31
-
32
-
33
-
34
-
35
-
36
-
37
-
38
-
39
-
40
-
41
-
42
-
43
-
44
-
45
-
46
-
47
-
48
 |
 |
