Samsung RF28N9780SR User Manual - Page 27
does not have a water tube., door, except for Step 6. The right door
 |
View all Samsung RF28N9780SR manuals
Add to My Manuals
Save this manual to your list of manuals |
Page 27 highlights
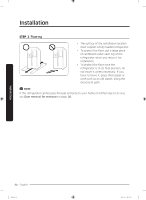
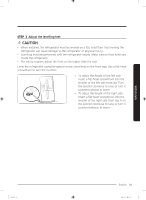
5. Connect the wire connectors. CAUTION • Make sure the wire connectors are connected properly. Otherwise, the display will not operate. 6. Connect the water tube. CAUTION • To prevent water leaks, make sure the red clips tighten the coupler properly. • Keep the clips out of children's reach. 7. Repeat the above steps for the other door, except for Step 6. The right door does not have a water tube. 8. Attach the top cover with the front side first, and then press down on its back to get it into position. Then, tighten the screws (x3). Installation Untitled-8 27 English 27 2018-08-27 4:45:00
-
 1
1 -
2
-
3
-
4
-
5
-
6
-
7
-
8
-
9
-
10
-
11
-
12
-
13
-
14
-
15
-
16
-
17
-
18
-
19
-
20
-
21
-
 22
22 -
 23
23 -
 24
24 -
 25
25 -
 26
26 -
 27
27 -
 28
28 -
 29
29 -
 30
30 -
 31
31 -
 32
32 -
33
-
34
-
35
-
36
-
37
-
38
-
39
-
40
-
41
-
42
-
43
-
44
-
45
-
46
-
47
-
48
-
49
-
50
-
51
-
52
-
53
-
54
-
55
-
56
-
57
-
58
-
59
-
60
-
61
-
62
-
63
-
64
-
65
-
66
-
67
-
68
-
69
-
70
-
71
-
72
-
73
-
74
-
75
-
76
-
77
-
78
-
79
-
80
-
81
-
82
-
83
-
84
-
85
-
86
-
87
-
88
-
89
-
90
-
91
-
92
-
93
-
94
-
95
-
96
-
97
-
98
-
99
-
100
-
101
-
102
-
103
-
104
-
105
-
106
-
107
-
108
-
109
-
110
-
111
-
112
-
113
-
114
-
115
-
116
-
117
-
118
-
119
-
120
-
121
-
122
-
123
-
124
-
125
-
126
-
127
-
128
-
129
-
130
-
131
-
132
-
133
-
134
-
135
-
136
-
137
-
138
-
139
-
140
-
141
-
142
-
143
-
144
-
145
-
146
-
147
-
148
-
149
-
150
-
151
-
152
-
153
-
154
-
155
-
156
-
157
-
158
-
159
-
160
-
161
-
162
-
163
-
164
-
165
-
166
-
167
-
168
-
169
-
170
-
171
-
172
-
173
-
174
-
175
-
176
-
177
-
178
-
179
-
180
-
181
-
182
-
183
-
184
-
185
-
186
-
187
-
188
-
189
-
190
-
191
-
192
-
193
-
194
-
195
-
196
-
197
-
198
-
199
-
200
-
201
-
202
-
203
-
204
-
205
-
206
-
207
-
208
-
209
-
210
-
211
-
212
-
213
-
214
-
215
-
216
-
217
-
218
-
219
-
220
-
221
-
222
-
223
-
224
-
225
-
226
-
227
-
228
-
229
-
230
-
231
-
232
-
233
-
234
-
235
-
236
-
237
-
238
-
239
-
240
-
241
-
242
-
243
-
244
-
245
-
246
-
247
-
248
-
249
-
250
-
251
-
252
-
253
-
254
-
255
-
256
-
257
-
258
-
259
-
260
 |
 |

English
27
Installation
5.
Connect the wire connectors.
CAUTION
•
Make sure the wire connectors are
connected properly. Otherwise, the
display will not operate.
6.
Connect the water tube.
CAUTION
•
To prevent water leaks, make sure the
red clips tighten the coupler properly.
•
Keep the clips out of children’s reach.
7.
Repeat the above steps for the other
door, except for Step 6. The right door
does not have a water tube.
8.
Attach the top cover with the front side
first, and then press down on its back
to get it into position. Then, tighten the
screws (x3).
Untitled-8
27
2018-08-27
°° 4:45:00