Samsung RF4287HARS User Manual (user Manual) (ver.0.1) (English) - Page 14
driver +. Open the door, reinsert the cap top table, and then close the doors. - problems
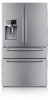 |
UPC - 036725569713
View all Samsung RF4287HARS manuals
Add to My Manuals
Save this manual to your list of manuals |
Page 14 highlights
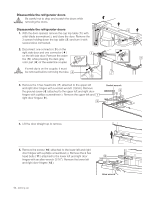
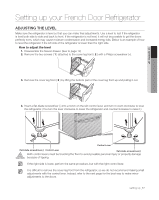
4. Connect the dispenser door tube ( 5 ) and, then insert a clip on the coupler while pulling tube. Connect the connector ( 4 ) on the left side door and one connector ( 3 ) on the right side door. The clip is enveloped inside of the top cap. 4 Red Clip (1/4") 3 5 Dispenser Door Tube Cabinet Tube dispenser door tube The dispenser door tube ( 5 ) must be fully inserted to the marked line to caution prevent water leakage from the dispenser. coupler 5. Position the top table ( 2 ) in place. Insert the 3 screws into the top table then, tighten with a philips screw driver (+). Open the door, reinsert the cap top table ( 1 ), and then close the doors. When re-attaching the top table, make sure that the wires are not pressed or damaged by the hinge 2 cover. After assembling, close the door and check to see whether the door has gaps between gaskets or is 1 tilted. If there is a problem, please refer to "Adjusting the doors" on page 18. 14_ setting up
-
 1
1 -
2
-
3
-
4
-
5
-
6
-
7
-
8
-
 9
9 -
 10
10 -
 11
11 -
 12
12 -
 13
13 -
 14
14 -
 15
15 -
 16
16 -
 17
17 -
 18
18 -
 19
19 -
20
-
21
-
22
-
23
-
24
-
25
-
26
-
27
-
28
-
29
-
30
-
31
-
32
-
33
-
34
-
35
-
36
-
37
-
38
-
39
-
40
-
41
-
42
 |
 |
