Samsung SCD303 User Manual (user Manual) (ver.1.0) (English) - Page 45
Demonstration
 |
View all Samsung SCD303 manuals
Add to My Manuals
Save this manual to your list of manuals |
Page 45 highlights
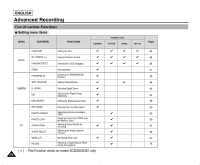
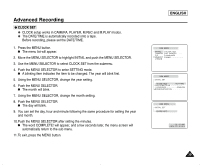
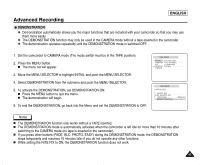
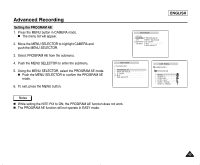
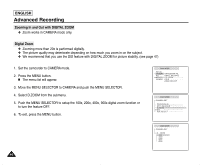
Advanced Recording ENGLISH G DEMONSTRATION ✤ Demonstration automatically shows you the major functions that are included with your camcorder so that you may use them more easily. ✤ The DEMONSTRATION function may only be used in the CAMERA mode without a tape inserted in the camcorder. ✤ The demonstration operates repeatedly until the DEMONSTRATION mode is switched OFF. 1. Set the camcorder to CAMERA mode (The mode switch must be in the TAPE position). 2. Press the MENU button. I The menu list will appear. 3. Move the MENU SELECTOR to highlight INITIAL and push the MENU SELECTOR. 4. Select DEMONSTRATION from the submenu and push the MENU SELECTOR. 5. To activate the DEMONSTRATION, set DEMONSTRATION ON. I Press the MENU button to quit the menu. I The demonstration will begin. 6. To end the DEMONSTRATION, go back into the Menu and set the DEMONSTRATION to OFF. CAM MODE INITIAL CAMERA A/V MEMORY VIEWER CLOCK SET WL. REMOTE LANGUAGE DEMO CAM MODE INITIAL SET CLOCK SET WL.REMOTE LANGUAGE DEMONSTRATION ENGLISH Notes I The DEMONSTRATION function only works without a TAPE inserted. I The DEMONSTRATION mode is automatically activated when the camcorder is left idle for more than 10 minutes after switching to the CAMERA mode (no tape is inserted in the camcorder). I If you press other buttons (FADE, BLC, PHOTO, EASY) during the DEMONSTRATION mode, the DEMONSTRATION stops temporarily and resumes 10 minutes later if you do not operate any other functions. I While setting the NITE PIX to ON, the DEMONSTRATION function does not work. 41
-
 1
1 -
2
-
3
-
4
-
5
-
6
-
7
-
8
-
9
-
10
-
11
-
12
-
13
-
14
-
15
-
16
-
17
-
18
-
19
-
20
-
21
-
22
-
23
-
24
-
25
-
26
-
27
-
28
-
29
-
30
-
31
-
32
-
33
-
34
-
35
-
36
-
37
-
38
-
39
-
 40
40 -
 41
41 -
 42
42 -
 43
43 -
 44
44 -
 45
45 -
 46
46 -
 47
47 -
 48
48 -
 49
49 -
 50
50 -
51
-
52
-
53
-
54
-
55
-
56
-
57
-
58
-
59
-
60
-
61
-
62
-
63
-
64
-
65
-
66
-
67
-
68
-
69
-
70
-
71
-
72
-
73
-
74
-
75
-
76
-
77
-
78
-
79
-
80
-
81
-
82
-
83
-
84
-
85
-
86
-
87
-
88
-
89
-
90
-
91
-
92
-
93
-
94
-
95
-
96
-
97
-
98
-
99
-
100
-
101
-
102
-
103
-
104
-
105
-
106
-
107
-
108
-
109
-
110
-
111
 |
 |
