Samsung SCD303 User Manual (user Manual) (ver.1.0) (English) - Page 71
In the POWER NITE PIX mode, certain functions are not available, such as White Balance, Program AE,
 |
View all Samsung SCD303 manuals
Add to My Manuals
Save this manual to your list of manuals |
Page 71 highlights
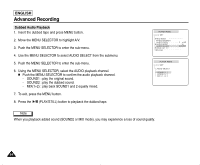
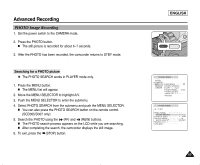
Advanced Recording ENGLISH POWER NITE PIX ✤ The POWER NITE PIX function works in CAMERA mode. ✤ The POWER NITE PIX function can record a subject more brightly in darkness than the NITE PIX function. ✤ POWER NITE PIX is displayed for three seconds on the LCD when the SLOW SHUTTER button is pressed in the NITE PIX mode. ✤ When you work in POWER NITE PIX mode, the POWER NITE PIX ( ) appears on the LCD continuously. 1. Set the camcorder to CAMERA mode. 2. Turn on the NITE PIX switch, and then press the SLOW SHUTTER button. POWER NITE PIX ON OFF 3. Press the SLOW SHUTTER button to set shutter speed (1/30, 1/15, 1/8). The SLOW SHUTTER function enables you to record a subject at three different brightness levels. 4. When using POWER NITE PIX the image takes on a slow motion like effect. 5. To cancel the POWER NITE PIX function, press the SLOW SHUTTER button to set to "off " and then turn off the NITE PIX switch. POWER NITE PIX Notes 1 2 : 0 0 A M J A N . 1 0 , 2 0 0 4 I The maximum recording distance using the infrared light is about 3 m (about 10 feet). I If you use the POWER NITE PIX function in normal recording situations (ex. outdoors by day), the recorded picture may contain unnatural colors. I In the POWER NITE PIX mode, certain functions are not available, such as White Balance, Program AE, DSE, BLC. I When the subject is too bright, press the SLOW SHUTTER button (1/30 ➝ 1/8) to obtain better quality recordings. 67
-
 1
1 -
2
-
3
-
4
-
5
-
6
-
7
-
8
-
9
-
10
-
11
-
12
-
13
-
14
-
15
-
16
-
17
-
18
-
19
-
20
-
21
-
22
-
23
-
24
-
25
-
26
-
27
-
28
-
29
-
30
-
31
-
32
-
33
-
34
-
35
-
36
-
37
-
38
-
39
-
40
-
41
-
42
-
43
-
44
-
45
-
46
-
47
-
48
-
49
-
50
-
51
-
52
-
53
-
54
-
55
-
56
-
57
-
58
-
59
-
60
-
61
-
62
-
63
-
64
-
65
-
 66
66 -
 67
67 -
 68
68 -
 69
69 -
 70
70 -
 71
71 -
 72
72 -
 73
73 -
 74
74 -
 75
75 -
 76
76 -
77
-
78
-
79
-
80
-
81
-
82
-
83
-
84
-
85
-
86
-
87
-
88
-
89
-
90
-
91
-
92
-
93
-
94
-
95
-
96
-
97
-
98
-
99
-
100
-
101
-
102
-
103
-
104
-
105
-
106
-
107
-
108
-
109
-
110
-
111
 |
 |