Samsung SDS-P3022 User Manual - Page 57
Event, Video Loss Detection, ENTER, Tampering Detection
 |
View all Samsung SDS-P3022 manuals
Add to My Manuals
Save this manual to your list of manuals |
Page 57 highlights
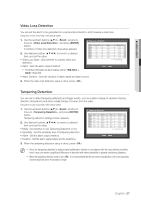
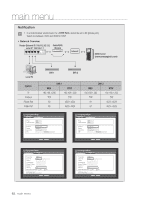
! main menu Video Loss Detection You can set the alarm to be generated on a camera disconnection, which causes a video loss. Using the mouse may help make setup easier. 1. Use the up/down buttons (▲▼) in window to move to , and press [ENTER] button. A window of video loss detection area setup appears. 2. Use direction buttons to move to a desired item, and set the value. • Video Loss State : Sets whether to activate video loss detection. Video Loss Detection CH Video Loss State 1 OFF 2 OFF 3 OFF 4 OFF 5 OFF 6 OFF 7 OFF 8 OFF Alarm None None None None None None None None • Alarm : Sets the alarm output method. OK Cancel `` For further information on alarm output, refer to "HDD Alarm > Alarm". (Page 49) • Alarm Duration : Sets the duration of alarm signal and alarm sound. Alarm Duration 10 sec 10 sec 10 sec 10 sec 10 sec 10 sec 10 sec 10 sec Previous/Next Page Help 3. When the video loss detection setup is done, press . Tampering Detection You can set to detect tampering attempts and trigger events, such as sudden change of camera's framing direction, blocked lens and other overall change of scenes from the video. Using the mouse may help make setup easier. 1. Use the up/down buttons (▲▼) in window to move to , and press [ENTER] button. Tampering detection settings screen appears. 2. Use direction buttons to move to a desired item, and set the value. • Mode : Set whether to use Tampering Detection or not. • Sensitivity : Set the sensitivity level of tampering detection. • Alarm : Set the alarm output method. • Duration : Set the alarm signal output and its dwell time. Tampering Detection CH Mode Sensitivity Alarm 1 OFF Medium None 2 OFF Medium None 3 OFF Medium None 4 OFF Medium None 5 OFF Medium None 6 OFF Medium None 7 OFF Medium None 8 OFF Medium None Duration 10 sec 10 sec 10 sec 10 sec 10 sec 10 sec 10 sec 10 sec Previous/Next Page OK Cancel 3. When the tampering detection setup is done, press . MM `` Since the tampering detection is designed and optimized to function in accordance with the user defined sensitivity level, it may not render a significant difference in detection with varied sensitivity in general monitoring situations. `` When the tampering detection mode is set , it is recommended that the pre event recording time of the corresponding channel should be set to 10 seconds or longer. English _57
-
 1
1 -
2
-
3
-
4
-
5
-
6
-
7
-
8
-
9
-
10
-
11
-
12
-
13
-
14
-
15
-
16
-
17
-
18
-
19
-
20
-
21
-
22
-
23
-
24
-
25
-
26
-
27
-
28
-
29
-
30
-
31
-
32
-
33
-
34
-
35
-
36
-
37
-
38
-
39
-
40
-
41
-
42
-
43
-
44
-
45
-
46
-
47
-
48
-
49
-
50
-
51
-
 52
52 -
 53
53 -
 54
54 -
 55
55 -
 56
56 -
 57
57 -
 58
58 -
 59
59 -
 60
60 -
 61
61 -
 62
62 -
63
-
64
-
65
-
66
-
67
-
68
-
69
-
70
-
71
-
72
-
73
-
74
-
75
-
76
-
77
-
78
-
79
-
80
-
81
-
82
-
83
-
84
-
85
-
86
-
87
-
88
-
89
-
90
-
91
-
92
-
93
-
94
-
95
-
96
-
97
-
98
-
99
-
100
-
101
-
102
-
103
-
104
-
105
-
106
-
107
-
108
-
109
-
110
-
111
-
112
-
113
-
114
-
115
-
116
-
117
-
118
-
119
-
120
-
121
-
122
-
123
-
124
-
125
-
126
-
127
-
128
-
129
-
130
-
131
-
132
-
133
-
134
-
135
-
136
-
137
-
138
-
139
-
140
-
141
-
142
-
143
-
144
-
145
-
146
 |
 |
