Samsung SGH-T429 Service Manual - Page 19
Assembly, SHIELDCAN & KEYPAD, Assembly
 |
View all Samsung SGH-T429 manuals
Add to My Manuals
Save this manual to your list of manuals |
Page 19 highlights
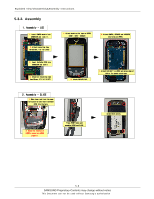
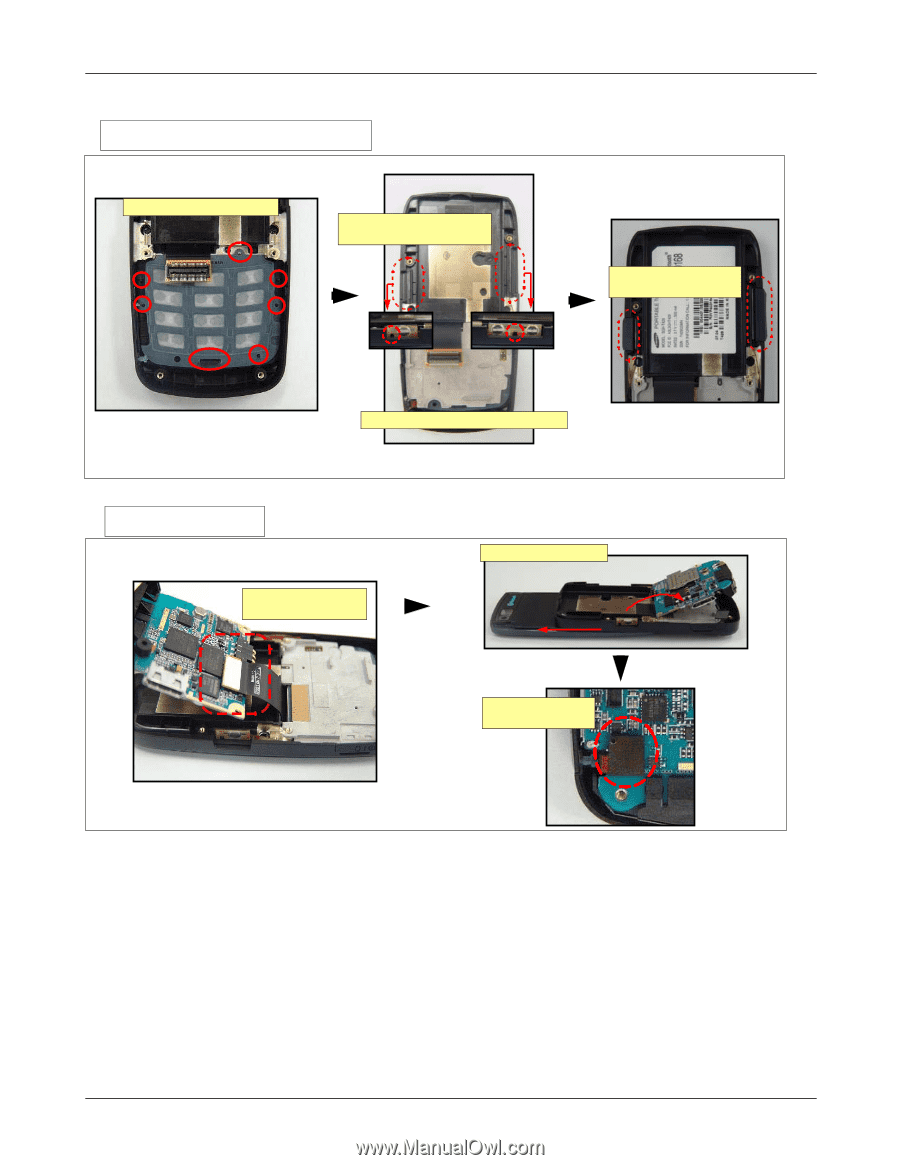
Exploded View/Disassembly&Assembly Instructions 3.Assembly - SHIELDCAN & KEYPAD Attach KEYPAD to FRONT RIB. 2. Attach SIDE KEY and DOME SHEET along the lead gutter. Insert CAMERA KEY and VOLUME KEY 1. Attach SHIELD CAN to KEYPAD. 4. Assembly - PBA Connect PBA CONNECTOR to LCD FPCB. Slide up and put in PBA Attach KEY FPCB to PBA CONNECTOR. 5-7 SAMSUNG Proprietary-Contents may change without notice This Document can not be used without Samsung's authorization
-
 1
1 -
2
-
3
-
4
-
5
-
6
-
7
-
8
-
9
-
10
-
11
-
12
-
13
-
 14
14 -
 15
15 -
 16
16 -
 17
17 -
 18
18 -
 19
19 -
 20
20 -
 21
21 -
 22
22 -
 23
23 -
 24
24 -
25
-
26
-
27
-
28
-
29
-
30
-
31
-
32
-
33
-
34
-
35
-
36
-
37
-
38
-
39
-
40
-
41
-
42
-
43
-
44
-
45
-
46
-
47
-
48
-
49
-
50
-
51
-
52
-
53
-
54
-
55
-
56
-
57
-
58
-
59
-
60
-
61
-
62
-
63
-
64
 |
 |
SAMSUNG Proprietary-Contents may change without notice
Exploded View/Disassembly&Assembly Instructions
5-7
This Document can not be used without Samsung's authorization
3.Assembly
-
SHIELDCAN & KEYPAD
Insert CAMERA KEY and VOLUME
KEY
Attach KEYPAD to FRONT RIB.
2.
Attach SIDE KEY and DOME
SHEET along the lead gutter.
1.
Attach SHIELD CAN to KEYPAD.
4. Assembly
-
PBA
Attach KEY FPCB to PBA
CONNECTOR.
Connect PBA CONNECTOR to
LCD FPCB.
Slide up and put in PBA