Samsung SMH1622B Installation Instructions - Page 16
For Preparation Of Top - warranty
 |
View all Samsung SMH1622B manuals
Add to My Manuals
Save this manual to your list of manuals |
Page 16 highlights
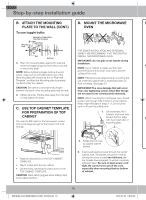
Step-by-step installation guide B. ATTACH THE MOUNTING D. Mount the microwave D PLATE TO THE WALL (cont.) oven To use toggle bolts: Spacing for Toggles More Than Wall Thickness Mounting Plate Toggle Wings Toggle Bolt FOR EASIER INSTALLATION AND PERSONAL SAFETY, WE RECOMMEND THAT TWO PEOPLE Wall Bolt End INSTALL THIS MICROWAVE OVEN. IMPORTANT: Do not grip or use handle during 3. Place the mounting plate against the wall and installation. insert the toggle wings into the holes in the wall 4 to mount the plate. NOTE: If your cabinet is metal, use the nylon NOTE: Before tightening toggle bolts and wood screw, make sure to coincide bottom line of the grommet around the power cord hole to prevent cutting of the cord. Mounting plate with Horizontal line of "Rear wall NOTE: Filler blocks are required when mounting this Template" and then the Mounting plate is properly unit under any cabinet with a recessed bottom or centered under the cabinet. front overhang. (See page 9.) CAUTION: Be careful to avoid pinching fingers between the back of the mounting plate and the wall. IMPORTANT:The case damage that will occur from over tightening screws when filler blocks 4. Tighten all bolts. Pull the plate away from the wall are not used is not covered under warranty. to help tighten the bolts. NOTE: When mounting the microwave oven, thread power cord through hole in bottom of top cabinet. Keep it tight throughout Steps 1-3. Do not pinch C. Use top cabinet template cord or lift oven by pulling cord. for preparation of top cabinet You need to drill holes for the top support screws and a hole large enough for the power cord to fit 1. Lift microwave, tilt it forward, and hook slots at back bottom edge 6 onto four lower tabs of mounting plate. through. • Read the instructions on the TOP CABINET TEMPLATE. • Tape it underneath the top cabinet. • Drill the holes, following the instructions on the TOP CABINET TEMPLATE. CAUTION: Wear safety goggles when drilling holes in the cabinet bottom. 2. Rotate front of oven up against cabinet bottom. 3. Insert a self-aligning screw through top center cabinet hole. Temporarily secure the oven by turning the screw at least two full turns after the threads have engaged. (It will be completely tightened later.) Be sure to keep power cord tight. Be careful not to pinch the cord, especially when mounting flush to bottom of cabinet. 16 SMH8165_XAA DE68-03587A-04-EN_120725.indd 16 2012-07-25 �� 8:05:32
-
 1
1 -
2
-
3
-
4
-
5
-
6
-
7
-
8
-
9
-
10
-
 11
11 -
 12
12 -
 13
13 -
 14
14 -
 15
15 -
 16
16 -
 17
17 -
 18
18 -
 19
19 -
 20
20
 |
 |
