Samsung SPH-M560 User Manual (user Manual) (ver.f10) (English) - Page 124
Video Mode Options
 |
View all Samsung SPH-M560 manuals
Add to My Manuals
Save this manual to your list of manuals |
Page 124 highlights
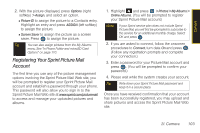
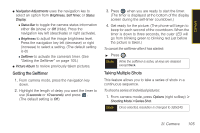
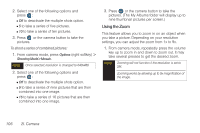
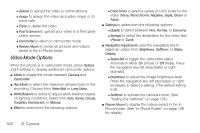
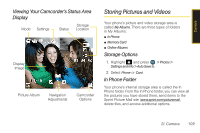
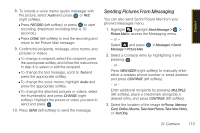
Ⅲ Upload to upload the video to online albums. Ⅲ Assign to assign the video as a video ringer or to voice calls. Ⅲ Erase to delete the video. Ⅲ Post To Service to upload your video to a third party online service. Ⅲ Camcorder to return to camcorder mode. Ⅲ Review Album to review all pictures and videos saved in the In Phone folder. Video Mode Options When the phone is in camcorder mode, press Options (right softkey) to display additional camcorder options: ⅷ Mode to toggle the mode between Camera and Camcorder. ⅷ Rec Mode to select the maximum allowed size for the recording. Choose from Video Mail or Long Video. ⅷ White Balance to select to adjust white balance based on lighting conditions. Select from Auto, Sunny, Cloudy, Tungsten, Fluorescent, or Manual. ⅷ Effect to select from the following options: Ⅲ Color Tones to select a variety of color tones for the video (None, Monochrome, Negative, Sepia, Green or Aqua). ⅷ Settings to select from the following options: Ⅲ Quality to select between Fine, Normal, or Economy. Ⅲ Storage to select the destination for the video files (Phone or Card). ⅷ Navigation Adjustments uses the navigation key to select an option from Brightness, Selftimer, or Status Display. Ⅲ Status Bar to toggle the camcorder status information either On (show) or Off (Hide). Press the navigation key left (deactivate) or right (activate). Ⅲ Brightness to adjust the image brightness level. Press the navigation key left (decrease) or right (increase) to select a setting. (The default setting is 0.) Ⅲ Selftimer to activate the camera's timer. (See "Setting the Selftimer" on page 105.) ⅷ Picture Album to display the videos saved in the In Phone folder. (See "In Phone Folder" on page 109 for details.) 108 2I. Camera
-
 1
1 -
2
-
3
-
4
-
5
-
6
-
7
-
8
-
9
-
10
-
11
-
12
-
13
-
14
-
15
-
16
-
17
-
18
-
19
-
20
-
21
-
22
-
23
-
24
-
25
-
26
-
27
-
28
-
29
-
30
-
31
-
32
-
33
-
34
-
35
-
36
-
37
-
38
-
39
-
40
-
41
-
42
-
43
-
44
-
45
-
46
-
47
-
48
-
49
-
50
-
51
-
52
-
53
-
54
-
55
-
56
-
57
-
58
-
59
-
60
-
61
-
62
-
63
-
64
-
65
-
66
-
67
-
68
-
69
-
70
-
71
-
72
-
73
-
74
-
75
-
76
-
77
-
78
-
79
-
80
-
81
-
82
-
83
-
84
-
85
-
86
-
87
-
88
-
89
-
90
-
91
-
92
-
93
-
94
-
95
-
96
-
97
-
98
-
99
-
100
-
101
-
102
-
103
-
104
-
105
-
106
-
107
-
108
-
109
-
110
-
111
-
112
-
113
-
114
-
115
-
116
-
117
-
118
-
 119
119 -
 120
120 -
 121
121 -
 122
122 -
 123
123 -
 124
124 -
 125
125 -
 126
126 -
 127
127 -
 128
128 -
 129
129 -
130
-
131
-
132
-
133
-
134
-
135
-
136
-
137
-
138
-
139
-
140
-
141
-
142
-
143
-
144
-
145
-
146
-
147
-
148
-
149
-
150
-
151
-
152
-
153
-
154
-
155
-
156
-
157
-
158
-
159
-
160
-
161
-
162
-
163
-
164
-
165
-
166
-
167
-
168
-
169
-
170
-
171
-
172
-
173
-
174
-
175
-
176
-
177
-
178
-
179
-
180
-
181
-
182
-
183
-
184
-
185
-
186
-
187
-
188
-
189
-
190
-
191
-
192
-
193
-
194
-
195
-
196
-
197
-
198
-
199
-
200
-
201
-
202
-
203
-
204
-
205
-
206
-
207
-
208
-
209
-
210
-
211
-
212
-
213
-
214
-
215
-
216
-
217
-
218
-
219
-
220
-
221
-
222
 |
 |
