Samsung SPH-M560 User Manual (user Manual) (ver.f10) (English) - Page 96
Creating a Countdown, Viewing the Work Calendar
 |
View all Samsung SPH-M560 manuals
Add to My Manuals
Save this manual to your list of manuals |
Page 96 highlights
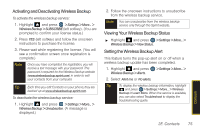
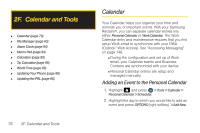
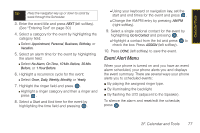
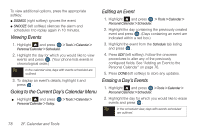
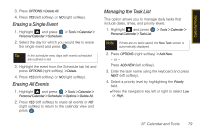
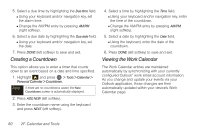
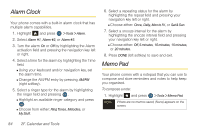
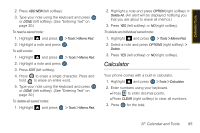
5. Select a due time by highlighting the Due time field. Ⅲ Using your keyboard and/or navigation key, set the alarm time. Ⅲ Change the AM/PM entry by pressing AM/PM (right softkey). 6. Select a due date by highlighting the Due date field. Ⅲ Using your keyboard and/or navigation key, set the date. 7. Press DONE (left softkey) to save and exit. Creating a Countdown This option allows you to enter a timer that counts down to an event based on a date and time specified. 1. Highlight and press > Tools > Calendar > Personal Calendar > Countdown. Note If there are no countdowns saved, the New Countdown screen is automatically displayed. 2. Press ADD NEW (left softkey). 3. Enter the countdown name using the keyboard and press NEXT (left softkey). 4. Select a time by highlighting the Time field. Ⅲ Using your keyboard and/or navigation key, enter the time of the countdown. Ⅲ Change the AM/PM entry by pressing AM/PM (right softkey). 5. Select a date by highlighting the Date field. Ⅲ Using the keyboard, enter the date of the countdown. 6. Press DONE (left softkey) to save and exit. Viewing the Work Calendar The Work Calendar entries are maintained automatically by synchronizing with your currently configured Outlook® work email account information. As you change and update your events via your Outlook application, those changes are then automatically updated within your device's Work Calendar page. 80 2F. Calendar and Tools
-
 1
1 -
2
-
3
-
4
-
5
-
6
-
7
-
8
-
9
-
10
-
11
-
12
-
13
-
14
-
15
-
16
-
17
-
18
-
19
-
20
-
21
-
22
-
23
-
24
-
25
-
26
-
27
-
28
-
29
-
30
-
31
-
32
-
33
-
34
-
35
-
36
-
37
-
38
-
39
-
40
-
41
-
42
-
43
-
44
-
45
-
46
-
47
-
48
-
49
-
50
-
51
-
52
-
53
-
54
-
55
-
56
-
57
-
58
-
59
-
60
-
61
-
62
-
63
-
64
-
65
-
66
-
67
-
68
-
69
-
70
-
71
-
72
-
73
-
74
-
75
-
76
-
77
-
78
-
79
-
80
-
81
-
82
-
83
-
84
-
85
-
86
-
87
-
88
-
89
-
90
-
 91
91 -
 92
92 -
 93
93 -
 94
94 -
 95
95 -
 96
96 -
 97
97 -
 98
98 -
 99
99 -
 100
100 -
 101
101 -
102
-
103
-
104
-
105
-
106
-
107
-
108
-
109
-
110
-
111
-
112
-
113
-
114
-
115
-
116
-
117
-
118
-
119
-
120
-
121
-
122
-
123
-
124
-
125
-
126
-
127
-
128
-
129
-
130
-
131
-
132
-
133
-
134
-
135
-
136
-
137
-
138
-
139
-
140
-
141
-
142
-
143
-
144
-
145
-
146
-
147
-
148
-
149
-
150
-
151
-
152
-
153
-
154
-
155
-
156
-
157
-
158
-
159
-
160
-
161
-
162
-
163
-
164
-
165
-
166
-
167
-
168
-
169
-
170
-
171
-
172
-
173
-
174
-
175
-
176
-
177
-
178
-
179
-
180
-
181
-
182
-
183
-
184
-
185
-
186
-
187
-
188
-
189
-
190
-
191
-
192
-
193
-
194
-
195
-
196
-
197
-
198
-
199
-
200
-
201
-
202
-
203
-
204
-
205
-
206
-
207
-
208
-
209
-
210
-
211
-
212
-
213
-
214
-
215
-
216
-
217
-
218
-
219
-
220
-
221
-
222
 |
 |