Sanyo WXU700 Instruction Manual, PLC-WXU700 - Page 36
Image Mode Selection, Image Select Menu, Remote Control
 |
UPC - 086483074219
View all Sanyo WXU700 manuals
Add to My Manuals
Save this manual to your list of manuals |
Page 36 highlights
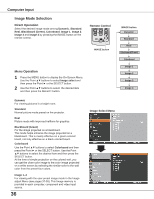
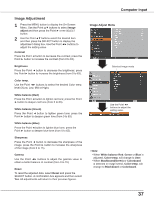
Computer Input Image Mode Selection Direct Operation Select the desired image mode among Dynamic, Standard, Real, Blackboard (Green), Colorboard, Image 1, Image 2, Image 3 and Image 4 by pressing the IMAGE button on the remote control. Remote Control IMAGE button Menu Operation 1 Press the MENU button to display the On-Screen Menu. Use the Point ▲▼ buttons to select Image select and then press the Point ► or the SELECT button. 2 Use the Point ▲▼ buttons to select the desired item and then press the SELECT button. IMAGE button Dynamic Standard Real Blackboard(Green) Colorboard Image 1 Image 2 Image 3 Image 4 Dynamic For viewing pictures in a bright room. Standard Normal picture mode preset on the projector. Real Picture mode with improved halftone for graphics. Blackboard (Green) For the image projected on a blackboard. This mode helps enhance the image projected on a blackboard. This is mainly effective on a green colored board, not truly effective on a black colored board. Colorboard Use the Point ▲▼ buttons to select Colorboard and then press the Point ► or the SELECT button. Use the Point ▲▼ buttons to select the desired item and then press the SELECT button. At the time of simple projection on the colored wall, you can get the close color image to the color image projected on a white screen by selecting the similar color to the wall color from the preset four colors. Image 1-4 For viewing with the user preset image mode in the Image adjust Menu (see pages 37-38). This Image memory is provided in each computer, component and video input source. 36 Image Select Menu
-
 1
1 -
2
-
3
-
4
-
5
-
6
-
7
-
8
-
9
-
10
-
11
-
12
-
13
-
14
-
15
-
16
-
17
-
18
-
19
-
20
-
21
-
22
-
23
-
24
-
25
-
26
-
27
-
28
-
29
-
30
-
 31
31 -
 32
32 -
 33
33 -
 34
34 -
 35
35 -
 36
36 -
 37
37 -
 38
38 -
 39
39 -
 40
40 -
 41
41 -
42
-
43
-
44
-
45
-
46
-
47
-
48
-
49
-
50
-
51
-
52
-
53
-
54
-
55
-
56
-
57
-
58
-
59
-
60
-
61
-
62
-
63
-
64
-
65
-
66
-
67
-
68
-
69
-
70
-
71
-
72
-
73
-
74
-
75
-
76
-
77
-
78
-
79
-
80
-
81
-
82
-
83
-
84
-
85
 |
 |
