Sanyo WXU700 Instruction Manual, PLC-WXU700 - Page 41
Input Source Selection (Component, RGB Scart 21-pin, HDMI), Computer 1, Component, RGB Scart, Input
 |
UPC - 086483074219
View all Sanyo WXU700 manuals
Add to My Manuals
Save this manual to your list of manuals |
Page 41 highlights
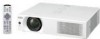
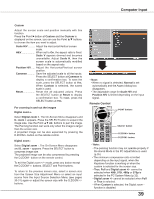
Video Input Input Source Selection (Component, RGB Scart 21-pin, HDMI) Direct Operation Choose Computer 1 by pressing the INPUT button on the top control or press the COMPUTER button on the remote control; choose HDMI by pressing the INPUT button on the top control or press the HDMI button on the remote control. Before using these buttons, correct input source should be selected through Menu operation as described below. Remote Control HDMI button Top Control INPUT button Computer 1 HDMI COMPUTER button Computer 2 Computer 1 HDMI Computer 2 COMPUTER 2 can not be selected when using the COMPUTER IN 2/ MONITOR OUT terminal as MONITOR OUT output. Menu Operation 1 Press the MENU button to display the On-Screen Menu. Use the Point ▲▼ buttons to select Input and then press the Point ► or the SELECT button. 2 Use the Point ▲▼ buttons to select Computer 1 and then press the Point ► button; use the Point ▲▼ buttons to select HDMI, and then press the SELECT button. Input Menu Video S-video Network 3 When Computer 1 is selected, use the Point ▲▼ buttons to select Component or RGB(Scart) and then press the SELECT button. Component When the input source is coming from video equipment connected to the COMPUTER IN 1/COMPONENT IN terminal with a Component-VGA Cable, select Component. RGB (Scart) When the input source is coming from video equipment connected to the COMPUTER IN 1/COMPONENT IN terminal with a ScartVGA Cable, select RGB (Scart). HDMI When the video signal is connected to the HDMI terminal, select HDMI. Note: • Network is for the Network function. See the owner's manual of "Network Set-up and Operation" . • When the Input Search function is set to On1 or On2, the input signal will be searched automatically (p.48). 41
-
 1
1 -
2
-
3
-
4
-
5
-
6
-
7
-
8
-
9
-
10
-
11
-
12
-
13
-
14
-
15
-
16
-
17
-
18
-
19
-
20
-
21
-
22
-
23
-
24
-
25
-
26
-
27
-
28
-
29
-
30
-
31
-
32
-
33
-
34
-
35
-
 36
36 -
 37
37 -
 38
38 -
 39
39 -
 40
40 -
 41
41 -
 42
42 -
 43
43 -
 44
44 -
 45
45 -
 46
46 -
47
-
48
-
49
-
50
-
51
-
52
-
53
-
54
-
55
-
56
-
57
-
58
-
59
-
60
-
61
-
62
-
63
-
64
-
65
-
66
-
67
-
68
-
69
-
70
-
71
-
72
-
73
-
74
-
75
-
76
-
77
-
78
-
79
-
80
-
81
-
82
-
83
-
84
-
85
 |
 |
