Sharp 770SH User Guide - Page 47
Dialling a Service Phone Number, Synchronisation Settings, M 8-7-5
 |
View all Sharp 770SH manuals
Add to My Manuals
Save this manual to your list of manuals |
Page 47 highlights
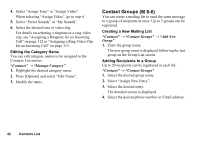
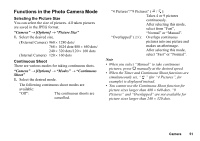
Synchronisation Settings (M 8-7-5) "Contacts" → "Synchronise" → "Sync Settings" 1. Select the desired account or "Create New" to enter the following settings. "Profile Name": Synchronisation profile name (Unique name) "Server Name": "User ID": "Password": Server address User ID for authentication Password for authentication "Proxy": Selects Proxy setting for synchronisation. "Contacts DB Name": Contacts List database name on the server Note • Synchronisation settings may have already been entered in your phone depending on your service provider. You may have restrictions on viewing, deleting, copying or modifying the settings. Contact your service provider for details. Dialling a Service Phone Number (M 8-10) Certain SIM cards contain service phone numbers that can be dialled. Contact your SIM card vendor for more information. On the Contacts screen, "Service Dialling No." is displayed at the bottom of the list. "Contacts" → "Service Dialling No." 1. Select the desired service phone number. Tip • If the SIM card contains only one service phone number, you can dial it in step 1 by pressing B. • If no service phone number is stored in the SIM card, this menu is not displayed. 46 Contacts List
-
 1
1 -
2
-
3
-
4
-
5
-
6
-
7
-
8
-
9
-
10
-
11
-
12
-
13
-
14
-
15
-
16
-
17
-
18
-
19
-
20
-
21
-
22
-
23
-
24
-
25
-
26
-
27
-
28
-
29
-
30
-
31
-
32
-
33
-
34
-
35
-
36
-
37
-
38
-
39
-
40
-
41
-
 42
42 -
 43
43 -
 44
44 -
 45
45 -
 46
46 -
 47
47 -
 48
48 -
 49
49 -
 50
50 -
 51
51 -
 52
52 -
53
-
54
-
55
-
56
-
57
-
58
-
59
-
60
-
61
-
62
-
63
-
64
-
65
-
66
-
67
-
68
-
69
-
70
-
71
-
72
-
73
-
74
-
75
-
76
-
77
-
78
-
79
-
80
-
81
-
82
-
83
-
84
-
85
-
86
-
87
-
88
-
89
-
90
-
91
-
92
-
93
-
94
-
95
-
96
-
97
-
98
-
99
-
100
-
101
-
102
-
103
-
104
-
105
-
106
-
107
-
108
-
109
-
110
-
111
-
112
-
113
-
114
-
115
-
116
-
117
-
118
-
119
-
120
-
121
-
122
-
123
-
124
-
125
-
126
-
127
-
128
-
129
-
130
-
131
-
132
-
133
-
134
-
135
-
136
-
137
-
138
-
139
-
140
-
141
-
142
-
143
-
144
-
145
-
146
-
147
-
148
-
149
-
150
-
151
-
152
-
153
-
154
-
155
-
156
-
157
-
158
-
159
-
160
-
161
-
162
-
163
-
164
-
165
 |
 |