Sharp AL 2040CS AL-2030 AL-2040CS Operation Manual - Page 28
Click the Set the IP Address - network
 |
UPC - 074000075153
View all Sharp AL 2040CS manuals
Add to My Manuals
Save this manual to your list of manuals |
Page 28 highlights
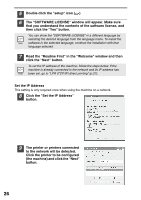
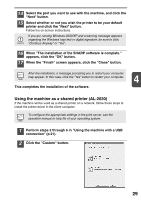
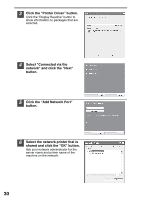
5 Double-click the "setup" icon ( ) 6 The "SOFTWARE LICENSE" window will appear. Make sure that you understand the contents of the software license, and then click the "Yes" button. You can show the "SOFTWARE LICENSE" in a different language by selecting the desired language from the language menu. To install the software in the selected language, continue the installation with that language selected. 7 Read the "Readme First" in the "Welcome" window and then click the "Next" button. To set the IP address of the machine, follow the steps below. If the machine is already connected to the network and its IP address has been set, go to "LPR (TCP/IP) direct printing" (p.27). Set the IP Address This setting is only required once when using the machine on a network. 8 Click the "Set the IP Address" button. 9 The printer or printers connected to the network will be detected. Click the printer to be configured (the machine) and click the "Next" button. 26
-
 1
1 -
2
-
3
-
4
-
5
-
6
-
7
-
8
-
9
-
10
-
11
-
12
-
13
-
14
-
15
-
16
-
17
-
18
-
19
-
20
-
21
-
22
-
 23
23 -
 24
24 -
 25
25 -
 26
26 -
 27
27 -
 28
28 -
 29
29 -
 30
30 -
 31
31 -
 32
32 -
 33
33 -
34
-
35
-
36
-
37
-
38
-
39
-
40
-
41
-
42
-
43
-
44
-
45
-
46
-
47
-
48
-
49
-
50
-
51
-
52
-
53
-
54
-
55
-
56
-
57
-
58
-
59
-
60
-
61
-
62
-
63
-
64
-
65
-
66
-
67
-
68
-
69
-
70
-
71
-
72
-
73
-
74
-
75
-
76
-
77
-
78
-
79
-
80
-
81
-
82
-
83
-
84
-
85
-
86
-
87
-
88
-
89
-
90
-
91
-
92
 |
 |
