Sharp AR-P450 AR-P350 AR-P450 Operation Manual
Sharp AR-P450 Manual
 |
View all Sharp AR-P450 manuals
Add to My Manuals
Save this manual to your list of manuals |
Sharp AR-P450 manual content summary:
- Sharp AR-P450 | AR-P350 | AR-P450 Operation Manual - Page 1
this product, be sure to read the installation requirements and cautions sections. Be sure to keep all operation manuals handy for reference including this manual, the "Operation manual for printer operation and general information" and operation manuals for any optional equipment which has been - Sharp AR-P450 | AR-P350 | AR-P450 Operation Manual - Page 2
copier. Caution: For complete electrical disconnection, pull out the main plug. The socket-outlet shall be installed operation manual. © Copyright SHARP Windows, MS-DOS, and Windows NT are trademarks of Microsoft Corporation in the U.S.A. and other countries. Macintosh, Power Macintosh, Mac - Sharp AR-P450 | AR-P350 | AR-P450 Operation Manual - Page 3
the name plate of the main unit. 3. Do not install your machine in areas that are: q damp, humid servicing and proper ventilation. 31-1/2" (80cm) 11-13/16" (30cm) 23-5/8" (60cm) 23-5/8" (60cm) A small amount of ozone is produced within the printer during operation copier in a ventilated area. 0-1 - Sharp AR-P450 | AR-P350 | AR-P450 Operation Manual - Page 4
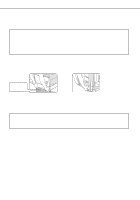
of the machine when viewed from the front. If a duplex module is installed the center of gravity will be even further shifted to the left. When duplex module are securely closed and latched before lifting. If a duplex module is installed, do not lift the machine by the module as it may come off - Sharp AR-P450 | AR-P350 | AR-P450 Operation Manual - Page 5
photoconductive drum. Scratches or smudges on the drum will cause dirty prints. 2. Driver's licenses Fusing unit Adjuster Lock Release "BATTERY DISPOSAL" THIS MACHINE CONTAINS A MANGANESE DIOXIDE BATTERY WHICH MUST BE DISPOSED OF PROPERLY. CONTACT YOUR SHARP DEALER OR SERVICER FOR INSTRUCTIONS - Sharp AR-P450 | AR-P350 | AR-P450 Operation Manual - Page 6
to 0.4 MILLIWATT PLUS 8 % and is maintained constant by the operation of the Automatic Power Control (APC). Caution This product contains a attempt to gain access to the inside of the product. Refer all servicing to qualified personnel. For North America: SAFETY PRECAUTIONS This Digital Equipment - Sharp AR-P450 | AR-P350 | AR-P450 Operation Manual - Page 7
CAUTIONS For Europe: CLASS 1 LASER PRODUCT LASER KLASSE 1 LUOKAN 1 LASERLAITE KLASS 1 LASERAPPARAT CAUTION INVISIBLE LASER RADIATION WHEN OPEN INTERLOCKS DEFEATED. AVOID EXPOSURE TO BEAM. VORSICHT UNSICHTBARE LASERSTRAHLUNG WENN ABDECKUNG GEÖFFNET UND SICHERHEITSVERRIEGELUNG ÜBERBRÜCKT. NICHT DEM - Sharp AR-P450 | AR-P350 | AR-P450 Operation Manual - Page 8
To extend the capabilities of this product to include facsimile functions, an optional facsimile expansion kit must be installed. Refer to the facsimile operation manual for details on using the facsimile features. s Line connection Use the telephone cable supplied with the facsimile expansion - Sharp AR-P450 | AR-P350 | AR-P450 Operation Manual - Page 9
DRIVERS AND PRINTER UTILITIES 2-3 INSTALLING PRINTER DRIVERS USING PLUG & PLAY OR THE "ADD PRINTER WIZARD 2-4 q Before installation 2-4 SETTING THE PRINTER DRIVER 2-5 q Printer driver settings under Windows (selecting and setting print conditions 2-5 PRINTER CONFIGURATION THROUGH THE NETWORK - Sharp AR-P450 | AR-P350 | AR-P450 Operation Manual - Page 10
q Setting in the printer driver 5-7 q Misfeed in the mail-bin stacker 5-8 FINISHER 5-9 q Part names 5-9 q Specifications 5-9 q Finisher functions 5-10 q Using the finisher functions 5-11 q Staple cartridge replacement 5-12 q Misfeed in the finisher 5-14 q Troubleshooting finisher problems - Sharp AR-P450 | AR-P350 | AR-P450 Operation Manual - Page 11
Operation panel of the scanner module 1-12 q Touch panel (on the scanner module 1-13 LOADING PAPER 1-16 q Loading paper in paper tray 1 1-16 q Changing the paper size in paper tray 1 1-16 q Specifications of paper trays 1-17 q Setting 1-24 ADDING TONER 1-25 STORAGE OF SUPPLIES 1-25 1-1 - Sharp AR-P450 | AR-P350 | AR-P450 Operation Manual - Page 12
extended to become multifunctional through the installation of optional peripheral devices. The product can be extended to include copier, network scanning, facsimile or network printing capabilities.This manual describes the basic use of the product as a printer and does not contain use information - Sharp AR-P450 | AR-P350 | AR-P450 Operation Manual - Page 13
its capabilities to include copier, network printer, network scanner or facsimile features. set by a key operator program. As an ENERGY STAR® Par tner, SHARP has determined that this product meets the ENERGY S TA R ® guidelines for energy efficiency. When this product is used as a printer - Sharp AR-P450 | AR-P350 | AR-P450 Operation Manual - Page 14
guide Exit tray* Duplex module/bypass tray* Module for two-sided printing Upper paper output area Finished sheets are deposited here. Upper exit tray extension* Provides support for large size paper. Operation , , and must be installed. If you install or , a power supply unit (page 1-8) must also be - Sharp AR-P450 | AR-P350 | AR-P450 Operation Manual - Page 15
on the photoconductive drum. NOTE Do not touch or damage the photoconductive drum. Cartridge lock lever When replacing the drum, toner or developer cartridge, turn down this lever and pull it out. * For replacement and installation of cartridges, refer to the Operation Manual (Read this document - Sharp AR-P450 | AR-P350 | AR-P450 Operation Manual - Page 16
PART NAMES AND FUNCTIONS Part names and functions of peripheral devices 1-6 - Sharp AR-P450 | AR-P350 | AR-P450 Operation Manual - Page 17
can be selected in the printer driver. Each bin can be assigned to receive printed output by an individual person or by groups of people so that their prints are separated from other users making them easy to retrieve. When this unit is installed, any copies or facsimile prints will be sent to the - Sharp AR-P450 | AR-P350 | AR-P450 Operation Manual - Page 18
s Other optional equipment q Scanner rack (AR-RK1) This rack is required to support the scanner module above the printer. q Power supply unit (AR-DC1) Some peripheral devices require the installation of this power supply. q Print server card (AR-NC5J) A NIC (network interface card) is necessary for - Sharp AR-P450 | AR-P350 | AR-P450 Operation Manual - Page 19
status of the printer. All printer settings are made by using the keys and display panel. 1 Message display Displays the current status of the printer. [ i ] displayed in any message indicates that the [INFORMATION] key should be pressed. [ERROR] indicator Lights up when paper or toner must be - Sharp AR-P450 | AR-P350 | AR-P450 Operation Manual - Page 20
up. READY. The printer is ready to print. FROM TRAY # CHANGE THE TONER CARTRIDGE. PAPER JAM. The printer is currently printing. Out of toner. Replace the toner cartridge. See the separate operation manual entitled "Operation Manual (Read this document before installing the product.)". A misfeed - Sharp AR-P450 | AR-P350 | AR-P450 Operation Manual - Page 21
job will appear. To delete the data, press the [OK] key. To cancel deletion, press the [BACK/C] key. Printing will resume. 1 q To delete print data of a reserved job (jobs stored in the printer): Print data transmitted from computers will be stored in this printer (up to 99 jobs) and will be - Sharp AR-P450 | AR-P350 | AR-P450 Operation Manual - Page 22
printing is being performed. [IMAGE SEND] key/LINE indicator/DATA indicator Press to enter the network scan/fax mode. (See the facsimile operation manual.) [COPY] key Press to select the copy mode.* [JOB STATUS] key Press to display the current job status. (See page 1-14.) [CUSTOM SETTINGS] key - Sharp AR-P450 | AR-P350 | AR-P450 Operation Manual - Page 23
. For the display in other modes, see their respective operation manuals.) 1 SELECT JOB. PRINT HOLD JOB LIST Sharp 005 Microsoft Word - Test001 Sharp 006 EXCEL1 1/1 CONDITION SETTINGS Message display Job status screen (See next page.) Print hold job list If the job retention function (see - Sharp AR-P450 | AR-P350 | AR-P450 Operation Manual - Page 24
screen (common to print, copy, network scan, and fax modes) This screen is displayed when the [JOB STATUS] key on the operation panel is pressed. SETS / PROGRESS STATUS 003 / 000 COPYING JOB QUEUE 1/1 COMPLETE 003 / 000 010 / 000 PAPER EMPTY* WAITING DETAIL PRIORITY STOP/DELETE PRINT - Sharp AR-P450 | AR-P350 | AR-P450 Operation Manual - Page 25
beeps can be disabled by a key operator program. (See page 9 of the Key Operator's Guide.) s Selection of function [ set on the special feature screen. They can be set or cancelled by alternate touches on the panel. Copier feature Dual page copy Job build Facsimile feature Polling Own number print - Sharp AR-P450 | AR-P350 | AR-P450 Operation Manual - Page 26
paper supplied by SHARP. (See page 1-18.) q When you change the paper type and size in paper tray 1, set the paper type and size referring to "Setting the paper size the machine. 2 Adjust the guide plates A and B in the tray to the length and width of the paper. The guide plates A and B are slidable - Sharp AR-P450 | AR-P350 | AR-P450 Operation Manual - Page 27
: 8-1/2 x 11, 8-1/2 x 11R q If "AUTO-AB" is selected in setting the paper size and type (page 1-19), the following paper sizes can be used drawer Plain paper (Refer to the next q If "AUTO-INCH" is selected in setting the 16 to 28 lbs. page for applicable plain papers.) paper size and type - Sharp AR-P450 | AR-P350 | AR-P450 Operation Manual - Page 28
, the orientation must be landscape. q Use SHARP recommended paper. Do not use labels other than SHARP recommended labels. Doing so may leave adhesive residue in the printer, causing paper misfeeds, smudges on prints or other machine trouble. q Japanese official postcards can be used. q Applicable - Sharp AR-P450 | AR-P350 | AR-P450 Operation Manual - Page 29
and type from the operation panel on the main printer When the paper size or type is changed in a paper tray, set them referring to the following procedure. 1 Press the [MENU] key repeatedly until "CUSTOM SETTINGS" appears in the 7 Press the [OK] key. 1 To cancel the setting change, press the - Sharp AR-P450 | AR-P350 | AR-P450 Operation Manual - Page 30
and the paper size. q If TRAY 1 has been selected in step 3: CUSTOM SETTINGS TRAY 1 TYPE/SIZE SETTING OK TYPE PLAIN LETTER HEAD PRE-PRINTED PRE-PUNCHED SIZE 81 2 11 A4 B5 RECYCLED COLOR The highlighted keys indicate the current selections. To change either type or size or both, touch - Sharp AR-P450 | AR-P350 | AR-P450 Operation Manual - Page 31
in the multi purpose drawer, set them in the orientation shown below. Loading postcards Load postcards print side up to the rear left of the tray as shown. Loading envelopes Envelopes can only be printed on the address side. Be sure to place envelopes with the address side up and the top of - Sharp AR-P450 | AR-P350 | AR-P450 Operation Manual - Page 32
windows, linings, self-adhesive patches or synthetic materials. Attempting to print on these may cause misfeeds, inadequate toner adherence or other trouble. envelopes or smudges on prints may occur even if envelopes within specification are used. In this case, the problem may be reduced by - Sharp AR-P450 | AR-P350 | AR-P450 Operation Manual - Page 33
printed on the label. Printing on the label may cause smudges on prints. Transparency film must be set envelopes, 20 postcards 25-3/4" (W) x 22-21/64" (D) x 5-43/64" (H) (654 mm (W) x 567 mm instructions for the multipurpose drawer on page 1-21. Middle and lower paper trays: Up to 500 sheets of SHARP - Sharp AR-P450 | AR-P350 | AR-P450 Operation Manual - Page 34
printer. 2 Load paper onto the right and left paper feed tables. q Load paper onto the right paper feed table. The right table holds approximately 1,200 sheets. q Raise the paper guide . After loading paper, be sure to return the paper guide. 4 Set the paper type. If you have changed the paper size - Sharp AR-P450 | AR-P350 | AR-P450 Operation Manual - Page 35
for replacement of these cartridges, see the separate "Operation manual (Read this document before installing the product.)." NOTE If you press and hold down the [INFORMATION] key or the [COPY] key while printing is being performed or in standby, 1 the quantity of toner remaining (as a percentage - Sharp AR-P450 | AR-P350 | AR-P450 Operation Manual - Page 36
1-26 - Sharp AR-P450 | AR-P350 | AR-P450 Operation Manual - Page 37
AND PRINTER UTILITIES ........ 2-3 INSTALLING PRINTER DRIVERS USING PLUG & PLAY OR THE "ADD PRINTER WIZARD 2-4 q Before installation 2-4 SETTING THE PRINTER DRIVER 2-5 q Printer driver settings under Windows (selecting and setting print conditions 2-5 PRINTER CONFIGURATION THROUGH THE NETWORK - Sharp AR-P450 | AR-P350 | AR-P450 Operation Manual - Page 38
this machine as a network printer, a print server card is needed. See the operation manual supplied with the print server card. For a network cable, use a shielded cable. SOFTWARE FOR WINDOWS When using this product in a Windows environment, you must install a printer driver in your computer system - Sharp AR-P450 | AR-P350 | AR-P450 Operation Manual - Page 39
DRIVERS AND PRINTER UTILITIES Windows client Printer Status Monitor Windows software PCL printer drivers PCL display font Network administrator Network Administration Utility The following software can be installed from the installer supplied in the CD-ROM : q PCL printer drivers (PCL5e and PCL6 - Sharp AR-P450 | AR-P350 | AR-P450 Operation Manual - Page 40
for using PCL5e driver under Windows NT R:\Option\English\Nt_pcl5e Path for using PCL6 driver under Windows NT R:\Option\English\Nt_pcl6 s Example of installation of a printer driver using the "Add Printer Wizard" under Windows 98 The installation method of a printer driver under Windows 98 is - Sharp AR-P450 | AR-P350 | AR-P450 Operation Manual - Page 41
[Settings] and then [Printers]. The Printer window will appear. 2 Right-click the installed printer driver and select [Document Defaults]. This example is the screen displayed by selecting AR-P350PCL5e. 3 Set each item. 3 Set each item. For setting items, see the printer driver help. For setting - Sharp AR-P450 | AR-P350 | AR-P450 Operation Manual - Page 42
the setting of each function, see the detailed description. 1 Open the Web browser on your computer. 2 Input the IP Address previously specified for this product to the ADDRESS field of the browser. Input the IP address previously specified in this product. (See page 13 of the Key Operator's Guide - Sharp AR-P450 | AR-P350 | AR-P450 Operation Manual - Page 43
, up to 100 destinations can be registered in the file server and desktop in total. s Setting E-mail Destinations Sets the destination information for E-mail delivery from the network scanner. 2 Destination E-mail addresses and file types as well as information for destination control (destination - Sharp AR-P450 | AR-P350 | AR-P450 Operation Manual - Page 44
The alert message is transmitted when a problem such as a supplies requirement (toner or paper) or errors(device failure or paper misfeed) occur. s SNMP Trap Setup IP addresses, trap community, and authentic community are set. * If a facsimile expansion kit is installed, this function cannot be used - Sharp AR-P450 | AR-P350 | AR-P450 Operation Manual - Page 45
" operation 1 Normal print 4 Proof print (For "Normal print", no input from the operation panel of the printer is needed.) 2 The print setting in this mode is the basic print operation. If no problem such as a paper misfeed and empty toner occurs in the printer, the print start operation is - Sharp AR-P450 | AR-P350 | AR-P450 Operation Manual - Page 46
. 2 Press the [OK] key. ARAI WORD-1 When the [OK] key is pressed, a user name and a file name of the print data stored as a hold job will appear. 3 Select the desired data. 5 Enter the first digit of the password and press the [OK] key. (needed only if a password has been set) Be sure to enter - Sharp AR-P450 | AR-P350 | AR-P450 Operation Manual - Page 47
1 to 9. JOB CONTROL 2 When the machine is being operated from the touch panel on a scanner module: 1 Press the [PRINT] key to display the printer basic screen. 4 Ensure that the desired number of prints is set. NUMBER OF PRINTS 1 (1 999) The number of prints can be changed by using the PRIN or - Sharp AR-P450 | AR-P350 | AR-P450 Operation Manual - Page 48
the number of pages for the printer with a key operator program. For registration of account numbers, see the Key Operator's Guide (page 7). When executing print operation from the computer, you must enter an account number on the setting screen of the printer driver.The account number entry screen - Sharp AR-P450 | AR-P350 | AR-P450 Operation Manual - Page 49
through a network. Using the printer in the Windows environment To use this machine as a PostScript printer, the PostScript printer driver or the PPD files (PostScript Printer Description 2 files) must be installed to your computer. For installation of the printer driver, use the PRINTER UTILITIES - Sharp AR-P450 | AR-P350 | AR-P450 Operation Manual - Page 50
fonts as needed when the PostScript printer driver is installed.To install the PS display fonts, select it when installing the PostScript printer driver using the installer. s Installing the resident font information for PPD (Windows 95/98/Me) After installing the PPD files, follow the procedure - Sharp AR-P450 | AR-P350 | AR-P450 Operation Manual - Page 51
refers to when using its LaserWriter printer driver for printing. s SHARP PPD Utility The SHARP PPD Utility is used to register account numbers and passwords when the auditing mode (page 7 of the Key Operator's Guide) or the job retention function with password (page 2-9) is used. This utility is - Sharp AR-P450 | AR-P350 | AR-P450 Operation Manual - Page 52
PRINTER s Installing the utilities The screens in the Mac OS 9.0 environment are used below as examples. The display varies with the operating system and printer driver versions. 1 Turn on the computer and start the operating system. 2 Insert the supplied SHARP PS3 Expansion Kit AR-PK1 PRINTER - Sharp AR-P450 | AR-P350 | AR-P450 Operation Manual - Page 53
The default printer name of this product is "SCXXXXXX" (XXXXXX: 6 alphanumeric characters). The printer name can be changed by adjusting the setting for the Print Server Card (AR-NC5J). 5 Click 'Create', 'Setup' or 'Setup...'. (Phrase depends on the version of MAC OS installed) q If you are setting - Sharp AR-P450 | AR-P350 | AR-P450 Operation Manual - Page 54
appear. (The display varies with the operating system versions, printer driver versions, and application software.) 2 Adjust each setting. q Paper size, reduction/enlargement, and orientation can be set. 3 Click the [OK] button. s Print condition setting 1 Select "Print" from the [File] menu of - Sharp AR-P450 | AR-P350 | AR-P450 Operation Manual - Page 55
the installer for Macintosh contained in the SHARP PS3 Expansion Kit AR-PK1 PRINTER UTILITIES CD-ROM. This utility allows up to 20 account numbers to be registered for the computer. The account numbers are the same as those for the copier auditing mode and must be registered using one of the key - Sharp AR-P450 | AR-P350 | AR-P450 Operation Manual - Page 56
2-20 - Sharp AR-P450 | AR-P350 | AR-P450 Operation Manual - Page 57
all printer configuration settings (items that can be set from the operation panel 3-2 q Default settings 3-4 q PCL settings 3-4 q PostScript settings 3-4 CUSTOM SETTINGS 3-5 q Operation procedure common to all custom settings (items that can be set from the operation panel 3-5 q Setting items - Sharp AR-P450 | AR-P350 | AR-P450 Operation Manual - Page 58
can be set from the operation panel) When the machine is being operated from the operation panel on the main unit: 1 Press the [MENU] key to display the configuration setting menu screen. Press the [MENU] key repeatedly until "CONDITION SETTING" appears. Any print jobs held in the printer and any - Sharp AR-P450 | AR-P350 | AR-P450 Operation Manual - Page 59
to the printer will be printed in the former print conditions. 2 Touch the key of the desired item to display its setting screen. CONDITION SETTINGS DEFAULT SETTINGS DEFAULT SETTINGSPCL SETTINGS PCL SETTINGS PostScript SETTPIoNsGtSScript SETTINGS 3 Touch the desired setting on the setting screen - Sharp AR-P450 | AR-P350 | AR-P450 Operation Manual - Page 60
SETTING Default settings The default settings allow detailed print conditions to be set for printing without any printer driver (for example, printing from MS-DOS and printing from a computer without any printer driver installed).The setting items are shown below. NOTE When some items can be set - Sharp AR-P450 | AR-P350 | AR-P450 Operation Manual - Page 61
the Key Operator's Guide. *1 Can be set if this product is equipped with a scanner module. *2 Can be set if this product is equipped with a scanner module and the facsimile feature can be used. *3 Can be set if this product is equipped with a scanner module and the facsimile feature or the network - Sharp AR-P450 | AR-P350 | AR-P450 Operation Manual - Page 62
on the next page. 4 To finish the setting operation, touch the [EXIT] key. CUSTOM SETTINGS TOTAL COUNT TRAY SETTINGS DISPLAY CONTRAST ADDRESS CONTROL LIST PRINT RECEIVE MODE KEY OPERATOR PROGRAMS CLOCK FAX DATA FORWARD CUSTOM SETTINGS TRAY SETTINGS TYPE / SIZE TRAY 1 PLAIN / 81/2X11 TRAY - Sharp AR-P450 | AR-P350 | AR-P450 Operation Manual - Page 63
NIC page printing: A list of settings used by the NIC (Network Interface Card), namely the print server card, is printed. q PostScript font list printing: A list of fonts that can be used with the PostScript printer driver is printed. NOTE If test page printing is disabled with key operator program - Sharp AR-P450 | AR-P350 | AR-P450 Operation Manual - Page 64
- Sharp AR-P450 | AR-P350 | AR-P450 Operation Manual - Page 65
procedure 4-2 q Misfeed removal guidance 4-3 q Misfeed in the paper feed area 4-4 q Misfeed in the transport area, fusing area, and exit area 4-6 q Misfeed in the duplex module 4-7 TROUBLESHOOTING 4-8 USER MAINTENANCE 4-11 q Cleaning the scanner module 4-11 4-1 - Sharp AR-P450 | AR-P350 | AR-P450 Operation Manual - Page 66
printing will stop and the message shown below will appear. Follow the procedure below to remove misfed paper. PAPER JAM. [i] NOTES q Do not damage or touch the photoconductive drum in the table. 2 Press the key. Use the or keys on the operation panel to scroll through the guidance messages - Sharp AR-P450 | AR-P350 | AR-P450 Operation Manual - Page 67
and printing including copying and facsimile output will stop. The approximate misfeed locations are indicated with " " shown in the illustration below. The page numbers for detailed information on misfeed removal are also shown. Misfeed in the scanner module . (See the operation manual for copier - Sharp AR-P450 | AR-P350 | AR-P450 Operation Manual - Page 68
stand. When reinstalling it, place the left rear or the drawer into the slot and rotate the drawer to the right and into the stand. Installation of trays in the stand/3x500 sheet paper drawer The middle and lower trays cannot be - Sharp AR-P450 | AR-P350 | AR-P450 Operation Manual - Page 69
in paper tray 1" (steps 1 to 5 on the previous page) to remove the misfed paper. Raise the paper guide and remove the misfed paper. After removing the misfed paper, be sure to return the paper guide. 4 Gently close the large capacity tray. Push the paper tray all the way into the machine. 5 Gently - Sharp AR-P450 | AR-P350 | AR-P450 Operation Manual - Page 70
care not to tear the paper. NOTE Do not touch or damage the transfer roller. Transfer roller Do not touch or damage the photoconductive drum. Photoconductive drum If the duplex module is equipped with an exit tray and paper is misfed in the exit area, remove the misfed paper as shown in - Sharp AR-P450 | AR-P350 | AR-P450 Operation Manual - Page 71
MISFEED REMOVAL Misfeed in the duplex module 1 Unlatch the duplex module and slide it to the left. Unlatch the unit and gently move the module away from the machine. 5 Gently close the duplex module. After closing the duplex module, confirm that the misfeed message has been cleared and the normal - Sharp AR-P450 | AR-P350 | AR-P450 Operation Manual - Page 72
problems concerning printer features. For troubleshooting specific problems related to copier, facsimile, or network scanner features, see the separate manuals provided for them. For problems related to peripheral devices, see chapter 5 of this manual. Problem Printer does not operate. Printer - Sharp AR-P450 | AR-P350 | AR-P450 Operation Manual - Page 73
. Installation of a hard disk drive will enable printing of large size files. Printed image is too light or too dark. q Is the exposure control set properly? The printer exposure level can be adjusted by using a key operator program. Contact your key operator. (page 11 of the Key Operator's Guide - Sharp AR-P450 | AR-P350 | AR-P450 Operation Manual - Page 74
TROUBLESHOOTING Problem Smudges on printed sheets Check q Is a message indicating a need of maintenance or replacement of developer cartridge displayed ([ERROR] indicator on the main unit operation panel lit)? Cannot select the desired paper in the printer driver or on the copier operation panel. - Sharp AR-P450 | AR-P350 | AR-P450 Operation Manual - Page 75
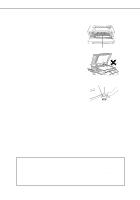
USER MAINTENANCE To ensure good service from this product over a long period of time, it is spots, these spots will become part of scanned images.These will show up as defects when the images are printed. Clean these areas by wiping them with a soft, clean cloth dampened with water or a small amount - Sharp AR-P450 | AR-P350 | AR-P450 Operation Manual - Page 76
- Sharp AR-P450 | AR-P350 | AR-P450 Operation Manual - Page 77
q Setting in the printer driver 5-7 q Misfeed in the mail-bin stacker 5-8 FINISHER 5-9 q Part names 5-9 q Specifications 5-9 q Finisher functions 5-10 q Using the finisher functions 5-11 q Staple cartridge replacement 5-12 q Misfeed in the finisher 5-14 q Troubleshooting finisher problems - Sharp AR-P450 | AR-P350 | AR-P450 Operation Manual - Page 78
DUPLEX MODULE If a duplex module is installed, printing onto both sides of paper can be performed. Two types of duplex modules are available: duplex module/bypass tray and duplex module. The descriptions in this manual are for the duplex module/bypass tray. For misfeed removal for these modules, - Sharp AR-P450 | AR-P350 | AR-P450 Operation Manual - Page 79
When setting 11"x 17", 8-1/2" x 14", 8-1/2" x 13, A3 or B4 paper, be sure to extend the bypass tray extension. 2 Set the bypass tray paper guides to When printing onto transparency film, remove the output sheets as soon as possible. q For transparency film, use SHARP recommended film. 4 Set the - Sharp AR-P450 | AR-P350 | AR-P450 Operation Manual - Page 80
descriptions are for a PCL driver in the Windows 98 environment. s Two-sided printing Open the "Main" tab and check the radio button of the desired two-sided printing mode. Copying in the duplex mode For copying in the duplex mode, press the COPY key on the operation panel and make all selections - Sharp AR-P450 | AR-P350 | AR-P450 Operation Manual - Page 81
MODULE Troubleshooting (concerning the duplex module) Check the list below before calling for service. Problem Check Solution or cause The printer will not Message indicating the paper type cannot Special paper cannot be used for two-sided print duplex prints. be used for two-sided printing - Sharp AR-P450 | AR-P350 | AR-P450 Operation Manual - Page 82
printer, copier, and facsimile features can be delivered here. Front cover Open for misfeed removal. Mail bins Each bin can be designated to receive printed output for assigned users. These bins cannot be used for copier and the mail bins Requires the installation of an optional power supply unit - Sharp AR-P450 | AR-P350 | AR-P450 Operation Manual - Page 83
that the network administrator assign bins by individual or by department. For example, the Product Planning department can be assigned to mail bin 1 and the Engineering department assigned to mail bin 2 etc. 2 Select the mail bin for receiving prints in the printer driver. For the setting in the - Sharp AR-P450 | AR-P350 | AR-P450 Operation Manual - Page 84
If a misfeed has occurred in the mail-bin stacker during printing, remove the misfed paper following the procedure below. 1 Open is not found in step 2, open the front cover. 7 Close the paper guide. Close the paper guide securely. 8 Close the front cover. 4 Turn the roller rotating knob in the - Sharp AR-P450 | AR-P350 | AR-P450 Operation Manual - Page 85
. Top tray Printer, copier and fax output can be delivered here. To print onto large paper (11" x 17", 8-1/2" x 14", 8-1/2" x 13", A3 or B4), extend the tray. Staple box Pull the box out to replace the staple cartridge or to remove jammed staples. Offset tray Stapled sets or sets to be offset - Sharp AR-P450 | AR-P350 | AR-P450 Operation Manual - Page 86
or group will be offset from the previous set or group for easy separation. Offset will function for non-stapled printer or copier output, Non-offset can only be selected for copier output. Stapled sets will not be offset. s Staple sort mode Collated sets will be stapled and delivered to the offset - Sharp AR-P450 | AR-P350 | AR-P450 Operation Manual - Page 87
printer driver in the Windows 98 environment as an example. NOTES q The settings screens to the right will appear only if the devices have been set properly in the printer driver mark of offset will be automatically canceled. [OFFSET TRAY] key (See page 5-9.) When the offset tray is selected, copies - Sharp AR-P450 | AR-P350 | AR-P450 Operation Manual - Page 88
lever to the left, rotate the staple unit to face down. 5 Insert a new staple cartridge into the staple box aligning the arrow of the staple cartridge with that of the staple box. 9 Close the front cover. NOTE Make a test print or copy in the staple sort mode to ensure that stapling is performed - Sharp AR-P450 | AR-P350 | AR-P450 Operation Manual - Page 89
staple unit to face up. 11 Close the front cover. 6 Pull the release lever for the staple box and remove the box. NOTE Make a test print or copy in the staple sort mode to ensure that stapling is performed properly. 5-13 - Sharp AR-P450 | AR-P350 | AR-P450 Operation Manual - Page 90
. 1 Remove the misfed paper from the output area. Be careful not to tear the misfed paper during removal. 5 Raise the paper guide and remove the misfed paper. Paper guide Do not remove paper from the stapler compiler. 2 Open the finisher top cover. Top cover Move the tab in the direction of - Sharp AR-P450 | AR-P350 | AR-P450 Operation Manual - Page 91
FINISHER Troubleshooting finisher problems Check the list below before calling for service. Problem Stapling position is not correct. The finisher does not operate. Check Stapling position not set correctly? Are any finisher covers open? Message indicating need to remove paper from the stapler - Sharp AR-P450 | AR-P350 | AR-P450 Operation Manual - Page 92
FINISHER Stapling position quick reference guide for duplex output The orientation of the copy paper, position stapling Two-position stapling Left binding Top binding Right binding Landscape orientation printing One-position stapling Two-position stapling with left binding cannot be made. - Sharp AR-P450 | AR-P350 | AR-P450 Operation Manual - Page 93
for staple cartridge replacement or to remove jammed staples. NOTES q Do not press on the saddle stitch finisher (particularly the offset tray). q Be careful about the offset tray during printing because the tray moves up and down. q The saddle stitch finisher requires the installation of other - Sharp AR-P450 | AR-P350 | AR-P450 Operation Manual - Page 94
side. Lower tray: 4-47/64" (120 mm) pitch from the center of paper Requires the installation of an optional power supply Sets will move from side to side so that each set or group will be offset from the previous set or group for easy separation. Offset will function for non-stapled printer or copier - Sharp AR-P450 | AR-P350 | AR-P450 Operation Manual - Page 95
mode Collated sets of prints or copies will be stapled and delivered to the offset tray. When saddle stitching is selected, the prints or copies (only if a punch module is installed) If the saddle stitch finisher is equipped with a hole punch module, printed paper can be hole punched and delivered - Sharp AR-P450 | AR-P350 | AR-P450 Operation Manual - Page 96
printer driver in the Windows 98 environment as an example. NOTES q The settings screens above will appear only if the devices have been set properly in the printer driver offset will be automatically canceled. [CENTER TRAY] key If the center tray is selected, output paper will be delivered to the - Sharp AR-P450 | AR-P350 | AR-P450 Operation Manual - Page 97
be stapled at the center and delivered to the saddle stitch tray. [PUNCH] key (See page 5-19.) If the saddle stitch finisher is equipped with a hole punch module, printed paper can be hole punched and delivered to the offset tray. Staple cartridge replacement and staple jam removal When the staple - Sharp AR-P450 | AR-P350 | AR-P450 Operation Manual - Page 98
clicks into place. 10 Close the front cover. NOTE Make a test print or copy in the staple sort mode to ensure that stapling is performed jam removal 1 Unlatch the saddle stitch finisher and slide it away from the printer. 5 If saddle stitch was selected, open the saddle stitch section cover. - Sharp AR-P450 | AR-P350 | AR-P450 Operation Manual - Page 99
. 14 Push the stapler section back into the finisher. 15 Close the front cover. 16 5 Push the saddle stitch finisher back against the printer. NOTE Make a test print or copy in the staple sort mode to ensure that stapling is performed properly. s Disposal of hole punch scrap 1 Unlatch the saddle - Sharp AR-P450 | AR-P350 | AR-P450 Operation Manual - Page 100
in the saddle stitch finisher, remove the misfed paper following the procedure below. 1 Unlatch the saddle stitch finisher and slide it away from the printer. 5 Close the top cover. 2 Remove the misfed paper from the main unit. After removing the misfed paper, open and close the duplex module to - Sharp AR-P450 | AR-P350 | AR-P450 Operation Manual - Page 101
misfed paper during removal. 12 Close the saddle stitch section cover. 5 13 Close the front cover. 14 Push the saddle stitch finisher back against the printer. 5-25 - Sharp AR-P450 | AR-P350 | AR-P450 Operation Manual - Page 102
FINISHER Troubleshooting (concerning the saddle stitch finisher) Check the list below before calling for service. Problem Stapling position is not correct (including saddle stitch). The saddle stitch finisher does not operate. Stapling cannot be performed (including saddle stitch). Stapled sets - Sharp AR-P450 | AR-P350 | AR-P450 Operation Manual - Page 103
SADDLE STITCH FINISHER Stapling position quick reference guide for duplex output The orientation of the copy paper, cannot be made. Top binding Portrait orientation printing Right binding Left binding Top binding Landscape orientation printing One-position stapling Two-position stapling Two- - Sharp AR-P450 | AR-P350 | AR-P450 Operation Manual - Page 104
Page 1 Page 2 Page 1 & Page 2 Duplexed Output result Page 3 Page 4 Page 3 & Page 4 Duplexed Left binding Portrait orientation printing Right binding Landscape orientation printing Same as above Page 1 Page 2 Page 1 & Page 2 Duplexed Page 3 Page 4 Page 3 & Page 4 Duplexed NOTES - Sharp AR-P450 | AR-P350 | AR-P450 Operation Manual - Page 105
CHAPTER 6 APPENDIX Page PRINTER SPECIFICATIONS 6-2 q List of principal printer driver functions 6-3 LIST OF COMBINATION OF PERIPHERAL DEVICES 6-4 NOTICE PAGE PRINTING 6-5 PRINT AREA 6-6 6-1 - Sharp AR-P450 | AR-P350 | AR-P450 Operation Manual - Page 106
to console type if an optional stand is installed.) Print system Exposure system Developer system Paper feed system Fusing system CPU Electrophotographic system Semiconductor laser diode system Magnetic brush development Paper trays Heat roller 64 bit RISC, 200 MHz Memory capacity (standard) 32 - Sharp AR-P450 | AR-P350 | AR-P450 Operation Manual - Page 107
SPECIFICATIONS List of principal printer driver functions General Paper Paper output Graphic When an optional PS3 expansion kit is installed Driver selections PCL5e/PCL6 PS PPD (Windows) PPD (Macintosh) Copies Orientation Duplex print 1 - 999 Yes Yes 1 - 999 Yes Yes 1 - 999 Yes Yes - Sharp AR-P450 | AR-P350 | AR-P450 Operation Manual - Page 108
PS3 expansion kit Network scanner expansion kit *1 *1 Facsimile expansion kit *1 *1 Fax memory (8 MB) *1 *1 Power supply unit Hard disk drive Multi-function controller *1 *1 board Print server card = ( A ) and ( B) must be installed together. *1 = ( A) requires installation of one of - Sharp AR-P450 | AR-P350 | AR-P450 Operation Manual - Page 109
of other jobs. q When a print job is sent to the printer and the number of print hold jobs has reached the maximum of set. Disabling of notice page printing Notice page printing can be disabled using a key operator program. See "Disable notice page printing" on page 11 of the Key Operator's Guide - Sharp AR-P450 | AR-P350 | AR-P450 Operation Manual - Page 110
a printer driver for Windows or Macintosh is used for printing, the printable area will be smaller. The actual printable area depends on the printer driver to : 15 PC1004 (OS/2) 16 DeskTop 17 PS Text 18 Microsoft Publishing 19 Math-8 20 PS Math No. symbol set 21 Pi Font 22 ISO 8859-2 Latin - Sharp AR-P450 | AR-P350 | AR-P450 Operation Manual - Page 111
- Sharp AR-P450 | AR-P350 | AR-P450 Operation Manual - Page 112
Operation manual for printer operation and general information SHARP ELECTRONICS CORPORATION Sharp Plaza, Mahwah, New Jersey 07430-2135. SHARP CORPORATION PRINT IN CHINA 2001 KS1 TINSE2057FCZZ P350,P450,3500,3501 P3551,4500,4501,4551
-
 1
1 -
 2
2 -
 3
3 -
 4
4 -
 5
5 -
 6
6 -
 7
7 -
8
-
9
-
10
-
11
-
12
-
13
-
14
-
15
-
16
-
17
-
18
-
19
-
20
-
21
-
22
-
23
-
24
-
25
-
26
-
27
-
28
-
29
-
30
-
31
-
32
-
33
-
34
-
35
-
36
-
37
-
38
-
39
-
40
-
41
-
42
-
43
-
44
-
45
-
46
-
47
-
48
-
49
-
50
-
51
-
52
-
53
-
54
-
55
-
56
-
57
-
58
-
59
-
60
-
61
-
62
-
63
-
64
-
65
-
66
-
67
-
68
-
69
-
70
-
71
-
72
-
73
-
74
-
75
-
76
-
77
-
78
-
79
-
80
-
81
-
82
-
83
-
84
-
85
-
86
-
87
-
88
-
89
-
90
-
91
-
92
-
93
-
94
-
95
-
96
-
97
-
98
-
99
-
100
-
101
-
102
-
103
-
104
-
105
-
106
-
107
-
108
-
109
-
110
-
111
-
112
 |
 |

LASER PRINTER
Operation manual
(for printer operation and general information)
Be sure to become thoroughly familiar with this manual to
gain the maximum benefit from the product.
Before installing this product, be sure to read the
installation requirements and cautions sections.
Be sure to keep all operation manuals handy for reference
including this manual, the "Operation manual for printer
operation and general information" and operation manuals
for any optional equipment which has been installed.