Sharp BT421 User Manual for the - Page 10
Parts Name and Functions, Control Panel
 |
View all Sharp BT421 manuals
Add to My Manuals
Save this manual to your list of manuals |
Page 10 highlights
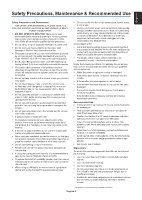
Parts Name and Functions Control Panel 1 MENU button (MENU) Turns on/off the OSD menu. 2 SOURCE button (SOURCE) Acts as INPUT button within OSD menu. You can select [DVI1] or [DVI2] with the up ( )/down ( ) button. These are available input only, shown as their factory preset name. 3 PLUS button (+) Acts as (+) button to increase the adjustment with OSD menu. 4 MINUS button (-) Acts as (-) button to decrease the adjustment with OSD menu. 5 UP button ( ) Acts as UP button to move the highlighted area up to select adjustment items within OSD menu. 6 DOWN button ( ) Acts as DOWN button to move the highlighted area down to select adjustment items within OSD menu. G POWER button ( ) Switches the power on/off. See also page 14. H Remote control sensor and Power Indicator Receives the signal from the remote control (when using the wireless remote control). See also page 11. Glows green when the LCD monitor is in active mode. Glows red when the LCD is in POWER OFF mode. Glows red while in Power Standby mode with the "Scheduler" function enabled. When a component failure is detected within the monitor, the indicator will blink red. English-8
-
 1
1 -
2
-
3
-
4
-
 5
5 -
 6
6 -
 7
7 -
 8
8 -
 9
9 -
 10
10 -
 11
11 -
 12
12 -
 13
13 -
 14
14 -
 15
15 -
16
-
17
-
18
-
19
-
20
-
21
-
22
-
23
-
24
-
25
-
26
-
27
-
28
-
29
-
30
-
31
 |
 |
