Sharp LC-26SH12U Service Manual - Page 9
Disassembly, Instructions - parts
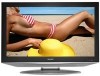 |
UPC - 074000370012
View all Sharp LC-26SH12U manuals
Add to My Manuals
Save this manual to your list of manuals |
Page 9 highlights
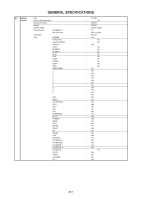
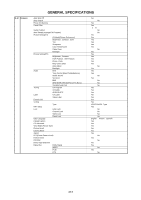
DISASSEMBLY INSTRUCTIONS 1. REMOVAL OF MECHANICAL PARTS AND P.C. BOARDS 1-1: BACK CABINET (Refer to Fig. 1-1) 1. Remove the 14 screws 1. 2. Remove the 7 screws 2. 3. Remove the Back Cabinet in the direction of arrow. 1 222 2 11 2 12 1 2 1 1 1-3: REMOCON PCB (Refer to Fig. 1-3) 1. Disconnect the following connector: (CP106). 2. Remove the 2 screws 1. 3. Remove the Remocon PCB in the direction of arrow. 11 Remocon PCB 1 1 1 1 1 1 1 Back Cabinet Fig. 1-3 1-4: LCD BLOCK (Refer to Fig. 1-4) 1. Disconnect the following connectors: (CP406, CP1001 and CP2407). 2. Remove the 2 screws 1. 3. Remove the Angle Panel in the direction of arrow (A). 4. Remove the Holder Panel. 5. Remove the 4 screws 2. 6. Remove the LCD Block in the direction of arrow (B). 7. Remove the 4 screws 3. 8. Remove the Angle Main. Fig. 1-1 1-2: OPERATION PCB (Refer to Fig. 1-2) 1. Disconnect the following connector: (CP103). 2. Remove the Plate Button Ass'y in the direction of arrow (A). 3. Remove the 3 screws 1. 4. Remove the Operation PCB in the direction of arrow (B). 5. Remove the 7 screws 2. 6. Remove the 2 screws 3. 7. Remove the Angle Hinge in the direction of arrow (C). Holder Panel Angle Main 3 3 3 3 2 Angle Main 2 2 LCD Block 2 Operation PCB (B) Plate Button Ass'y 11 1 2 3 2 3 2 2 2 2 (C) 2 (A) Angle Hinge 1 1 Holder Panel (B) Angle Panel (A) Fig. 1-2 Fig. 1-4 B1-1
-
 1
1 -
2
-
3
-
 4
4 -
 5
5 -
 6
6 -
 7
7 -
 8
8 -
 9
9 -
 10
10 -
 11
11 -
 12
12 -
 13
13 -
 14
14 -
15
-
16
-
17
-
18
-
19
-
20
-
21
-
22
-
23
-
24
-
25
-
26
-
27
-
28
-
29
-
30
-
31
-
32
-
33
-
34
-
35
-
36
-
37
-
38
-
39
-
40
-
41
-
42
-
43
-
44
-
45
-
46
-
47
-
48
-
49
-
50
-
51
-
52
-
53
-
54
-
55
-
56
-
57
-
58
-
59
-
60
-
61
-
62
-
63
-
64
 |
 |
