Sharp LC26SB24U Operation Manual - Page 67
i!ii!,i!_i
 |
UPC - 074000371101
View all Sharp LC26SB24U manuals
Add to My Manuals
Save this manual to your list of manuals |
Page 67 highlights
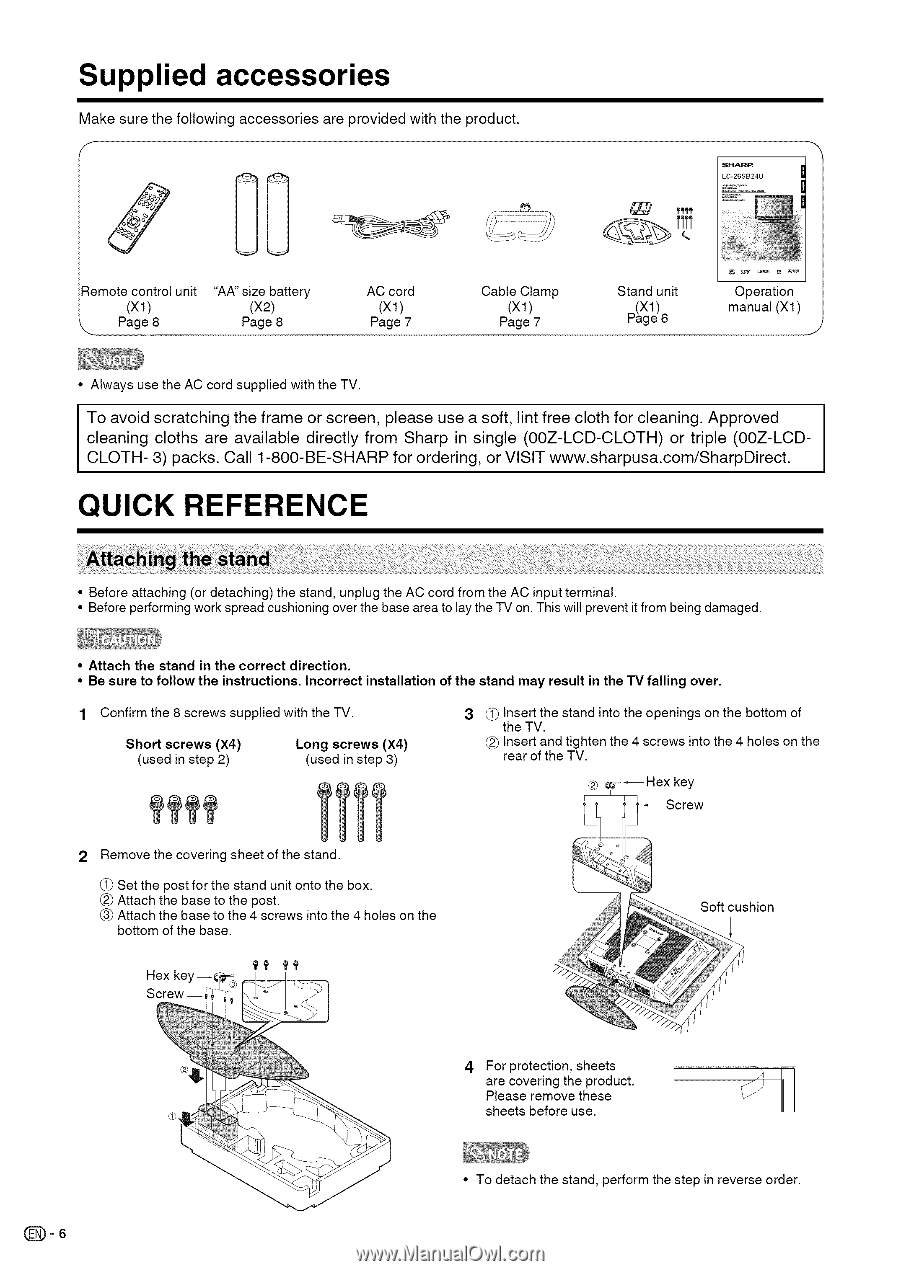
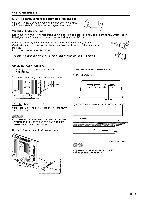
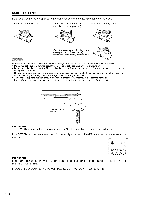
Supplied accessories Make sure the following accessories are provided with the product. :{emote control unit (Xl) Page 8 "AA" size battery (X2) Page 8 AC cord (Xl) Page 7 Cable Clamp (Xl) Page 7 Stand unit _(Xl) i-'age 6 Operation manual (Xl) • Always use the AC cord supplied with the TV. To avoid scratching the frame or screen, please use a soft, lint free cloth for cleaning. Approved cleaning cloths are available directly from Sharp in single (OOZ-LCD-CLOTH) or triple (OOZ-LCDCLOTH- 3) packs. Call 1-800-BE-SHARP for ordering, or VISIT www.sharpusa.com/SharpDirect. II QUICK REFERENCE i_ii_ii,!!_i_iilii_i_ii!_i_i ii__!!i:_i_ii!_i!_i!!_i!i!_ii!,_li!_ii_!i_il_!i,!_ii!_ii_:!_ii_!li_i_l!i_!!il_!i_i!_i!_!i!_i,_i_i!i_l:i_:!i_i!_li:!i_i_i!_i_ii_il_!i!_i!_i:!i_!li!i_!il!i_l:!i!_il_!i_i!_!i_i;_!i_i!li_i_!l!i_i!_li_i!l_i_i!i__i!i!_i:!i_l_i!l_i!_ii!_!_ii_!i_!i_!ii_!li_;i_!,_ii!_i!_!i!i!_i!;i_!i!l_ii_!_i!i_i!l!_il!i_!i_!i_ii!_l!i_i_i_li_i_i_l!i_,i!_li_i_i!_il_i_i!_li_li_!il_i_li_!li_i_li_!li_li_i_!il_li_i!il__li_!li_i_li_!li_li_i_!il_li_i!il__li_!li_i_li_!fli_lii_!i__l_i!illi_!ii_li_!ili_!i__ii_ • Before attaching (or detaching) the stand, unplug the AC cord from the AC input terminal. • Before performing work spread cushioning over the base area to lay the TV on. This will prevent it from being damaged. • Attach the stand in the correct direction. • Be sure to follow the instructions. Incorrect installation of the stand may result in the TV falling over. 1 Confirm the 8 screws supplied with the TV. Short screws (X4) (used in step 2) Long screws (X4) (used in step 3) 3 (_ Insert the stand into the openings on the bottom of the TV. _2_Insert and tighten the 4 screws into the 4 holes on the rear of the TV. --Hex key Remove the covering sheet of the stand. (_ Set the post for the stand unit onto the box. _) Attach the base to the post. (_ Attach the base to the 4 screws into the 4 holes on the bottom of the base. Hex key--_ Screw -- ]--Screw 4 For protection, sheets are covering the product. Please remove these sheets before use. • To detach the stand, perform the step in reverse order. _-6
-
 1
1 -
2
-
3
-
4
-
5
-
6
-
7
-
8
-
9
-
10
-
11
-
12
-
13
-
14
-
15
-
16
-
17
-
18
-
19
-
20
-
21
-
22
-
23
-
24
-
25
-
26
-
27
-
28
-
29
-
30
-
31
-
32
-
33
-
34
-
35
-
36
-
37
-
38
-
39
-
40
-
41
-
42
-
43
-
44
-
45
-
46
-
47
-
48
-
49
-
50
-
51
-
52
-
53
-
54
-
55
-
56
-
57
-
58
-
59
-
60
-
61
-
 62
62 -
 63
63 -
 64
64 -
 65
65 -
 66
66 -
 67
67 -
 68
68 -
 69
69 -
 70
70 -
 71
71 -
 72
72 -
73
-
74
-
75
-
76
-
77
-
78
-
79
-
80
-
81
-
82
-
83
-
84
-
85
-
86
-
87
-
88
-
89
-
90
 |
 |