Sharp MX-M283N Quick Start Guide - Page 60
Base Screen Of Fax Mode - review
 |
View all Sharp MX-M283N manuals
Add to My Manuals
Save this manual to your list of manuals |
Page 60 highlights
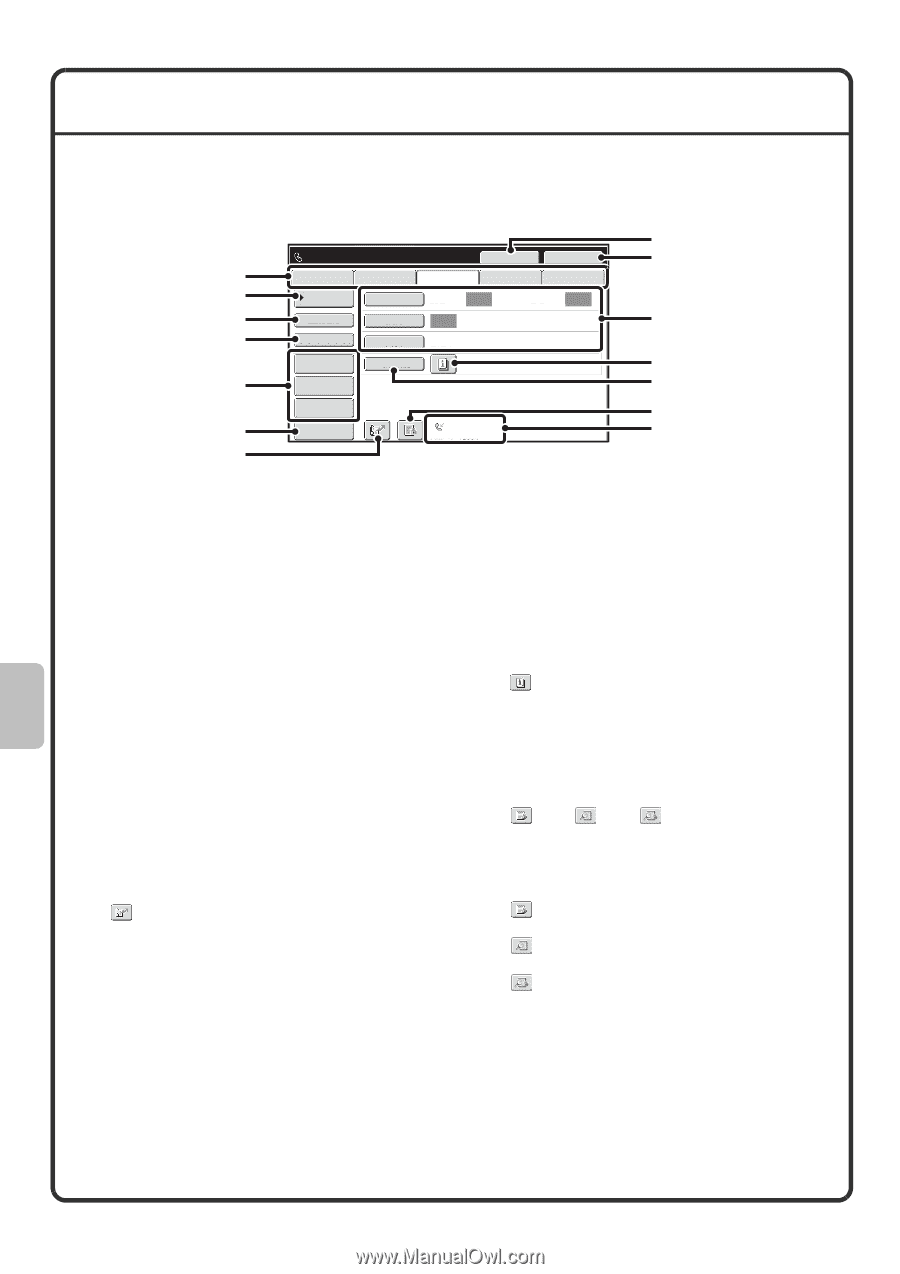
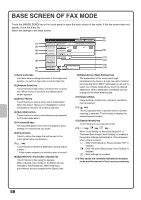
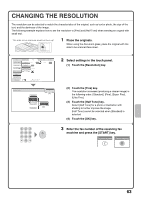
BASE SCREEN OF FAX MODE Touch the [IMAGE SEND] key in the touch panel to open the base screen of fax mode. If the fax screen does not appear, touch the [Fax] tab. Select fax settings in the base screen. (1) (2) (3) (4) (5) (6) (7) Ready to send. Speaker Resend Scan Internet Fax Fax USB Mem. Scan PC Scan Address Book Original Scan: Auto Send: Auto Direct TX Sub Address Exposure Auto Resolution Standard Address Review Special Modes File Quick File Preview Auto Reception Fax Memory:100% (8) (9) (10) (11) (12) (13) (14) (1) Send mode tabs Use these tabs to change the mode of the image send function. To switch to fax mode, touch the [Fax] tab. (2) [Address Book] key Touch this key to dial using a one-touch key or group key. When the key is touched, the address book screen appears. (3) [Direct TX] key Touch this key to send a fax by direct transmission. When the [Direct TX] key is not highlighted, normal transmission (memory TX mode) is selected. (4) [Sub Address] key Touch this key to enter a sub-address and passcode for F-code transmission. (5) Customized keys The keys that appear here can be changed to show settings or functions that you prefer. (6) [Preview] key Touch to check the image that will be sent in the touch panel before transmission. (7) key Touch this key to retrieve a destination using a search number.* * 4-digit number assigned to a destination when it is stored. (8) [Speaker] key / [Pause] key / [Space] key Touch this key to dial using the speaker. When entering a fax number to be dialed, the key changes to the [Pause] key. When entering a sub-address, the key changes to the [Space] key. (9) [Resend] key / [Next Address] key The destinations of the most recent eight transmissions by Scan to E-mail, fax and/or Internet fax (including Direct SMTP addresses) are stored. To select one of these destinations, touch the desired destination. After a destination is selected, this key changes to the [Next Address] key. (10) Image settings Image settings (original size, exposure, resolution) can be selected. (11) key This key appears when a special mode or 2-sided scanning is selected. Touch the key to display the selected special modes. (12) [Special Modes] key Touch this key to use a special mode. (13) key / key / key When "Hold Setting for Received Data Print" or "Received Data Image Check Setting" is enabled in the system settings (administrator), this will appear when a fax is received. : Only "Hold Setting for Received Data Print" is enabled : Only "Received Data Image Check Setting" is enabled : Both settings are enabled (14) This shows the currently selected fax reception mode and the amount of free memory remaining. 58
-
 1
1 -
2
-
3
-
4
-
5
-
6
-
7
-
8
-
9
-
10
-
11
-
12
-
13
-
14
-
15
-
16
-
17
-
18
-
19
-
20
-
21
-
22
-
23
-
24
-
25
-
26
-
27
-
28
-
29
-
30
-
31
-
32
-
33
-
34
-
35
-
36
-
37
-
38
-
39
-
40
-
41
-
42
-
43
-
44
-
45
-
46
-
47
-
48
-
49
-
50
-
51
-
52
-
53
-
54
-
 55
55 -
 56
56 -
 57
57 -
 58
58 -
 59
59 -
 60
60 -
 61
61 -
 62
62 -
 63
63 -
 64
64 -
 65
65 -
66
-
67
-
68
-
69
-
70
-
71
-
72
-
73
-
74
-
75
-
76
-
77
-
78
-
79
-
80
-
81
-
82
-
83
-
84
-
85
-
86
-
87
-
88
-
89
-
90
-
91
-
92
-
93
-
94
-
95
-
96
-
97
-
98
-
99
-
100
-
101
-
102
-
103
-
104
-
105
-
106
-
107
-
108
-
109
-
110
-
111
-
112
-
113
-
114
-
115
-
116
 |
 |