Sharp MX-M283N Quick Start Guide - Page 83
Changing The Exposure And, Original Image Type
 |
View all Sharp MX-M283N manuals
Add to My Manuals
Save this manual to your list of manuals |
Page 83 highlights
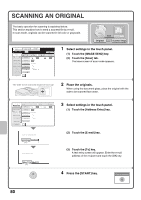
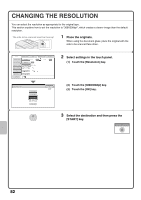
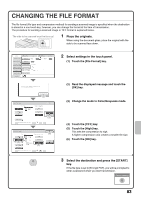
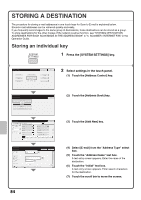
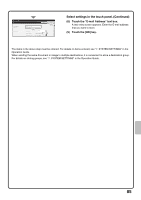
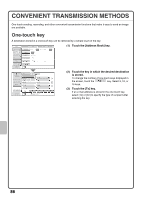
CHANGING THE EXPOSURE AND ORIGINAL IMAGE TYPE Exposure and original image type settings can be selected as appropriate for the original. The procedure for darkening the exposure and setting the original image type to "Text/Prtd. Photo" is explained below. The side to be scanned must be face up! 1 Place the originals. When using the document glass, place the original with the side to be scanned face down. Scan Internet Fax Fax USB Mem. Scan PC Scan Address Book Original Scan: Auto 8½x11 Send: Auto Address Entry Send Settings Exposure (1) Resolution Auto 200X200dpi Address Review File Format PDF File Quick File Color Mode Special Modes Mono2 Preview When Fax/I-Fax address is included, exposure setting shared among Fax/ I-Fax/ Scanner mode is selected. OK (2) Scan/Exposure Auto Manual 1 3 5 Original Image Type Text Printed Photo Text/ Prtd.Photo (3)Photo (4) Moiré Reduction OK (5) Text/Photo Map 2 Select settings in the touch panel. (1) Touch the [Exposure] key. (2) Read the displayed message and touch the [OK] key. (3) Touch the [Text/Prtd. Photo] key. (4) Darken light colors with the key. 5 levels are available for the exposure. Darken light originals with the key, and lighten dark originals with the key. (5) Touch the [OK] key. 3 Select the destination and then press the [START] key. Cancel scanning 81
-
 1
1 -
2
-
3
-
4
-
5
-
6
-
7
-
8
-
9
-
10
-
11
-
12
-
13
-
14
-
15
-
16
-
17
-
18
-
19
-
20
-
21
-
22
-
23
-
24
-
25
-
26
-
27
-
28
-
29
-
30
-
31
-
32
-
33
-
34
-
35
-
36
-
37
-
38
-
39
-
40
-
41
-
42
-
43
-
44
-
45
-
46
-
47
-
48
-
49
-
50
-
51
-
52
-
53
-
54
-
55
-
56
-
57
-
58
-
59
-
60
-
61
-
62
-
63
-
64
-
65
-
66
-
67
-
68
-
69
-
70
-
71
-
72
-
73
-
74
-
75
-
76
-
77
-
 78
78 -
 79
79 -
 80
80 -
 81
81 -
 82
82 -
 83
83 -
 84
84 -
 85
85 -
 86
86 -
 87
87 -
 88
88 -
89
-
90
-
91
-
92
-
93
-
94
-
95
-
96
-
97
-
98
-
99
-
100
-
101
-
102
-
103
-
104
-
105
-
106
-
107
-
108
-
109
-
110
-
111
-
112
-
113
-
114
-
115
-
116
 |
 |