Sharp UP-820F UP-810F UP-820F Operation Manual - Page 275
Removing a paper jam UP-810F, Removing a paper jam UP-820F
 |
View all Sharp UP-820F manuals
Add to My Manuals
Save this manual to your list of manuals |
Page 275 highlights
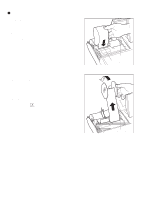
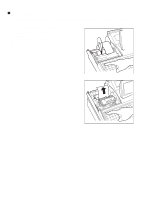
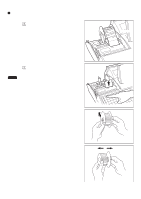
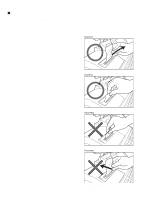
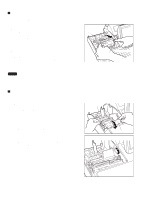
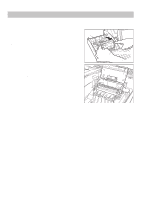
Removing a paper jam (UP-810F) Precaution: Be very careful not to cut yourself with the cutter. Never touch the print head immediately after printing, because the head may still be hot. 1. Remove the printer cover. 2. While pushing the cutter open lever to the right, pull up the cutter unit. 3. Remove the paper jam. Check for any shreds of paper in the printer and cutter unit and if any remove. 4. Pull up the print head release lever to the "up" position. 5. Remove the receipt paper. Cut off the paper end if it wrinkles squashed. 6. Return the cutter unit to its original position. Make sure the metal part is surely hooked to the cutter open lever. 7. Return the print head release lever to its original position. 8. Reset the paper roll correctly by following the steps in "Install- ing a paper roll". 9. Replace the printer cover. Cutter unit Cutter open lever Gear NOTE In case the cutter blade won't return to its original position due to paper jams or small foreign objects like clips stuck in the cutter unit, turn the gear on the cutter unit using a small screwdriver or some other tapered tool. Removing a paper jam (UP-820F) Precaution: Be very careful with the cutter, so as not to cut yourself. Never touch the print head immediately after printing, because the head may still be hot. 1. Remove the printer cover. 2. Remove the receipt paper, and if the paper jam is at the journal paper, remove the journal paper, too. 3. While pushing the cutter open tab, pull up the cutter unit. 4. Pull the print head release lever all the way forward (after it Cutter open tab stops at one position, continue pulling forward until it stops again and cannot be pulled forward any further). 5. Remove the paper jam. Check for and remove any shreds of paper that may remain in the printer. 6. Return the print head release lever to its original position. 7. Return the cutter unit to its original position. Make sure the metal part is surely hooked to the cutter open tab. 8. Reset the paper roll(s) correctly by following the steps in "Installing the paper roll". 9. Replace the printer cover. Cutter unit Pull all the way forward - 273 -
-
 1
1 -
2
-
3
-
4
-
5
-
6
-
7
-
8
-
9
-
10
-
11
-
12
-
13
-
14
-
15
-
16
-
17
-
18
-
19
-
20
-
21
-
22
-
23
-
24
-
25
-
26
-
27
-
28
-
29
-
30
-
31
-
32
-
33
-
34
-
35
-
36
-
37
-
38
-
39
-
40
-
41
-
42
-
43
-
44
-
45
-
46
-
47
-
48
-
49
-
50
-
51
-
52
-
53
-
54
-
55
-
56
-
57
-
58
-
59
-
60
-
61
-
62
-
63
-
64
-
65
-
66
-
67
-
68
-
69
-
70
-
71
-
72
-
73
-
74
-
75
-
76
-
77
-
78
-
79
-
80
-
81
-
82
-
83
-
84
-
85
-
86
-
87
-
88
-
89
-
90
-
91
-
92
-
93
-
94
-
95
-
96
-
97
-
98
-
99
-
100
-
101
-
102
-
103
-
104
-
105
-
106
-
107
-
108
-
109
-
110
-
111
-
112
-
113
-
114
-
115
-
116
-
117
-
118
-
119
-
120
-
121
-
122
-
123
-
124
-
125
-
126
-
127
-
128
-
129
-
130
-
131
-
132
-
133
-
134
-
135
-
136
-
137
-
138
-
139
-
140
-
141
-
142
-
143
-
144
-
145
-
146
-
147
-
148
-
149
-
150
-
151
-
152
-
153
-
154
-
155
-
156
-
157
-
158
-
159
-
160
-
161
-
162
-
163
-
164
-
165
-
166
-
167
-
168
-
169
-
170
-
171
-
172
-
173
-
174
-
175
-
176
-
177
-
178
-
179
-
180
-
181
-
182
-
183
-
184
-
185
-
186
-
187
-
188
-
189
-
190
-
191
-
192
-
193
-
194
-
195
-
196
-
197
-
198
-
199
-
200
-
201
-
202
-
203
-
204
-
205
-
206
-
207
-
208
-
209
-
210
-
211
-
212
-
213
-
214
-
215
-
216
-
217
-
218
-
219
-
220
-
221
-
222
-
223
-
224
-
225
-
226
-
227
-
228
-
229
-
230
-
231
-
232
-
233
-
234
-
235
-
236
-
237
-
238
-
239
-
240
-
241
-
242
-
243
-
244
-
245
-
246
-
247
-
248
-
249
-
250
-
251
-
252
-
253
-
254
-
255
-
256
-
257
-
258
-
259
-
260
-
261
-
262
-
263
-
264
-
265
-
266
-
267
-
268
-
269
-
 270
270 -
 271
271 -
 272
272 -
 273
273 -
 274
274 -
 275
275 -
 276
276 -
 277
277 -
 278
278 -
 279
279 -
 280
280 -
281
-
282
 |
 |
