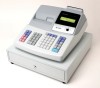
Sharp XE-A404 XE-A40S Quick Start Guide in English and Spanish - Page 7
Mode Switch and Mode Keys, 4 Keyboard, Keyboard layout, Key names - change time
 |
UPC - 074000049208
View all Sharp XE-A404 manuals
Add to My Manuals
Save this manual to your list of manuals |
Page 7 highlights
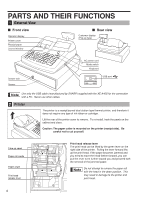
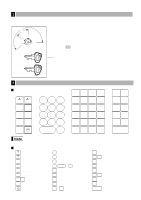
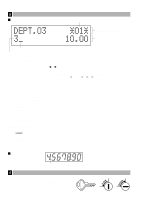
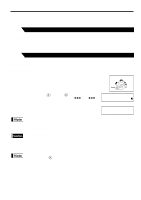
3 Mode Switch and Mode Keys The mode switch can be operated by inserting one of the two supplied mode keys - manager (MA) and operator (OP) keys. These keys can be inserted or removed only in the "REG" or "OFF" position. MA OP REG OPX/Z MGR OFF X1/Z1 VOID X2/Z2 PGM Manager key (MA) Operator key (OP) OP MA The mode switch has these settings: OFF: This mode locks all register operations. (AC power turns off.) No change occurs to register data. OP X/Z: To take individual clerk X or Z reports, and to take flash reports. It can be used to toggle receipt state "ON" and "OFF" by pressing the R key. REG: For entering sales. PGM: To program various items. VOID: Enters into the void mode. This mode allows correction after finalizing a transaction. MGR: For manager's entries. The manager can use this mode for an override entry. X1/Z1: To take the X/Z report for various daily totals X2/Z2: To take the X/Z report for periodic (weekly or monthly) consolidation 4 Keyboard Keyboard layout RECEIPT JOURNAL RA %1 RCPT /PO %2 - NUMBER VOID RFND DC SHIFT ESC BS SPACE @/FOR • CL 789 456 123 0 00 PLU /SUB DEPT # DEPT SHIFT CLK# 25 30 35 40 5 A 10 F 15 K 20 P 24 29 34 39 4 B 9 G 14 L 19 Q 23 28 33 38 3 C 8 H 13 M 18 R 22 27 32 37 2 D 7 I 12 N 17 S 21 26 31 36 1 E 6 J 11 O 16 T TAX AUTO U X TAX1 TAX2 SHIFT SHIFT V Y CONV CH1 W Z CHK CH2 MDSE #/TM SBTL SBTL CA/AT/NS The small characters on the bottom or lower right in each key indicates functions or characters which can be used for character entries for text programming. For details, refer to page 39. Key names RECEIPT Receipt paper feed key JOURNAL Journal paper feed key @/FOR Multiplication key • Decimal point key TAX Tax key TAX1 TAX2 SHIFT SHIFT Tax 1 and 2 shift keys RA Received-on account key CL Clear key AUTO Automatic sequence key RCPT /PO Receipt print/Paid-out key 00 0 ~ 9 Numeric keys CONV Conversion key VOID Void key PLU /SUB PLU/Subdepartment key CHK Check key ESC Escape key DEPT # Department code entry key CH1 CH2 Charge 1 and 2 keys %1 %2 Percent 1 and 2 keys RFND Refund key Discount key DEPT SHIFT Department shift key CLK# Clerk code entry key ~ 21 1 40 20 Department keys MDSE SBTL Merchandise subtotal key #/TM Non-add code/Time display SBTL /Subtotal key CA/AT/NS Total/Amount tender /No sale key 5
-
 1
1 -
 2
2 -
 3
3 -
 4
4 -
 5
5 -
 6
6 -
 7
7 -
 8
8 -
 9
9 -
 10
10 -
 11
11 -
 12
12 -
13
-
14
-
15
-
16
-
17
-
18
-
19
-
20
-
21
-
22
-
23
-
24
-
25
-
26
-
27
-
28
-
29
-
30
-
31
-
32
-
33
-
34
-
35
-
36
-
37
-
38
-
39
-
40
-
41
-
42
-
43
-
44
-
45
-
46
-
47
-
48
-
49
-
50
-
51
-
52
-
53
-
54
-
55
-
56
-
57
-
58
-
59
-
60
-
61
-
62
-
63
-
64
-
65
-
66
-
67
-
68
-
69
-
70
-
71
-
72
-
73
-
74
-
75
-
76
-
77
-
78
-
79
-
80
-
81
-
82
-
83
-
84
-
85
-
86
-
87
-
88
-
89
-
90
-
91
-
92
-
93
-
94
-
95
-
96
-
97
-
98
-
99
-
100
-
101
-
102
-
103
-
104
-
105
-
106
-
107
-
108
-
109
-
110
-
111
-
112
-
113
-
114
-
115
-
116
 |
 |
